|
 |
|
| |
37.6 Configuring an LDAP Client with YaST
YaST includes a module to set up LDAP-based user management. If you did
not enable this feature during the installation, start the module by
selecting . YaST automatically enables any PAM and NSS related
changes as required by LDAP and installs the necessary
files.
37.6.1 Standard Procedure
Background knowledge of the processes acting in the background of a
client machine helps you understand how the YaST LDAP client module
works. If LDAP is activated for network authentication or the YaST module
is called, the packages pam_ldap
and nss_ldap are installed and
the two corresponding configuration files are adapted. pam_ldap is the PAM module responsible for
negotiation between login processes and the LDAP directory as the source of
authentication data. The dedicated module pam_ldap.so
is installed and the PAM configuration is adapted (see
Example 37-11).
Example 37-11
pam_unix2.conf Adapted to LDAP
auth:       use_ldap
account:    use_ldap
password:   use_ldap
session:    none
When manually configuring additional services to use LDAP, include
the PAM LDAP module in the PAM configuration file corresponding to the
service in /etc/pam.d.
Configuration files already adapted to individual services can be found in
/usr/share/doc/packages/pam_ldap/pam.d/.
Copy appropriate files to /etc/pam.d.
glibc name resolution through the
nsswitch mechanism is adapted to the employment of LDAP
with nss_ldap. A new, adapted
file nsswitch.conf is created in
/etc with the installation of this package.
Find more about the workings of nsswitch.conf
in Section 31.6.1,
Configuration Files.
The following lines must be present in nsswitch.conf
for user administration and authentication with LDAP. See
Example 37-12.
Example 37-12
Adaptations in nsswitch.conf
passwd: compat
group: compat

passwd_compat: ldap
group_compat: ldap
These lines order the resolver library of glibc
first to evaluate the corresponding files in /etc and
additionally access the LDAP server as sources for authentication and user
data. Test this mechanism, for example, by reading the content of the user
database with the command getent
passwd. The returned set should contain a
survey of the local users of your system as well as all users stored on the
LDAP server.
To prevent regular users managed through LDAP from logging in to the server
with ssh or login,
the files /etc/passwd and
/etc/group each need to include an additional
line. This is the line
+::::::/sbin/nologin in
/etc/passwd and
+::: in /etc/group.
37.6.2 Configuring the LDAP Client
After the initial adjustments of nss_ldap,
pam_ldap, /etc/passwd, and
/etc/group have been taken care of by YaST, you can
simply connect your client to the server and let YaST manage users
over LDAP. This basic setup is described in
Basic Configuration.
Use the YaST LDAP client to further configure the YaST group and
user configuration modules. This includes manipulating the default settings
for new users and groups and the number and nature of the attributes
assigned to a user or a group. LDAP user management allows you to assign
far more and different attributes to users and groups than traditional user
or group management solutions. This is described in
Configuring the YaST Group and User Administration Modules.
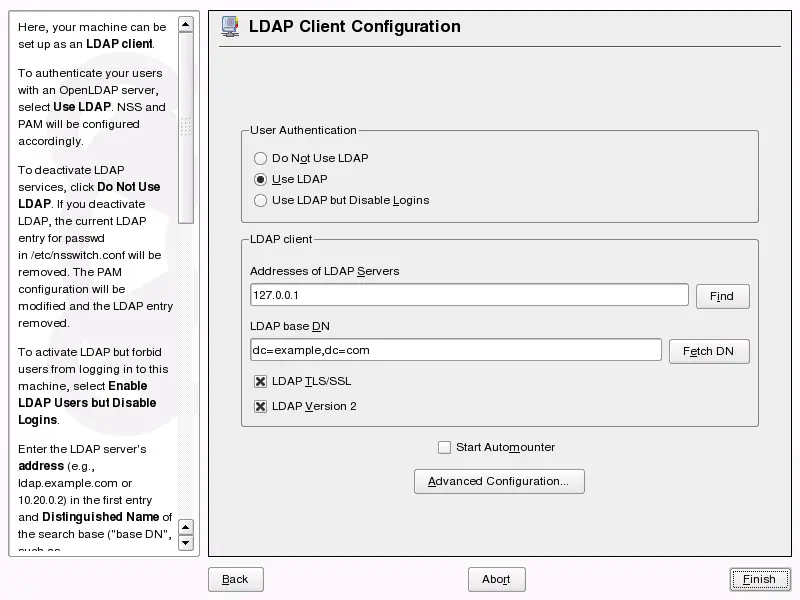
Basic Configuration
The basic LDAP client configuration dialog (Figure 37-3) opens during installation if
you choose LDAP user management or when you select
in the YaST Control Center in the installed system.
To authenticate users of your machine against an
OpenLDAP server and enable user management via OpenLDAP, proceed as
follows:
-
Click to enable the use of
LDAP. Select
instead if you want to
use LDAP for authentication, but do not want other users to log in to
this client.
-
Enter the IP address of the LDAP server to use.
-
Enter the to select the search base
on the LDAP server.
To retrieve the base DN automatically, click
. YaST then checks for any LDAP
database on the server address specified above. Choose the
appropriate base DN from the search results given by YaST.
-
If TLS or SSL protected communication with the server is required,
select .
-
If the LDAP server still uses LDAPv2, explicitly enable the use of
this protocol version by selecting .
-
Select to mount remote
directories on your client, such as a remotely managed
/home.
-
Click to apply your settings.
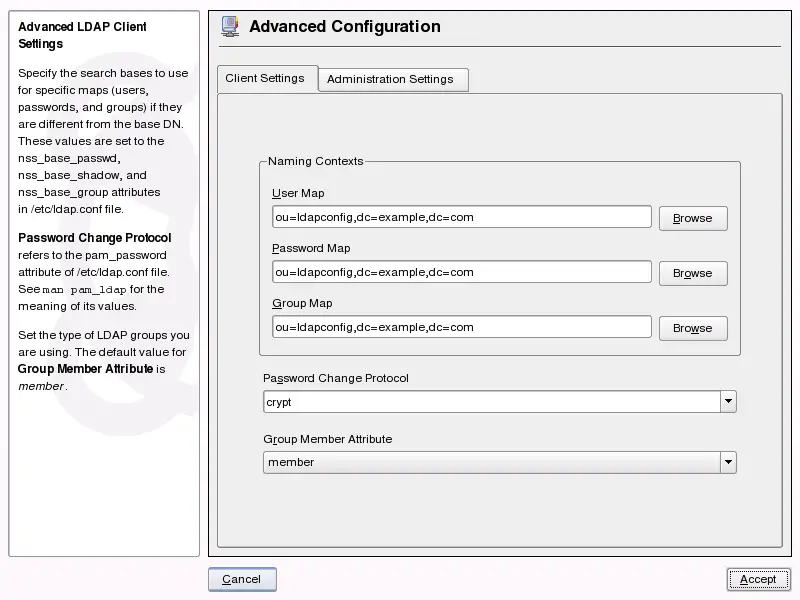
To modify data on the server as administrator, click . The following dialog is split in two tabs. See
Figure 37-4.
-
In the tab, adjust
the following settings to your needs:
-
If the search base for users, passwords, and groups differs from
the global search base specified the ,
enter these different naming contexts in , , and .
-
Specify the password change protocol. The standard method to
use whenever a password is changed is crypt,
meaning that password hashes generated by crypt are
used. For details on this and other options, refer to the
pam_ldap man page.
-
Specify the LDAP group to use with . The default value for this is
member.
-
In , adjust the following
settings:
-
Set the base for storing your user management data via
.
-
Enter the appropriate value for . This DN must be identical with the
rootdn value specified in
/etc/openldap/slapd.conf to enable this
particular user to manipulate data stored on the LDAP server.
Enter the full DN (such as cn=admin,dc=suse,dc=de) or
activate to have the
base DN added automatically when you enter
cn=admin.
-
Check to
create the basic configuration objects on the server to enable user
management via LDAP.
-
If your client machine should act as a file server for home
directories across your network, check .
-
Click to leave the then to apply
your settings.
Use to edit
entries on the LDAP server. Access to the configuration
modules on the server is then granted according to the ACLs and ACIs
stored on the server. Follow the procedures outlined in
Configuring the YaST Group and User Administration Modules.
Configuring the YaST Group and User Administration Modules
Use the YaST LDAP client to adapt the YaST modules for user and
group administration and to extend them as needed. Define templates with
default values for the individual attributes to simplify the data
registration. The presets created here are stored as LDAP objects in the
LDAP directory. The registration of user data is still done with the
regular YaST modules for user and group management. The registered data
is stored as LDAP objects on the server.
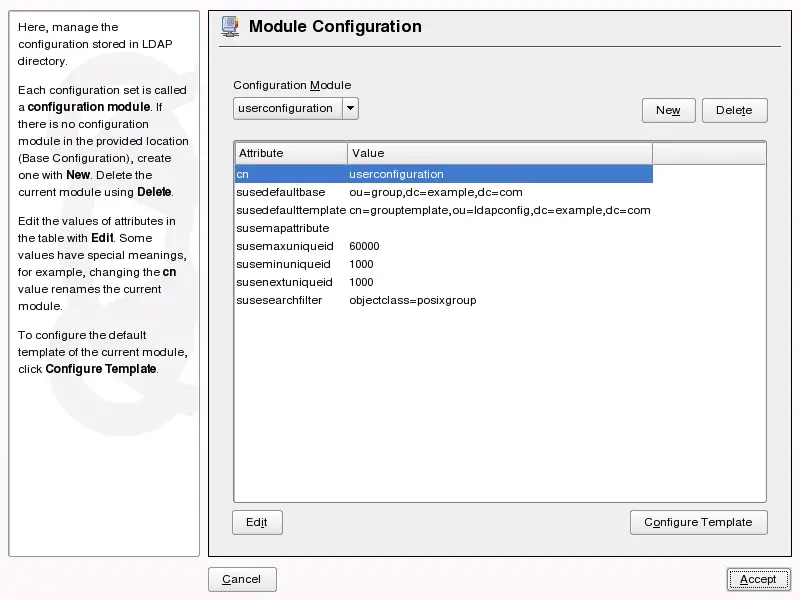
The dialog for module configuration (Figure 37-5) allows the creation of new modules,
selection and modification of existing configuration modules, and design
and modification of templates for such modules.
To create a new configuration module, proceed as follows:
-
Click and select the type of module
to create. For a user configuration module, select
suseuserconfiguration and for a group configuration
choose susegroupconfiguration.
-
Choose a name for the new template. The content view then features
a table listing all attributes
allowed in this module with their assigned values. Apart from all set
attributes, the list also contains all other attributes allowed by the
current schema but currently not used.
-
Accept the preset values or adjust the defaults to use in group
and user configuration by selecting the respective attribute, pressing
, and entering the new value. Rename a module by
simply changing the cn attribute of the
module. Clicking deletes the currently
selected module.
-
After you click , the new module is
added to the selection menu.
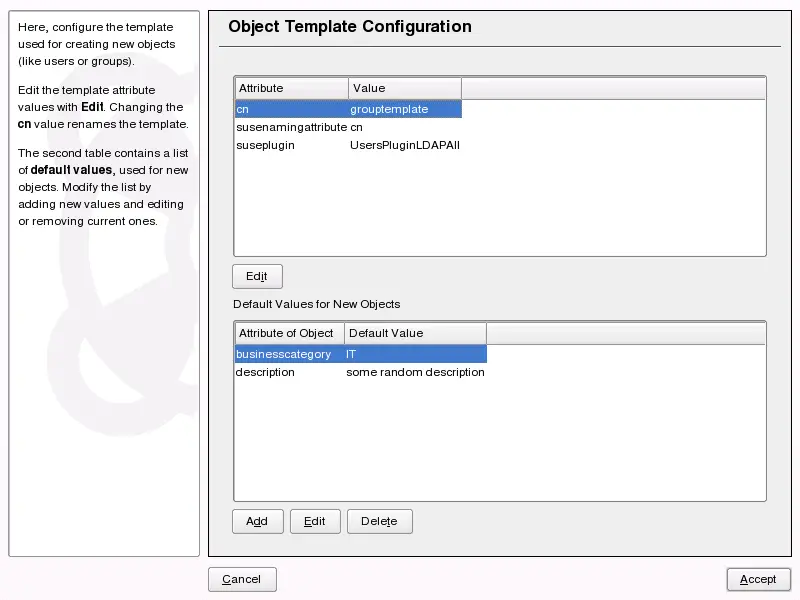
The YaST modules for group and user administration embed templates
with sensible standard values. To edit a template associated with a
configuration module, proceed as follows:
-
In the dialog, click
.
-
Determine the values of the general attributes assigned to this
template according to your needs or leave some of them empty. Empty
attributes are deleted on the LDAP server.
-
Modify, delete, or add new default values for new objects (user or
group configuration objects in the LDAP tree).
Connect the template to its module by setting the
susedefaulttemplate attribute value of the module to
the DN of the adapted template.
HINT:The default values for an attribute can be created from other
attributes by using a variable instead of an absolute value. For
example, when creating a new user, cn=%sn %givenName
is created automatically from the attribute values for
sn and givenName.
Once all modules and templates are configured correctly and ready to
run, new groups and users can be registered in the usual way with
YaST.
|
|
|