|
 |
|
| |
6.1 LVM Configuration
This section briefly describes the principles behind LVM and its
basic features that make it useful under many circumstances. In
Section 6.1.2,
LVM Configuration with YaST, learn how to set
up LVM with YaST.
WARNING:
Using LVM might be associated with increased risk, such as data loss. Risks
also include application crashes, power failures, and faulty commands. Save
your data before implementing LVM or reconfiguring volumes. Never work
without a backup.
6.1.1 The Logical Volume Manager
The Logical Volume Manager (LVM) enables flexible distribution of hard disk
space over several file systems. It was developed because sometimes the need
to change the segmentation of hard disk space arises only after the initial
partitioning during installation has already been done. Because it is
difficult to modify partitions on a running system, LVM provides a virtual
pool (volume group, VG for short) of memory space from which logical volumes
(LVs) can be created as needed. The operating system accesses these LVs
instead of the physical partitions. Volume groups can span more than only
one disk so that several disks or parts of them may constitute one single
VG. This way, LVM provides a kind of abstraction from the physical disk space
that allows its segmentation to be changed in a much easier and safer way
than physical repartitioning does. Background information regarding
physical partitioning can be found in
Partition Types and
Section 7.5.6,
Partitioner.
Figure 6-1 compares physical partitioning (left)
with LVM segmentation (right). On the left side, one single disk has been
divided into three physical partitions (PART), each with a mount
point (MP) assigned so that the operating system can access them.
On the right side, two disks have been divided into two and three physical
partitions each. Two LVM volume groups (VG 1 and VG 2) have been
defined. VG 1 contains two partitions from DISK 1 and one from
DISK 2. VG 2 contains the remaining two partitions from
DISK 2. In LVM, the physical disk partitions that are incorporated
in a volume group are called physical volumes (PVs). Within the volume groups,
four logical volumes (LV 1 through LV 4) have been defined, which
can be used by the operating system via the associated mount points.
The border between different logical volumes need not be
aligned with any partition border. See the border
between LV 1 and LV 2 in this example.
LVM features:
-
Several hard disks or partitions can be combined in a large logical
volume.
-
Provided the configuration is suitable, an LV (such as
/usr) can be enlarged when the free space is
exhausted.
-
Using LVM, it is possible to add hard disks or LVs in a running
system. However, this
requires hot-swappable hardware that is capable of such actions.
-
It is possible to activate a "striping mode" that distributes the data
stream of a logical volume over several physical volumes. If these
physical volumes reside on different disks, this can improve the reading
and writing performance just like RAID 0.
-
The snapshot feature enables consistent backups (especially for servers)
in the running system.
With these features, using LVM already makes sense for heavily used home PCs
or small servers. If you have a growing data stock, as in the case of
databases, music archives, or user directories, LVM is just the right thing
for you. This would allow file systems that are larger than the physical
hard disk. Another advantage of LVM is that up to 256 LVs can be added.
However, keep in mind that working with LVM is different from working
with conventional partitions. Instructions and further information about
configuring LVM is available in the official LVM HOWTO at https://tldp.org/HOWTO/LVM-HOWTO/.
Starting from kernel version 2.6, LVM version 2 is available,
which is downward-compatible with the previous LVM and enables the continued
management of old volume groups. When creating new volume groups, decide
whether to use the new format or the downward-compatible version. LVM 2
does not require any kernel patches. It makes use of the device mapper
integrated in kernel 2.6. This kernel only supports LVM version 2.
Therefore, when talking about LVM, this section always refers to LVM
version 2.
6.1.2 LVM Configuration with YaST
The YaST LVM configuration can be reached from the YaST Expert
Partitioner (see Section 7.5.6,
Partitioner). This
partitioning tool enables you to edit and delete existing
partitions and create new ones that should be used with LVM. There, create
an LVM partition by first clicking then selecting
as the partition identifier. After
creating all the partitions to use with LVM, click
to start the LVM configuration.
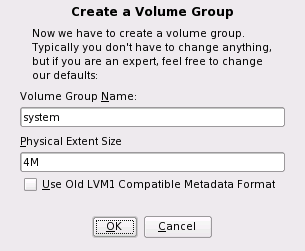
Creating Volume Groups
If no volume group exists on your system yet, you
are prompted to add one (see Figure 6-2). It is
possible to create additional groups with , but
usually one single volume group is sufficient. system is
suggested as a name for the volume group in which the SUSE® Linux Enterprise system
files are located. The physical extent size defines the size of a physical
block in the volume group. All the disk space in a volume group is handled
in chunks of this size. This value is normally set to 4 MB and allows
for a maximum size of 256 GB for physical and logical volumes. The physical
extent size should only be increased, for example, to 8, 16, or 32
MB, if you need logical volumes larger
than 256 GB.
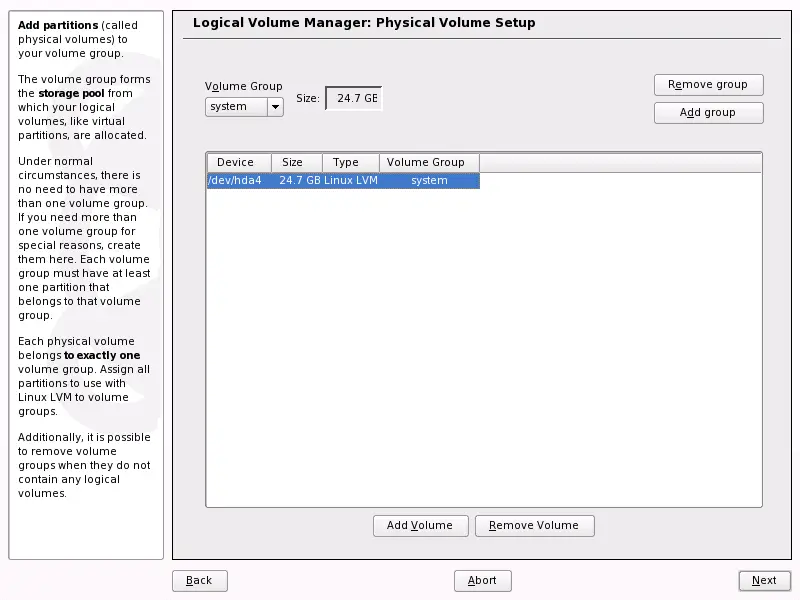
Configuring Physical Volumes
Once a volume group has been created, the following dialog lists all
partitions with either the Linux LVM or Linux
native type. No swap or DOS partitions are shown. If a partition
is already assigned to a volume group, the name of the volume group is
shown in the list. Unassigned partitions are indicated with
-- .
If there are several volume groups, set the current volume group in
the selection box to the upper left. The buttons in the upper right enable
creation of additional volume groups and deletion of existing volume
groups. Only volume groups that do not have any partitions assigned can be
deleted. All partitions that are assigned to a volume group are also
referred to as a physical volumes (PV).
To add a previously unassigned partition to the selected volume group,
first click the partition then . At this
point, the name of the volume group is entered next to the selected
partition. Assign all partitions reserved for LVM to a volume group.
Otherwise, the space on the partition remains unused. Before exiting
the dialog, every volume group must be assigned at least one physical
volume. After assigning all physical volumes, click
to proceed to the configuration of logical volumes.
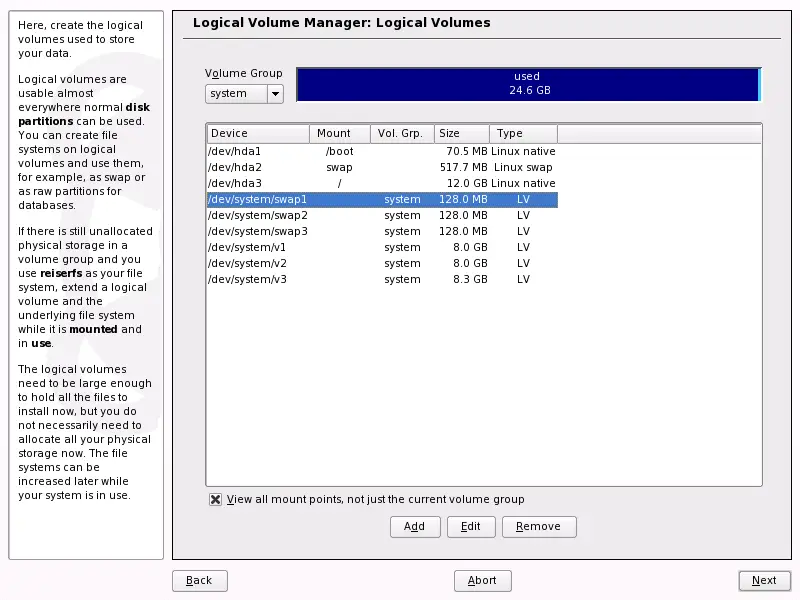
Configuring Logical Volumes
After the volume group has been filled with physical volumes,
define the logical
volumes the operating system should use in the next
dialog. Set the current volume group in a selection box to the
upper left. Next to it, the free space in the current volume group is
shown.
The list below contains all logical volumes in that volume group. All
normal Linux partitions to which a mount point is assigned, all swap
partitions, and all already existing logical volumes are listed
here. , , and
logical volumes as needed until all space in the
volume group has been exhausted. Assign at least one logical volume to each
volume group.
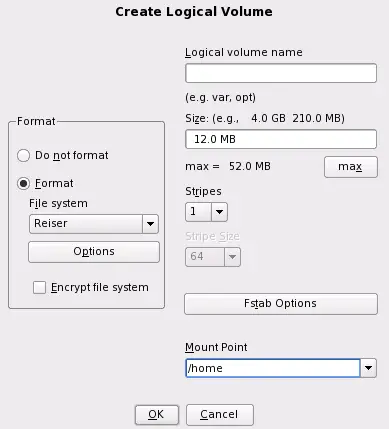
To create a new logical volume, click and
fill out the pop-up that opens. As for partitioning, enter the size, file
system, and mount point. Normally, a file system, such as
reiserfs or ext2, is created on a logical volume and is then designated a
mount point. The files stored on this logical volume can be found at this
mount point on the installed system. Additionally it is possible to
distribute the data stream in the logical volume among several physical
volumes (striping). If these physical volumes reside on different hard
disks, this generally results in a better reading and writing
performance (like RAID 0). However, a striping LV with
n stripes can only be created correctly if the hard disk
space required by the LV can be distributed evenly to n
physical volumes. If, for example, only two physical volumes are available,
a logical volume with three stripes is impossible.
WARNING: Striping
YaST has no chance at this point to verify the correctness of your
entries concerning striping. Any mistake made here is apparent only
later when the LVM is implemented on disk.
If you have already configured LVM on your system, the existing logical
volumes can be entered now. Before continuing, assign appropriate
mount points to these logical volumes too. With ,
return to the YaST Expert Partitioner and finish your work there.
Direct LVM Management
If you already have configured LVM and only want to change something, there
is an alternative way to do that. In the YaST Control Center, select
.
Basically this dialog allows the same actions as described above with the
exception of physical partitioning. It shows the existing physical volumes
and logical volumes in two lists and you can manage your LVM system
using the methods already described.
|
|
|