|
 |
|
| |
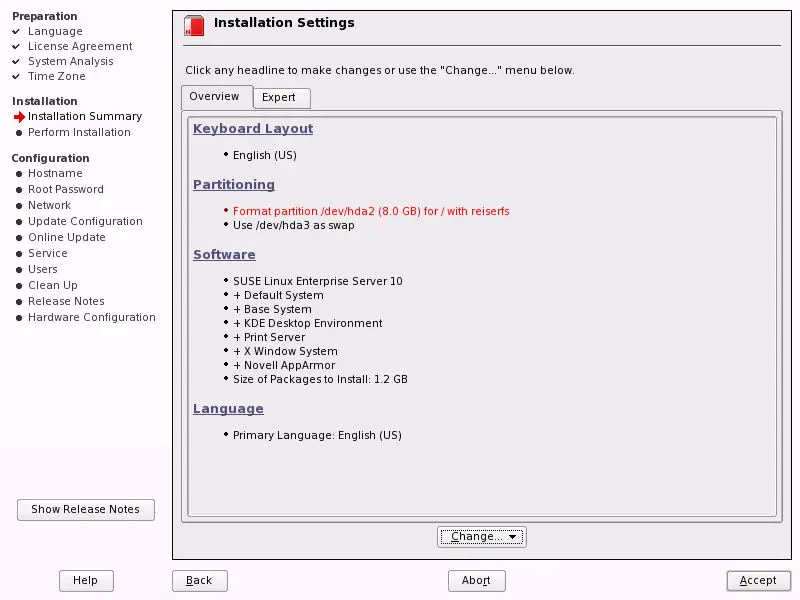
3.7 Installation Summary
After a thorough system analysis, YaST presents
reasonable suggestions for all installation settings. The options
that sometimes need manual intervention in common installation
situations are presented under the tab.
Find more special options in the tab. After
configuring any of the items presented in these dialogs, you are
always returned to the summary window, which is updated accordingly.
The individual settings are discussed in the following sections.
3.7.1 Partitioning
In most cases, YaST proposes a reasonable partitioning
scheme that can be accepted without change. YaST can also be
used to customize the partitioning. This section describes the
necessary steps.
Partition Types
Every hard disk has a partition table with space for four
entries. An entry in the partition table can correspond to a
primary partition or an extended partition. Only one extended
partition entry is allowed, however.
A primary partition simply consists of a continuous range of
cylinders (physical disk areas) assigned to a particular operating
system. With primary partitions only, you would be limited to four
partitions per hard disk, because more do not fit in the partition
table. This is why extended partitions are used. Extended
partitions are also continuous ranges of disk cylinders, but an
extended partition may itself be subdivided into logical
partitions. Logical partitions do not require entries
in the partition table. In other words, an extended partition is a
container for logical partitions.
If you need more than four partitions, create an extended
partition as the fourth partition or earlier. This extended
partition should span the entire remaining free cylinder range.
Then create multiple logical partitions within the extended
partition. The maximum number of logical partitions is 15 on SCSI,
SATA, and Firewire disks and 63 on (E)IDE disks. It does not matter
which types of partitions are used for Linux. Primary and logical
partitions both work fine.
Required Disk Space
YaST normally proposes a reasonable partitioning scheme
with sufficient disk space. If you want to implement your own
partitioning scheme, consider the following recommendations
concerning the requirements for different system types.
- Minimal System: 500 MB
-
No graphical interface (X Window System) is
installed, which means that only console applications can be
used. Also, only a very basic selection of software is
installed.
The partitions to create depend on the available space. The
following are some basic partitioning guidelines:
- Up to 4 GB:
-
One partition for the swap space and one root partition
(/). In this case, the root partition must
allow for those directories that often reside on their own
partitions if more space is available.
- 4 GB or More:
-
A swap partition, a root partition (1 GB), and
one partition each for the following directories as needed:
/usr (4 GB or more),
/opt (4 GB or more), and
/var (1 GB). If you do not want
to have separate partitions for these directories, add the
suggested disk space to the root partition. The rest of the
available space can be used for /home.
Depending on the hardware, it might also be useful to create
a boot partition (/boot) to hold the boot
mechanism and the Linux kernel. This partition should be located at
the start of the disk and should be at least 8 MB or one
cylinder. As a rule of thumb, always create such a partition if it
was included in YaST's original proposal. If you are unsure
about this, create a boot partition to be on the safe side.
You should also be aware that some (mostly commercial)
programs install their data in /opt.
Therefore, either create a separate partition for
/opt or make the root partition large enough.
Partitioning with YaST
When you select the partitioning item in the suggestion
window for the first time, the YaST partitioning dialog
displays the proposed partition settings. Accept these
current settings as they are or change them before continuing.
Alternatively, discard all the settings and start over from
scratch.
Nothing in the partitioning setup is changed if you select
. If you select , the opens. It allows tweaking the partition
setup in every detail. This dialog is explained in Section 7.5.6,
Partitioner. The original setup as
proposed by YaST is offered there as a starting point.
Selecting
opens the dialog for hard disk selection. Use the list to choose
among the existing hard disks on your system. SUSE Linux Enterprise will
be installed on the disk selected in this dialog.
The next step is to determine whether the entire disk should
be used () or whether to use
any existing partitions (if available) for the installation. If a
Windows operating system was found on the disk, you are asked
whether to delete or resize the partition. Before doing so, read
Resizing a Windows Partition. If desired, go to the
dialog to create a custom
partition setup as described in Section 7.5.6,
Partitioner.
WARNING: Using the Entire Hard Disk for Installation
If you choose , all
existing data on that disk is completely erased later in the
installation process and is then lost. YaST checks during the installation whether the disk
space is sufficient for the software selection made. If not,
YaST automatically changes the software selection. The
proposal dialog displays a notice to inform you about this. As long
as there is sufficient disk space available, YaST simply
accepts your settings and partitions the hard disk accordingly.
Resizing a Windows Partition
If a hard disk containing a Windows FAT or NTFS partition is selected as
the installation target, YaST offers to delete or shrink this partition. In
this way, you can install SUSE® Linux Enterprise even if there is currently not enough
space on the hard disk. This functionality is especially useful if the
selected hard disk contains only one Windows partition that covers
the entire hard disk. This is
sometimes the case on computers where Windows comes preinstalled.
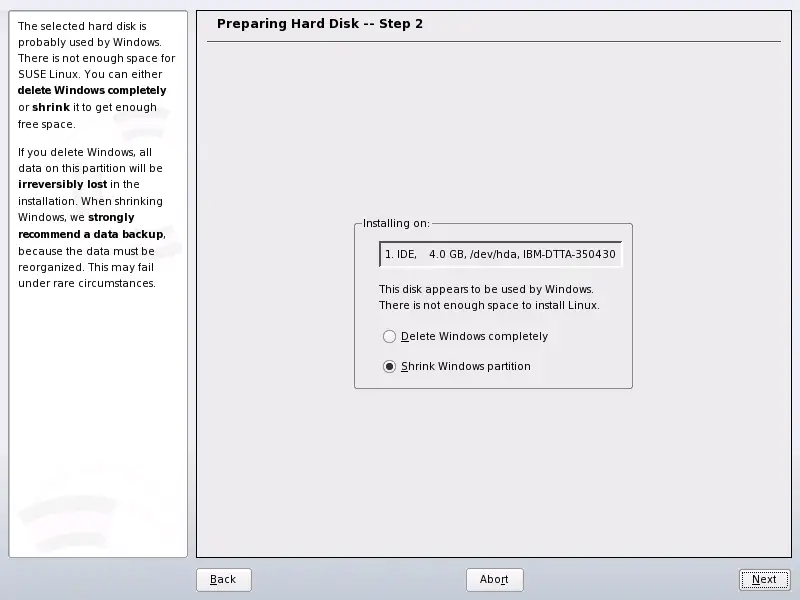
If YaST sees that there is not enough space on the selected hard disk, but
that space could be made available by deleting or shrinking a
Windows partition,
it presents a dialog in which to choose one of these two options.
If you select , the Windows
partition is marked for deletion and the space is used for the
installation of SUSE Linux Enterprise.
WARNING: Deleting Windows
If you delete Windows, all data will be lost beyond recovery as soon as the
formatting starts.
To shrink the Windows partition, interrupt the installation and boot Windows
to prepare the partition from there. Although this step is not
strictly required for FAT partitions, it speeds up the resizing process and
also makes it safer. These steps are vital for NTFS partitions.
- FAT File System
-
In Windows, first run scandisk to make sure that the
FAT partition is free of lost file fragments and crosslinks. After that,
run defrag to move files to the beginning of
the partition. This accelerates the resizing procedure in Linux.
If you have optimized virtual memory settings for Windows so a
contiguous swap file is used with the same initial (minimum) and
maximum size limit, consider another step. With these Windows settings, the
resizing might split the swap file into many small
parts scattered all over the FAT partition. Also, the entire swap file
would need to be moved during the resizing, which makes the process rather
slow. It is therefore useful to disable these Windows optimizations for the
time being and reenable them after the resizing has been completed.
- NTFS File System
-
In Windows, run scandisk and
defrag to move the files to the beginning of
the hard disk. In contrast to the FAT file system, you
must perform these steps. Otherwise the
NTFS partition cannot be resized.
IMPORTANT: Disabling the Windows Swap File
If you operate your system with a permanent swap file on an NTFS file
system, this file may be located at the end of the hard disk and remain
there despite defrag. Therefore, it may be
impossible to shrink the partition sufficiently. In this case,
temporarily deactivate the swap file (the virtual memory in Windows).
After the partition has been resized, reconfigure the virtual memory.
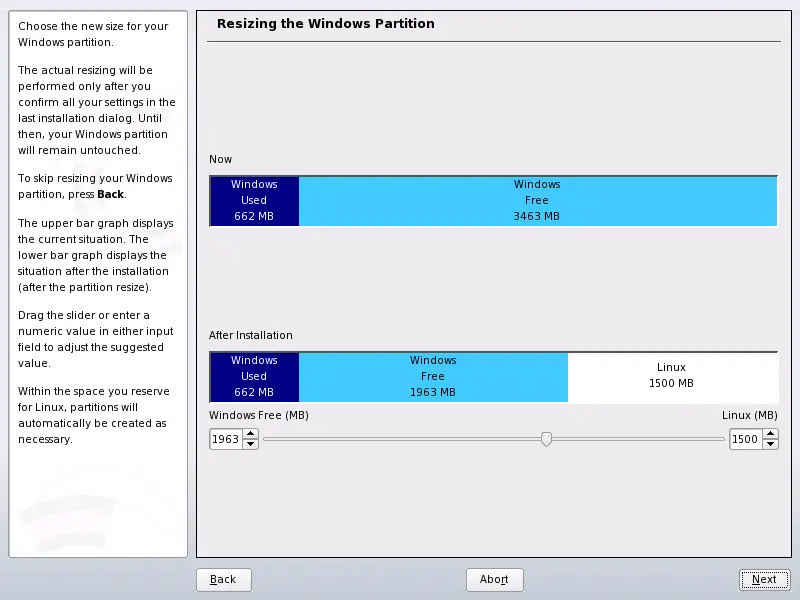
After these preparations, return to the Linux partitioning setup and select
. After a quick check of the
partition, YaST opens a dialog with a suggestion for resizing the Windows
partition.
The first bar graph shows how much disk space is currently occupied by
Windows and how much space is still available. The second bar graph shows how
the space would be distributed after the resizing, according to YaST's
current proposal. See Figure 3-3.
Accept the proposed
settings or use the slider to change the partition sizing (within certain
limits).
If you leave this dialog by selecting , the settings
are stored and you are returned to the previous dialog. The actual
resizing takes place later, before the hard disk is formatted.
IMPORTANT: Windows Systems Installed on NTFS Partitions
By default, the Windows versions NT, 2000, and XP use the NTFS file system.
Unlike FAT file systems, NTFS file systems can only be read from
Linux. This means you can read your Windows files from Linux, but you cannot
edit them. If you want write access to your Windows data and do not need the
NTFS file system, reinstall Windows on a FAT32 file system. In this case,
you will have full access to your Windows data from SUSE Linux Enterprise.
3.7.2 Software
SUSE Linux Enterprise contains a number of software packages for various
application purposes. Click in the suggestion
window to start the software selection and modify the installation scope
according to your needs. Select your categories from the list in the middle
and see the description in the right window. Each category
contains a number of software packages that meet most requirements for that
category. For more detailed selection of software packages
to install, select to switch to the YaST
Package Manager.
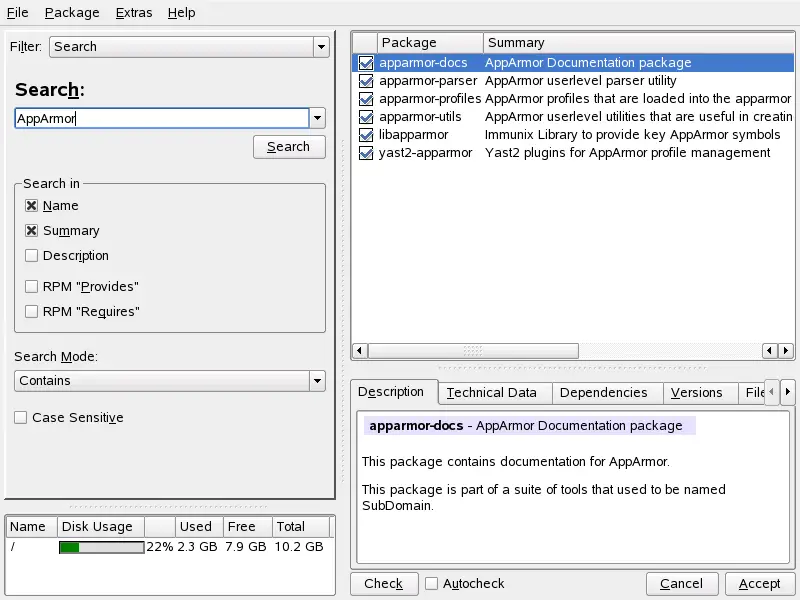
Changing the Installation Scope
If you have specific software needs, modify the current selection
with the package manager, which greatly eases this task. The package
manager offers various filter criteria to simplify selection from the
numerous packages in SUSE Linux Enterprise.
The filter selection box is located at the top left
under the
menu bar. The default filter is . Patterns
install packages based on the intended use or task of your system.
The groups included in the current system type are preselected. Click
the check boxes to select or deselect groups for installation.
The right part of the window displays a table listing the
individual packages included in the current group. The table
column furthest to the left shows the current status of each
package. Two status flags are especially relevant for the
installation: (the box in front of the
package name is checked) and (the
box is empty). To select or deselect individual software packages,
click the status box until the desired status is displayed.
Alternatively, right-click the package line to access a pop-up menu
listing all the possible status settings.
Other Filters
Click the filter selection box to view the other possible
filters. The selection according to can also be used for the installation. This filter
sorts the program packages by subjects in a tree structure to the
left. The more you expand the branches, the more specific the
selection of packages is and the fewer packages are displayed in
the list of associated packages to the right.
Use to search for a specific
package. This is explained in detail in Section 7.3.1,
Installing and Removing Software.
Package Dependencies and Conflicts
You cannot simply install any combination of software
packages. The different software packages must be compatible.
Otherwise they might interfere with each other and cause conflicts
that affect the system as a whole. Therefore, you may see alerts
about unresolved package dependencies or conflicts after selecting
or deselecting software packages in this dialog. If installing
SUSE Linux Enterprise for the first time or if you do not understand the
alerts, read Section 7.3.1,
Installing and Removing Software, which
provides detailed information about the operation of the package
manager.
Exiting the Software Selection
When satisfied with your software selection and all package
dependencies or conflicts are resolved, click
to apply your changes and exit the
module. During the installation, the changes are recorded
internally and applied later when the actual installation starts.
3.7.3 Language
The language was selected at the beginning of the installation
as described in Section 3.3,
Language Selection. However, you
can change this setting here and also select any additional
languages to install on your system. In the upper part of this
dialog, select the primary language. This is the language that will
be activated after installation. Adapt your keyboard and time zone
settings to the selected primary language by selecting those
options, if desired. Optionally, use to
set the language for the user root. There are three options:
- ctype only
-
The value of the variable LC_CTYPE in the
file /etc/sysconfig/language is adopted for
the user root. This
sets the localization for language-specific function calls.
- yes
-
The user root has
the same language settings as the local user.
- no
-
The language settings for the user root are not affected by the
language selection. All locale variables
are unset.
Make the setting for the locale explicitly with .
The list in the lower part of the language dialog allows for
selection of additional languages to install. For all the languages
selected in this list, YaST checks if there are any
language-specific packages for any packages in your current software
selection. If so, these packages are installed.
Click to complete the configuration.
3.7.4 System
This dialog presents all the hardware information YaST
could obtain about your computer. Select any item in the list and
click to see detailed information about
the selected item. You may also add PCI IDs to device drivers with
this dialog.
3.7.5 Keyboard Layout
Select the keyboard layout from the list. By default, the
layout corresponds to the selected language. After changing the
layout, test the characters that are special to the selected
language layout to make sure that the selection is correct. To set special
options regarding keyboard behavior, click
. Find more information about
that in Section 7.4.9,
Keyboard Layout. When
finished, click to return to the
installation settings dialog.
3.7.6 Booting
During the installation, YaST proposes a boot
configuration for your system. Normally, you can leave these
settings unchanged. However, if you need a custom setup, modify the
proposal for your system.
One possibility is to configure the boot mechanism to rely on
a special boot floppy. Although this has the disadvantage that it
requires the floppy to be in the drive when booting, it leaves an
existing boot mechanism untouched. Normally this should not be
necessary, however, because YaST can configure the boot loader
to boot other existing operating systems as well. Another
possibility with the configuration is to change the location of the
boot mechanism on the hard disk.
To change the boot configuration proposed by YaST,
select to open a dialog in which to
change many details of the boot mechanism. For information, read
Section 17.3,
Configuring the Boot Loader with YaST.
3.7.7 Default Runlevel
SUSE Linux Enterprise can boot to different runlevels. Normally
there should be no need to change anything here, but if necessary
set the default runlevel with this dialog. Refer to Section 7.5.11,
System Services (Runlevel) for information about
runlevel configuration.
3.7.8 Time Zone
In this dialog, change your region and time zone by selecting them
from the lists.
Choose between and
(GMT) under
. The selection depends on
how the BIOS hardware clock is set on your machine. If it is set to
GMT, which corresponds to UTC,
your system can rely on SUSE Linux Enterprise to switch from standard time
to daylight saving time and back automatically. Click
to set the current date and time. When
finished, click to return to the
installation settings dialog.
3.7.9 Performing the Installation
After making all installation settings, click
in the suggestion window to begin the
installation. Confirm with in the dialog
that opens. The installation usually takes between 15 and 30
minutes, depending on the system performance and the software
selected. As soon as all packages are installed, YaST boots
into the new Linux system, after which you can configure the
hardware and set up system services.
|
|
|