|
 |
|
| |
7.3 Software
7.3.1 Installing and Removing Software
To install, uninstall, and update software
on your machine, use .
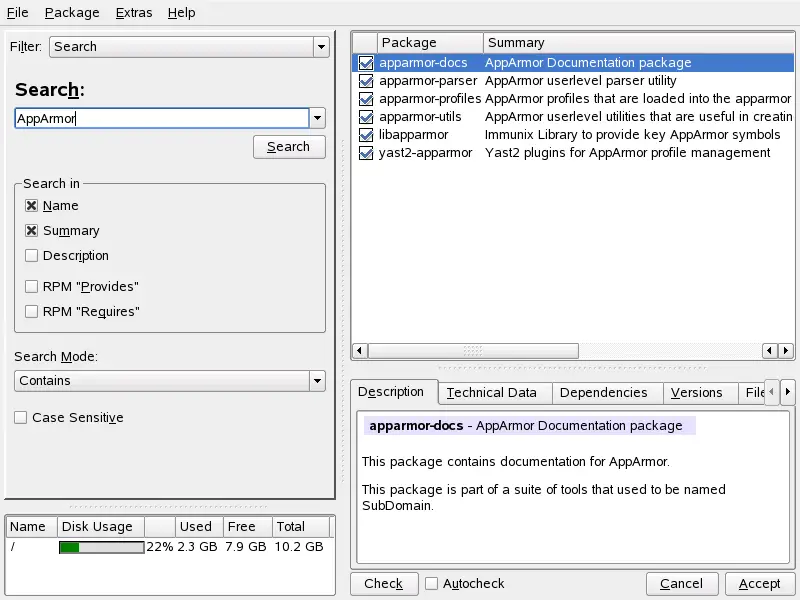
This opens a package manager dialog as
shown in Figure 7-2.
In SUSE® Linux Enterprise, software is available in the form of
RPM packages. Normally, a package contains everything needed for a program:
the program itself, the configuration files, and all documentation. A list
of individual packages is displayed to the
right in the individual package window. The content of this list is
determined by the currently selected filter. If, for example, the
filter is selected, the individual package
window displays all packages of the current selection.
In the package manager, each package has a status that determines what
to do with the package, such as Install or
Delete. This status is shown by a symbol in a
status box at the beginning of the line. Change the status by clicking
or selecting the desired status from the menu that opens when the item
is right-clicked. Depending on the current situation, some of the
possible status flags may not be available for selection. For example,
a package that has not yet been installed cannot be set to
Delete. View the available status flags with
.
The font color used for various packages in the individual package
window provides additional information. Installed packages for which a
newer version is available on the installation media are displayed in
blue. Installed packages whose version numbers are higher than those on
the installation media are displayed in red. However, because the version
numbering of packages is not always linear, the information may not be
perfect, but should be sufficient to indicate problematic packages. If
necessary, check the version numbers.
Installing Packages
To install packages, select packages for installation and
click . Selected packages should have the
status icon. The package manager
automatically checks the dependencies and selects any other required
packages (resolution of dependencies). To view other
packages required for installation before clicking
,
choose from the
main menu. After installing packages, continue working with the package
manager by clicking or close it by
clicking .
The package manager provides preselected groups for installation.
You can select an entire group instead of single packages.
To view these groups, use in the left frame.
HINT: List of All Available Packages
To display all packages on your installation media,
use the filter and select
at the bottom of the tree. SUSE Linux Enterprise contains a number of
packages and it might take some time to
display this long list.
The Patterns
filter groups the program packages according to their
application purpose, such as multimedia or office applications. The
various groups of the Patterns filter are
listed with the installed packages preselected. Click the status box at
the beginning of a line to install or uninstall this pattern.
Select a status directly by right-clicking the pattern and using
the context menu. From the individual package overview to the right,
which displays the packages included in the current pattern,
select and deselect individual packages.
To find language-specific packages, such as translated texts for the
user interface of programs,
documentation, and fonts, use the filter. This
filter
shows a list of all languages
supported by SUSE Linux Enterprise. If you select one of
these, the right frame shows all packages available for this
language. Among these, all packages applying to your current software
selection are automatically tagged for installation.
NOTE:
Because language-specific packages may depend on other packages, the
package manager may select additional packages for
installation.
Packages and Installation Sources
If you want to find only packages from the specific source, use
the filter. In the default
configuration, this filter shows a list of all packages from
the selected source. To restrict the list, use a secondary filter.
To view a list of the all installed packages from the selected
installation source, select the filter
then select
from and deactivate all check boxes
except .
The package status in the individual package window can be changed
as usual. However, the changed package may no longer meet the
search criteria. To remove such packages from the list, update the
list with .
Installing Source Packages
A package containing the source files for the program is usually
available. The sources are not needed for running the program,
but you may want to install the sources to compile a custom version of
the program.
To install sources for selected program, mark the check box in the
column. If you cannot see
a check box, your installation sources do not contain
the source of the package.
Removing Packages
To remove packages, assign the correct status to the packages to
remove and
click . Selected packages should have the
status. If a package required by
other installed packages is marked for deletion, the package manager
issues an alert with detailed information and alternative solutions.
Reinstalling Packages
If you find damaged files that belong to package or you want to
reinstall the original version of a package from your installation media,
reinstall the package. To reinstall packages, select packages
for reinstallation and click . Selected packages
should have the status. If any dependency issues arise with
installed packages, the package manager
issues an alert with detailed information and alternative solutions.
Searching for Packages, Applications, and Files
To find a specific package, use the filter.
Enter a search string and click . By specifying
various search criteria, you can restrict the search to display a few or even
only one package. You can also define special search patterns using wild cards and
regular expressions in .
HINT: Quick Search
In addition to the filter, all lists of
the package manager feature a quick search. Simply enter a letter
to move the cursor to the first package in the list whose name
begins with this letter. The cursor must be in the list (by
clicking the list).
To find a package by name, select ,
enter the name of the package to find in the search field, and click
.
To find a package by text in the description, select
and , enter a search string, and
click .
To search for the package that contains a certain file,
enter the name of the file,
select ,
and click .
To find all packages that depend on a particular package,
select ,
enter the name of package,
and click .
If you are familiar with the package structure of SUSE Linux Enterprise,
you can use the filter to find packages
by subject.
This filter sorts the program packages by subjects, such as
applications, development, and hardware, in a tree structure to the
left. The more you expand the branches, the more specific the
selection is. This means fewer packages are displayed in the
individual package window.
Installation Summary
After selecting the packages for installation, update, or deletion,
view the installation summary with . It shows
how packages will be affected when you click
. Use the check boxes to the left to filter
the packages to view in the individual package window. For example,
to check which packages are already installed, deactivate all check boxes
except
.
The package status in the individual package window can be changed
as usual. However, the respective package may no longer meet the
search criteria. To remove such packages from the list, update the
list with .
Information about Packages
Get information about the selected package with the tabs in the
bottom right
frame. If another version of the package is available, you get
information about both versions.
The tab with the description of the
selected
package is automatically active. To view information about package size,
version, installation
media, and other technical details, select .
Information about provided and required files is in
. To view available versions with their
installation
sources, click .
Disk Usage
During the selection of the software, the resource window at the bottom
left of the module displays the prospective disk usage of all mounted file
systems. The colored bar graph grows with every selection. As long as it
remains
green, there is sufficient space. The bar color slowly changes to red
as you approach the limit of disk space. If you select too many
packages for installation, an alert is displayed.
Checking Dependencies
Some packages depend on other packages. This means that the software of
the package only works properly if another package is also installed.
There are some packages with identical or similar functionalities.
If these packages use the same system resource, they should not be
installed at the same time (package conflict).
When the package manager starts, it examines the system and displays
installed packages. When you select to install and remove packages,
the package manager
automatically checks the dependencies and selects any other required
packages (resolution of dependencies). If you select or deselect conflicting
packages, the package manager indicates this and submits suggestions for
solving the problem (resolution of conflicts).
and
are located under the information window. If you click , the package manager checks if the current
package selection results in any unresolved package dependencies or
conflicts. In the event of unresolved dependencies, the required
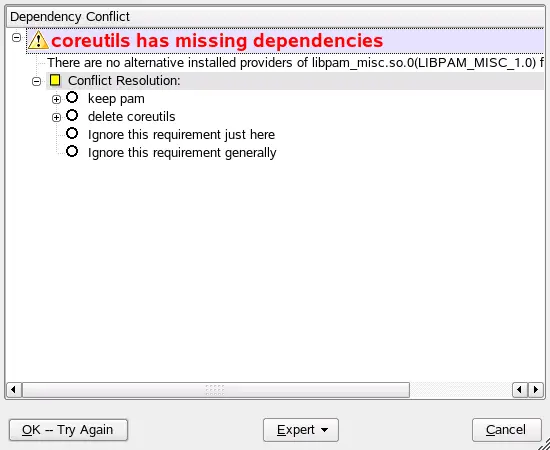
additional packages are selected automatically. For package conflicts,
the package manager opens a dialog that shows the conflict and offers
various options for solving the problem.
If you activate , any change of a package
status triggers an automatic check. This is a useful feature, because
the consistency of the package selection is monitored permanently.
However, this process consumes resources and can slow down the package
manager. For this reason, the autocheck is not activated by default. In
either case, a consistency check is performed when you confirm your
selection with .
For example, sendmail and
postfix may not be installed concurrently.
Figure 7-3
shows the conflict message prompting you to make a decision.
postfix is already installed. Accordingly, you
can refrain from installing sendmail, remove
postfix, or take the risk and ignore the
conflict.
WARNING: Handling Package Conflicts
Unless you are very experienced, follow the suggestions of YaST when
handling
package conflicts, because otherwise the stability and functionality
of your system could be endangered by the existing conflict.
Installing -devel Packages
The package manager provides functions for quick and easy installation
of devel and debug packages. To install all devel packages for your
installed system,
choose .
To install all debug packages for your installed system,
choose .
7.3.2 Installing Add-On Products
Add-on products are extensions for your system. You can install
a third party add-on product or a special extension of your SUSE Linux Enterprise, for
example, the SDK add-on or a CD with binary drivers. To install a new
add-on, use .
You can select various types of product media, like CD, FTP or local
directory. You can
work also directly with ISO files. To add an add-on as ISO file media,
select
then choose .
After successfully adding the add-on media, the package manager window
appears.
If the add-on provides a new
pattern, see the new item in the
filter.
To view the list of all packages from the selected
installation source, select the filter
and choose
the installation source to view.
To view packages from a selected add-on by package groups, select the
secondary filter .
Binary Drivers
Some hardware needs binary-only drivers for correct function. If you
have
such hardware, refer to the release notes
for more information about availability of binary drivers for your system.
To read the release notes, open YaST and select .
SUSE Software Development Kit (SDK) 10
SUSE Software Development Kit 10 is an add-on for SUSE Linux Enterprise 10. It is a complete tool
kit for application development. In fact, to provide a
comprehensive
build system, SUSE Software Development Kit 10 includes all the open source tools that were used
to build the SUSE Linux Enterprise Server product. It provides you, as a developer, independent
software vendor (ISV), or independent hardware vendor (IHV), with all
the tools needed to port applications to all the platforms supported
by the SUSE Linux Enterprise Desktop and SUSE Linux Enterprise Server.
SUSE Software Development Kit also contains integrated development environments (IDEs),
debuggers, code editors, and other related tools. It supports most major
programming languages (including C, C++, Java, and most scripting
languages). For your convenience, SUSE Software Development Kit includes multiple Perl
packages that are not included in the SUSE Linux Enterprise.
For detailed information, refer to
https://developer.novell.com/ndk/susesdk.htm. Use the
YaST add-on installer and package manager to install SUSE Software Development Kit 10.
7.3.3 Selecting the Installation Source
You can use multiple installation sources of several types. Select them
and enable their use for installation or update using
.
When started, it displays a
list of all previously registered sources. Following a normal
installation from CD, only the installation CD is listed. Click
to include additional sources in this list. Sources
can be CDs, DVDs, or network sources, such as NFS and FTP servers.
Even directories on the local hard disk can be selected as the
installation medium. See the detailed YaST help text for more details.
All registered sources have an activation status in the first column of
the list. Enable or
disable individual installation sources by clicking . During the installation of
software packages or updates, YaST selects a suitable entry from the
list of activated installation sources. When you exit the module with
, the current settings are saved and applied to
the configuration modules
and .
7.3.4 Updating Software Online
Install important updates and improvements with YaST Online Update (YOU).
The current patches for your SUSE product are available from the SUSE
catalogs. To add or remove catalogs, use the
module,
described in Section 7.3.3,
Selecting the Installation Source.
Find the list of available patches on the left.
Patches are sorted by security importance:
- Security
-
You must install these patches.
Not installing the patches is a real security hazard.
- Recommended
-
You should install these patches,
because your computer could be compromised.
- Optional
-
You can install these patches, but if you do
not install them your computer remains secure.
To install a patch, select it in the list and click
.
You can select multiple patches. To cancel your changes, click
.
If you need special settings, for example, if your computer is
behind a proxy server, use the command line tool rug. It is described in
Section 7.12,
Update from the Command Line.
7.3.5 Automatic Online Update
allows
you to schedule automatic online updates.
First enable automatic online update by activating
then set the time of the update. If you want to have full control
over installed patches, you can schedule only the download of patches and
install patches manually later.
To download patches only, check .
Some patches need some additional actions, for example, patches for the kernel
require a reboot for activation. Information about the additional actions
are provided with preinstallation information. To use automatic update only
for
normal patches without preinstallation information, check
.
Click to exit the dialog.
7.3.6 Updating from a Patch CD
The module from the section
installs patches from CD, not from an
FTP server. The
advantage lies in a much faster update with CD. After the patch CD is
inserted, all patches on the CD are displayed in
the dialog. Select the desired packages for installation
from the list of patches. The module issues an error message if no patch
CD is present. Insert the patch CD then restart the module.
7.3.7 Updating the System
Update the version of SUSE Linux Enterprise installed on your system with
.
During operation, you can only update application software, not the
base system. To update the base system, boot the computer
from an installation medium, such as CD. When selecting the installation
mode in YaST, select .
The procedure for updating the system is similar to a new installation.
Initially, YaST examines the system, determines a suitable update
strategy, and presents the results in a suggestion dialog. Click
or the individual items to change any details.
Update Options
Set the update method for your system. Two options are available.
- Update with Installation of New Software and Features
Based on the Selection
-
To update the entire system to the latest versions of software, select
one of the predefined selections. These selections ensure that packages that
did not exist previously are also installed.
- Only Update Installed Packages
-
This option merely updates packages that already exist on the
system. No new features are installed.
Additionally, you can use
to remove packages that do not exist in the new version. By default,
this option is preselected to prevent outdated packages from
unnecessarily occupying hard disk space.
Packages
Click to start the package manager and
select or deselect individual packages for update. Any package
conflicts should be resolved with the consistency check. The use of the
package manager is covered in detail in
Section 7.3.1,
Installing and Removing Software.
Backup
During the update, the configuration files of some packages may be
replaced by those of the new version. Because you may have modified some of
the files in your current system, the package manager normally makes
backup copies of the replaced files. With this dialog, determine the
scope of these backups.
IMPORTANT: Scope of the Backup
This backup does not include the software. It only contains
configuration files.
Language
Primary and other languages currently installed on the system
are listed here. Change them by clicking
in the displayed configuration or with
.
Optionally, adapt the keyboard layout and time zone to the
region where the primary language is spoken. Find more about language
selection in Section 7.5.14,
Language Selection.
Important Information about Updates
The system update is a very complex procedure. For each program
package, YaST must first check which version is installed on the
computer then determine what needs to be done to replace the old
version with the new version correctly. YaST also tries to adopt any
personal settings of the installed packages.
In most cases, YaST replaces old versions with new ones without
problems. A backup of the existing system should be performed prior
to updating to ensure that existing configurations are not lost during
the update. Conflicts can then be resolved manually after the update
has finished.
7.3.8 Installing into a Directory
This YaST module allows you to install packages into a directory
specified by you. Select where to place the root directory,
how to name directories, and the type of system and software
to install. After entering this module, YaST determines the system
settings and lists the default directory, installation instructions, and
software to install. Edit these settings by clicking
. All changes must be confirmed by clicking
. After changes have been made, click
until informed that the installation is complete.
Click to exit the dialog.
7.3.9 Installing into a Directory for Xen
Install packages into a directory for Xen with .
Xen is a virtual machine monitor (VMM) for x86-compatible computers that
enables you to run more than one virtual machine,
each with its own OS, on a single physical system and with excellent
performance. After this module starts, YaST determines the system
settings and lists the default directory, installation instructions, and
software to install. Edit the defaults by clicking
. Confirm all changes by clicking
. After making all desired changes, click
until you are informed that the installation is
complete.
Click to exit the dialog.
7.3.11 Registering SUSE Linux Enterprise
The registration and activation of your product is a precondition for
technical support and product updates. If you skipped the
registration during installation, you can register later
with the help of the module
from . Before
you start registration, prepare your contact e-mail and registration key.
In , select whether to
obtain some of the necessary information from your system. This simplifies
the registration process. If you want to see what is required to register
your system or what happens with your data, use
.
To register, you can also use the command line tool
suse_register. Refer to suse_register --help for directions.
To register your system without Internet access from a different computer,
you must
obtain a registration URL first. To obtain the URL, run
suse_register
without options on your new system. From the
suse_register output, copy the URL and
enter it in the URL field of a browser on a different computer.
|
|
|