The following sections introduce the basic concept of rule-based
installation using AutoYaST and provide an example scenario that enables
you to create your own custom autoinstallation setup.
5.2.1 Understanding Rule-Based Autoinstallation
Rule-based AutoYaST installation allows you to cope with heterogeneous
hardware environments:
-
Does your site contain hardware of different vendors?
-
Are the machines on your site of different hardware configuration
(for example, using different devices or using different memory and
disk sizes)?
-
Do you intend to install across different domains and need to
distinguish between them?
What rule-based autoinstallation does is, basically, generate a custom
profile to match a heterogeneous scenario by merging several profiles
into one. Each rule describes one particular distinctive feature of
your setup (such as disk size) and tells AutoYaST which profile to use when
the rule matches. Several rules describing different features of your
setup are combined in an AutoYaST rules.xml file. The
rule stack is then processed and AutoYaST generates the final profile by
merging the different profiles matching the AutoYaST rules into one. To
illustrate this procedure, refer to
Section 5.2.2,
Example Scenario for Rule-Based Autoinstallation.
Rule-based AutoYaST offers you great flexibility in planning and executing
your SUSE Linux Enterprise deployment. You can:
-
Create rules for matching any of the predefined system attributes
in AutoYaST
-
Combine multiple system attributes (such as disk size and kernel
architecture) into one rule by using logical operators
-
Create custom rules by running shell scripts and passing their
output to the AutoYaST framework. The number of custom rules is limited
to five.
NOTE:
For more information about rule creation and usage with AutoYaST, refer to
the package's documentation under
/usr/share/doc/packages/autoyast2/html/index.html,
Chapter .
To prepare for a rule-based AutoYaST mass installation, proceed as follows:
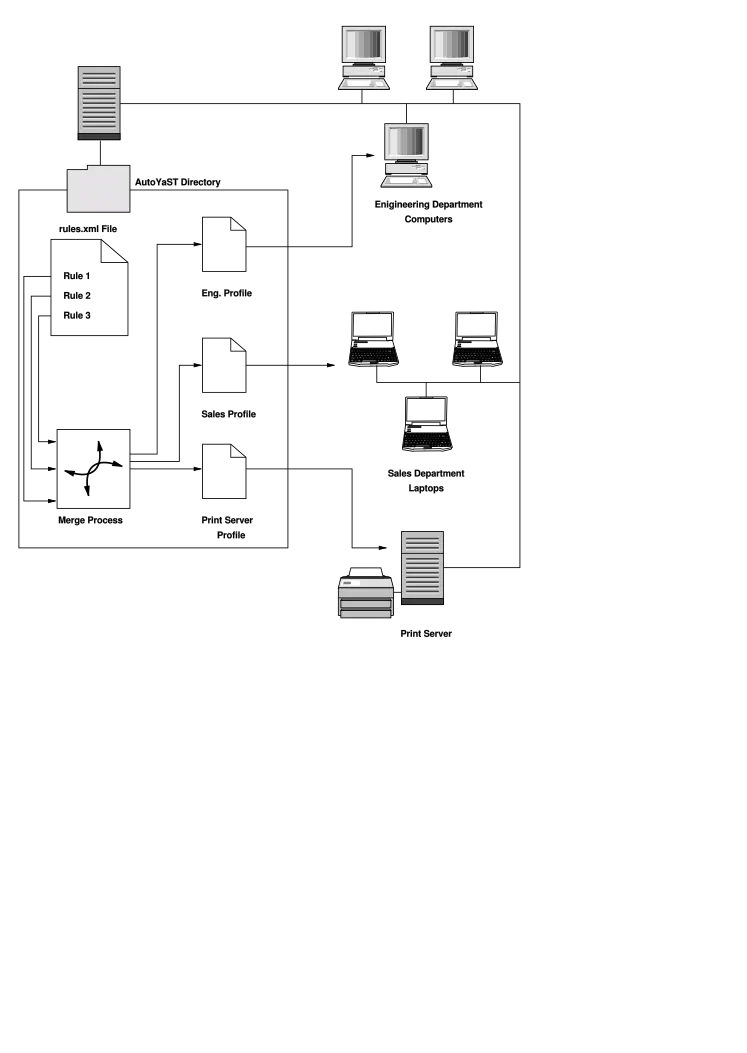
5.2.2 Example Scenario for Rule-Based Autoinstallation
To get a basic understanding of how rules are created, think of the
following example, depicted in Figure 5-2. One run of AutoYaST installs the
following setup:
- A Print Server
-
This machine just needs a minimal installation without a desktop
environment and a limited set of software packages.
- Workstations in the Engineering Department
-
These machines need a desktop environment and a broad set of
development software.
- Laptops in the Sales Department
-
These machines need a desktop environment and a limited set of
specialized applications, such as office and calendaring
software.
In a first step, use one of the methods outlined in
Section 5.1.1,
Creating an AutoYaST Profile to create profiles
for each use case. In this example, you would create
print.xml, engineering.xml,
and sales.xml.
In the second step, create rules to distinguish the three hardware
types from one another and to tell AutoYaST which profile to use. Use an
algorithm similar to the following to set up the rules:
-
Does the machine have an IP of ?
Then make it the print server.
-
Does the machine have PCMCIA hardware and feature an Intel chipset? Then
consider it an Intel laptop and install the sales department
software selection.
-
If none of the above is true, consider the machine a developer
workstation and install accordingly.
Roughly sketched, this translates into a rules.xml
file with the following content:
<?xml version="1.0"?>
<!DOCTYPE autoinstall SYSTEM "/usr/share/autoinstall/dtd/rules.dtd">
<autoinstall xmlns="https://www.suse.com/1.0/yast2ns" xmlns:config="https://www.suse.com/1.0/configns">
  <rules config:type="list">
    <rule>
       <hostaddress>
	    <match>192.168.27.11</match>
            <match_type>exact</match_type>
       </hostaddress>
       <result>
            <profile>print.xml</profile>
            <continue config:type="boolean">false</continue>
        </result>
    </rule>
    <rule>
       <haspcmcia>
            <match>1</match>
            <match_type>exact</match_type>
       </haspcmcia>
       <custom1>
           <script>
if grep -i intel /proc/cpuinfo > /dev/null; then
echo -n "intel"
else
echo -n "non_intel"
fi;
           </script>
           <match>*</match>
           <match_type>exact</match_type>
       </custom1>
       <result>
            <profile>sales.xml</profile>
            <continue config:type="boolean">false</continue>
        </result>
        <operator>and</operator>
    </rule>
    <rule>
        <haspcmcia>
            <match>0</match>
            <match_type>exact</match_type>
        </haspcmcia>
 	<result>
            <profile>engineering.xml</profile>
            <continue config:type="boolean">false</continue>
        </result>
    </rule>
  </rules>
</autoinstall>
When distributing the rules file, make sure that the
rules directory resides under the
profiles directory specified in the
autoyast=protocol:serverip/profiles/
URL. AutoYaST looks for a rules subdirectory
containing a file named rules.xml first then
loads and merges the profiles specified in the rules file.
The rest of the autoinstallation procedure is carried out as usual.