|
 |
|
| |
14.1 Getting Started with the Bash Shell
In Linux, you can use the command line parallel to the graphical
user interface and easily switch between them. To start a terminal
window from the graphical user interface in KDE, click the Konsole
icon in the panel. In GNOME, click the GNOME Terminal icon in the panel.
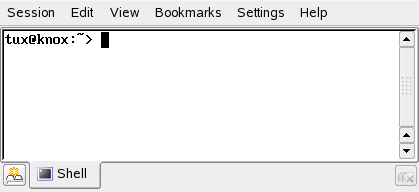
The Konsole or the GNOME Terminal window appears, showing the
prompt on the first line like in Figure 14-1. The prompt usually shows your login name (in this example,
tux), the hostname of your computer (here,
knox), and the current path (in this case, your
home directory, indicated by the tilde symbol,
~). When you are logged in on a remote computer
this information always shows you which system you are currently
working on. When the cursor is after this prompt, you can send
commands directly to your computer system.
14.1.1 Entering Commands
A command consists of several elements. The first element is
always the actual command, followed by parameters or options. You
can type a command and edit it by using , , , , and . You can also
add options or correct typing errors. The command is executed when
you press .
IMPORTANT: No News Is Good News
The shell is not verbose: in contrast to some graphical user
interfaces, it usually does not provide confirmation messages
when commands have been executed. Messages only appear in case
of problems or errors.
Also keep this in mind for commands to delete objects.
Before entering a command like rm for
removing a file, you should know if you really want to get rid
of the object: it will be deleted irretrievably, without
enquiry.
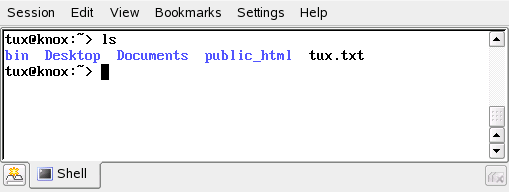
Using Commands without Options
Look at the structure of commands using a simple example:
the ls command, used to list the contents of a directory. The
command can be used with or without options. Entering the plain
ls command shows the contents of the current
directory:
Unlike in other operating systems, files in Linux may have a file
extension, such as .txt, but do not need to
have one. This makes it difficult to differentiate between files
and folders in this output of the ls. By
default, the colors can give you a hint: directories are usually
shown in blue, files in black.
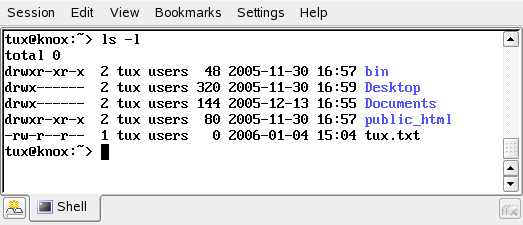
Using Commands with Options
A better way to get more details about the contents of a
directory is using the ls command with a
string of options. Options modify the way a command works so
that you can get it to do specific tasks. Options are separated
from the command with a blank and are prefixed with a hyphen.
The ls -l command shows the
contents of the same directory in full detail (long listing
format):
On the left of each object name, information about the
object is shown in several columns. The most important are the
following: The first column shows the file type of the object
(in this example, d for directory or
- for normal files). The next nine columns
show the user permissions for the object. Columns 11 and 12 show
the name of the file owner and the group (in this case,
tux and users). Find
information about user permissions and the user concept of Linux
in Section 14.2,
Users and Access Permissions. The next column
shows the file size in bytes. Then date and time of the last
change are displayed. The last column shows the object name.
If you want to see even more, you can combine two options
for the ls command and enter
ls
-la. The
shell now also shows hidden files in the directory, indicated by
a dot in front (for example, .hiddenfile).
Getting Help
Nobody is expected to know all options of all commands by
heart. If you remember the command name but are not sure about
the options, you can enter the command followed by a blank and
--help. This --help option
exists for many commands. Entering
ls
--help
displays all the options for the ls command.
14.1.2 Linux Directory Structure
Because the shell does not offer a graphical overview of
directories and files like the tree view in a file manager, it is
useful to have some basic knowlegde of the default directory
structure in a Linux system. You can think of directories as
electronic folders in which files, programs, and subdirectories
are stored. The top level directory in the hierarchy is the root
directory, referred to as /. This is the
place from which all other directories can be accessed.
Excerpt from a Standard Directory Tree shows the
standard directory tree in Linux, with the home directories of the example
users yxz, linux, and tux. The /home directory
contains the directories in which the individual users can store their
personal files.
NOTE: Home Directory in a Network Environment
If you are working in a network environment, your home
directory may not be called /home. It can
be mapped to any directory in the file system. The following list provides a brief description of the
standard directories in Linux.
Table 14-1 Overview of a Standard Directory Tree
|
/ |
Root directory, starting point of the directory tree |
|
/home |
Personal directories of users |
|
/etc |
Important files for system configuration |
|
/bin, /sbin |
Programs needed early in the boot process
(/bin) and for the administrator (/sbin) |
|
/usr, /usr/local |
All application programs and local, distribution-independent
extensions (/usr/local) |
|
/usr/bin, /usr/sbin |
Generally accessible programs (/usr/bin) and
reserved for the system administrator ( /usr/sbin) |
|
/usr/share/doc |
Various documentation files |
|
/tmp, /var/tmp |
Temporary files (do not save files in this directory unless you do
not need them) |
|
/opt |
Optional software, larger add-on program packages (such as KDE,
GNOME, and Netscape) |
14.1.3 Working with Directories and Files
To address a certain file or directory, you must specify the
path leading to that directory or file. There are two ways to
specify a path:
Absolute paths always start with a slash. Relative paths do
not have a slash at the beginning.
NOTE: Linux Is Case-Sensitive
Linux distinguishes between uppercase and lowercase in the
file system. For example, entering test.txt
or Test.txt makes a difference in Linux.
Keep this in mind when entering filenames or paths. To change directories, use the cd command.
-
To switch to your home directory, enter
cd.
-
Refer to the current directory with a dot
(.). This is mainly useful for other commands
(cp, mv, …).
-
The next higher level in the tree is represented by two dots
(..). For example, to switch to the parent directory of
your current directory, enter
cd ...
Examples of Addressing a File
The cd commands in Section 14.1.3,
Working with Directories and Files used relative paths. You
can use also absolute paths. For example, suppose you want to
copy a file from your home directory to a subdirectory of
/tmp:
-
First, from your home directory create a subdirectory in
/tmp:
-
If your current directory is not your home
directory, enter
cd ~ to switch to
it. From anywhere in the file system, you can reach your
home directory by entering
cd ~.
-
In your home directory, enter
mkdir
/tmp/test.
mkdir stands for make
directory . This command creates a new
directory named test in the
/tmp directory. In this case, use
an absolute path to create the directory.
-
To check what happened, now enter
ls -l
/tmp.
The new directory test should
appear in the list of contents of the
/tmp directory.
-
Now create a new file in your home directory and copy it
to the /tmp/test directory by using a
relative path.
-
Enter
touch myfile.txt.
The touch command with the
myfile.txt option creates a new,
empty file named myfile.txt in
your current directory.
-
Check this by entering
ls
-l.
The new file should appear in the list of
contents.
-
Enter cp myfile.txt
../tmp/test. This copies
myfile.txt to the directory
/tmp/test without changing the
name of the file.
-
Check this by entering ls -l
/tmp/test. The file
myfile.txt should appear in the
list of contents for
/tmp/test.
To list the contents of home directories of other users,
enter ls ~username
. In the example directory tree in Figure 14-4, one of the sample users is
tux. In this case,
ls ~tux would list the contents of the home
directory of tux.
NOTE: Handling Blanks in Filenames or Directory Names
If a filename contains a space, either escape the space
using a back slash (\) in front of the
blank or enclose the filename in single or double quotes.
Otherwise Bash interprets a filename like My
Documents as the names of two files or
directories. The difference between single and double quotes
is that variable expansion takes place within double quotes.
Single quotes ensure that the shell sees the quoted string
literally.
14.1.4 Useful Features of the Shell
Entering commands in Bash can include a lot of typing. In the
following, get to know some features of the Bash that can make
your work a lot easier and save a lot of typing.
History and Completion
By default, Bash remembers commands you have
entered. This feature is called history.
To repeat a command that has
been entered before, press until the desired
command appears at the
prompt. Press to move forward through the list of
previously entered commands. Use
Ctrl + R
to search in the history.
You can edit the selected command, for
example, changing the name of a file, before you execute the
command by pressing .
To edit the command line, just move the cursor to the desired
position using the arrow keys and start typing.
Completing a filename or directory name to its full length
after typing its first letters is another helpful feature of
Bash. To do so, type the first letters then press . If the filename or path can be
uniquely identified, it is completed at once and the cursor moves
to the end of the filename. You can then enter the next option
of the command, if necessary. If the filename or path cannot be
uniquely identified (because there are several filenames
starting with the same letters), the filename or path is only
completed up to the point where again several options are
possible. You can then obtain a list of them by pressing a second time. After this, you can
enter the next letters of the file or path then try completion
again by pressing . When
completing filenames and paths with the help of , you can simultaneously check whether
the file or path you want to enter really exists (and you can be
sure of getting the spelling right).
Wild Cards
Another convenience offered by the shell is wild cards for
pathname expansion. Wild cards are characters that can stand for
other characters. There are three different types of these in
Bash:
- ?
-
Matches exactly one arbitrary character
- *
-
Matches any number of characters
- [set]
-
Matches one of the characters from the group specified
inside the square brackets, which is represented here by
the string set. As part of
set you can also specify character
classes using the syntax
[:class:],
where a class is one of alnum,
alpha, ascii, etc.
Using ! or ^ at
the beginning of the group ([!set])
matches one character other than those identified by
set.
Assuming that your test directory
contains the files Testfile,
Testfile1,
Testfile2, and
datafile.
-
The command ls Testfile? lists the files
Testfile1 and Testfile2.
-
The command ls Testfile? lists the files
Testfile1 and Testfile2.
-
With ls Test*, the list also includes
Testfile.
-
The command ls *fil* shows all the sample
files.
-
Use the set wild card to
address all sample files whose last character is a number: ls
Testfile[1-9] or, using classes, ls
Testfile[[:digit:]].
Of the four types of wild cards, the most inclusive one is
the asterisk. It could be used to copy all files contained in
one directory to another one or to delete all files with one
command. The command rm *fil*, for instance,
would delete all files in the current directory whose name
includes the string fil.
Viewing Files with Less and More
Linux includes two small programs for viewing text files
directly in the shell: less and
more. Rather than starting an editor to read
a file like Readme.txt, simply enter
less Readme.txt to display the text in the
console window. Use Space to scroll down one
page. Use Page Up and Page
Down to move forward or backward in the text. To exit
less, press Q.
Instead of less, you can also use the older program more.
However, it is less convenient because it does not allow you to
scroll backwards.
The program less got its name from the the precept that
less is more and can also be used to view
the output of commands in a convenient way. To see how this
works, read
Redirection and Pipes.
Redirection and Pipes
Normally, the standard output in the shell is your screen or
the console window and the standard input is the keyboard.
However, the shell provides functions by which you can redirect
the input or the output to another object, such as a file or
another command. With the help of the symbols
> and <, for
example, you can forward the output of a command to a file
(output redirection) or use a file as input for a command (input
redirection). For example, if you want to write the output of a
command such as ls to a file, enter
ls -l > file.txt. This creates a
file named file.txt that contains the list
of contents of your current directory as generated by the
ls command. However, if a file named
file.txt already exists, this command
overwrites the existing file. To prevent this, use
>>. Entering ls -l >>
file.txt simply appends the output of the
ls command to an already existing file named
file.txt. If the file does not exist, it
is created.
Sometimes
it is also useful to use a file as the input for a command. For
example, with the tr command, you can replace
characters redirected from a file and write the result to the
standard output, your screen. Suppose you want to replace all
characters t of your
file.txt from the example above with
x and print this to your screen. Do so by
entering tr t x <
file.txt.
Just like the standard output, the standard error output is
sent to the console. To redirect the standard error output to a
file named errors, append
2> errors to the corresponding
command. Both standard output and standard error are saved to
one file named alloutput if you append
>& alloutput.
Using pipelines or
pipes is also a sort redirection, although
the use of the pipe is not constrained to files. With a pipe
(|), you can combine several commands,
using the output of one command as input for the next command.
For example, to view the contents or your current directory in
less, enter ls | less.
This only makes sense if the normal output with
ls would be too lengthy. For instance, if you
view the contents of the dev directory with
ls /dev, you only see a small portion in the
window. View the entire list with
ls /dev |
less.
14.1.5 Archives and Data Compression
Now that you have already created a number of files and
directories, consider the subject of archives and data
compression. Suppose you want to have the entire
test directory packed in one file that you
can save on a USB stick as a backup copy or send by e-mail. To do
so, use the command tar (for tape
archiver). With tar --help, view
all the options for the tar command. The most
important of these options are explained here:
- -c
-
(for create) Create a new archive.
- -t
-
(for table) Display the contents of an archive.
- -x
-
(for extract) Unpack the archive.
- -v
-
(for verbose) Show all files on screen while creating
the archive.
- -f
-
(for file) Choose a filename for the archive file. When
creating an archive, this option must always be given as the
last one.
To pack the test directory with all its
files and subdirectories into an archive named
testarchive.tar, do the following:
-
Open a shell.
-
Use cd to your home directory where the
test directory is located.
-
Enter
tar -cvf testarchive.tar test.
The -c option creates the archive, making it a file
as directed by
-f. The -v option lists the files as
they are processed.
-
View the contents of the archive file with
tar -tf testarchive.tar.
The test directory with all its files and
directories has remained unchanged on your hard disk. To unpack the archive,
enter tar -xvf testarchive.tar, but do not try this
yet.
For file compression, the obvious choice is
gzip or, for a even better compression ratio,
bzip2.
Just enter gzip testarchive.tar
(or bzip2 testarchive.tar, but
gzip is used in this example). With
ls, now see that the file
testarchive.tar is no longer there and that
the file testarchive.tar.gz has been created
instead. This file is much smaller and therefore much better
suited for transfer via e-mail or storage on a USB stick.
Now, unpack this file in the test2
directory created earlier. To do so, enter
cp
testarchive.tar.gz test2 to copy the
file to that directory. Change to the directory with
cd
test2. A compressed archive with the
.tar.gz extension can be unzipped with the gunzip command. Enter
gunzip testarchive.tar.gz, which results in the file
testarchive.tar, which then needs to be
extracted or untarred with
tar -xvf
testarchive.tar. You can also
unzip and extract a compressed archive in one step with
tar -xvf
testarchive.tar.gz (adding the
-z option is no longer required). With
ls, you can see that a new
test directory has been created with the same
contents as your test directory in your home
directory.
14.1.6 Cleaning Up
After this crash course, you should be familiar with the
basics of the Linux shell or command line. You may want to clean
up your home directory by deleting the various test files and
directories using the rm and
rmdir commands. In Section 14.3,
Important Linux Commands, find a list of the most
important commands and a brief description of their functions.
|
|
|