|
 |
|
| |
1.11 Important Utilities
The following pages introduce a number of small KDE utilities
intended to assist in daily work. These applications perform various
tasks, such as managing your Internet connections and your
passwords, creating data archives, and viewing PDF files.
1.11.1 Managing Internet Connections
To surf the Internet or send and receive e-mail messages,
connect an ISDN or ethernet card or a modem to your machine and
configure it. This can be done with the help of the YaST
system assistant. You can establish Internet connections with
NetworkManager or KInternet. In YaST, select whether to use
NetworkManager.
For further details, refer to Network Connectivity Guide. It includes
a list of criteria that help you to decide whether to use NetworkManager
or other applications and describes the usage of the applications.
1.11.2 Managing Passwords with KWallet Manager
Remembering all the passwords for protected resources to which
you need to log in can be problematic. KWallet remembers them for
you. It collects all passwords and stores them in an encrypted
file. With a single master password, open your wallet to view,
search, delete, or create entries. Normally you do not need to
insert an entry manually. KDE recognizes if a resource requires
authentication and KWallet starts automatically.
IMPORTANT: Protect Your KWallet Password
If you forget your KWallet password, it cannot be
recovered. Furthermore, anyone who knows your password can
obtain all information contained in the wallet.
Starting KWallet
When KWallet starts for the first time (for example, when
you access a Web site where you must enter a password to log
in), a dialog appears with the welcome screen. Choose between
(recommended) and
. If you choose
, in the next screen you can
choose whether to store personal information. Some KDE
applications, such as Konqueror or KMail, can use the wallet
system to store Web form data and cookies. Select to activate KWallet and leave with
.
If you choose , you have
an additional security level screen. The default settings are
generally acceptable for most users, but others may wish to
change them.
closes wallets after a period of inactivity. To separate network
passwords and local passwords, activate . Close with .
You can alter the settings at any time by right-clicking the
KWallet icon in the panel and selecting . A dialog box opens where you can select
several options. By default, all passwords are stored in one
wallet, , but you can also add new
wallets. Once configured, KWallet appears in the panel.
The KWallet Manager
To store data in your wallet or view its contents, click the
KWallet icon in the panel. A dialog box opens, showing the
wallets that are accessible on your system. Click the wallet to
open. A window prompts for your password.
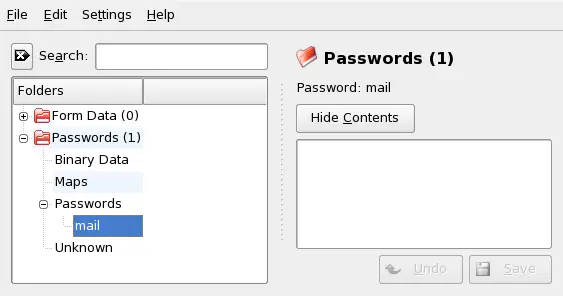
After a successful login, the KWallet Manager window opens.
It is divided into four different parts: the top left part
displays a summary, the top right part displays subfolders, the
lower left part shows a list with folder entries, and the lower
right part shows the contents of a selected entry.
In the KWallet Manager, you can change your master password
for KWallet at any time with .
You can add or delete folders. Selecting a folder updates
the folder entry list and the summary display. Selecting a
folder entry updates the entry contents pane and allows you to
edit that entry. Entries can also be created or deleted using
the context menu for the folder contents.
To insert a new entry, proceed as follows:
Inserting New Entries in Your Wallet
-
In the top right part of the window, select the
subfolder to which to add an entry.
The lower left part shows a list of entries belonging to
the subfolder. You can add a new entry to
or . Use
if you have key and value pairs.
Passwords can contain multiline entries.
-
To add a new password, right-click the
entry then select
from the context menu.
-
Specify a name for the new entry then click
. Your new entry is sorted under your
folder entry.
-
Click the new entry to display it on the right side (the
folder is initially empty).
-
Click to open an input
field where you can enter your new password.
-
Type in your password and click .
KWallet saves your password to the subfolder
selected.
Copying Your Wallet to Another Computer
For the most part, KWallet resides silently in the panel and
is automatically activated if needed. However, you can copy your
wallet files to another computer (for example, your laptop). To
simplify this task, wallets can be dragged from the manager
window to a file browser window. This let you easily package a
new wallet for transfer to another environment. For example, a
new wallet could be created and copied onto a removable flash
memory device. Important passwords could be transferred there,
so you have them available in other locations.
1.11.3 Displaying, Decompressing, and Creating Archives
To save space on the hard disk, use a packer that compresses
files and directories to a fraction of their original size. The
application Ark can be used to manage such archives. It supports
common formats, such as zip,
tar.gz, tar.bz2,
lha, and rar.
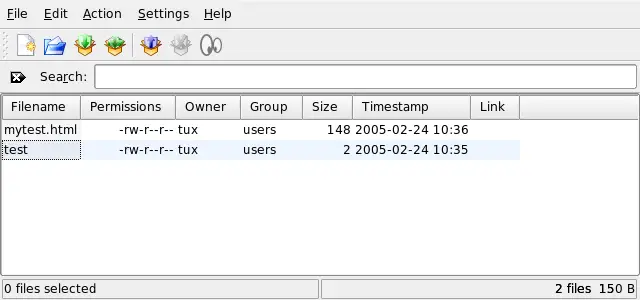
Start Ark from the main menu or from the command line with
ark. If you already have some compressed files,
move these from an open Konqueror window to the Ark window to view
the contents of the archive. To view an integrated preview of the
archive in Konqueror, right-click the archive in Konqueror and
select . Alternatively,
select in Ark to open the file directly.
Once you have opened an archive, perform various actions.
offers options such as , ,
, ,
, , and
.
To create a new archive, select . Enter the name of the new archive in the dialog
that opens and specify the format using .
After confirming with or by pressing
Enter, Ark opens an empty window. You can drag
and drop files and directories from the file manager into this
window. As the final step, Ark compresses everything into the
previously selected archive format. For more information about
Ark, select .
1.11.4 Taking Screen Shots
With KSnapshot, you can create snapshots of your screen or
individual application windows. Start the program from the main
menu or by pressing
Alt
F2
and entering ksnapshot. The
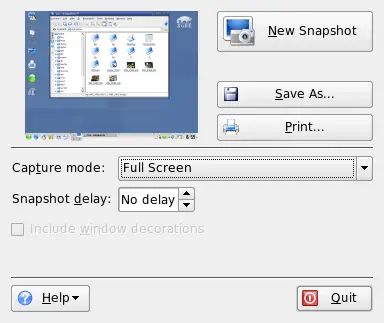
KSnapshot dialog consists of two parts. The upper area (Current
Snapshot) contains a preview of the current screen and three
buttons for creating and saving the screen shots. The lower area
contains further options for the actual creation of the screen
shot.
To take a screen shot, use
to determine the time (in seconds) to wait between clicking
and the actual creation of the
screen shot. If is selected, only the window containing the
pointer is saved. To save the screen shot, click and designate the directory and filename for
the image in the subsequent dialog. Click to print the screen shot.
You can also use The GIMP to take screen shots. To open The
GIMP, press
Alt
F2
and enter gimp. When you run GIMP
for the first time, it installs some files in your home directory
and displays dialogs that give you the opportunity to adapt it to
your environment. For information about using The GIMP, refer to
Section 17.0,
Manipulating Graphics with The GIMP or see its help. You may need
to install the help with YaST (kdeutils3-extra).
1.11.5 Viewing PDF Files with KPDF
PDF is probably one of more important formats. KPDF is a KDE
program that can view and print them.
Start KPDF by pressing
Alt
F2
and entering kpdf. Load a PDF file
with . KPDF displays it in its main window. On the left
side, there is a sidebar with thumbnails and a contents view.
Thumbnails give an overview of the page. The contents view
contains bookmarks to navigate in your document. Sometimes it is
empty, meaning bookmarks are not supported by this PDF.
To view two pages in the main window, select . The view depends on what last two options you
activate in the menu.
Another nice option is to select the area in which you are
interested with the select tool from the toolbar. Draw a rectangle
and choose from the pop-up menu whether you need the selected area
as text or as a graphic. It is copied to the clipboard. You can
even save the area to a file.
1.11.6 Font Administration with KFontinst
By default, SUSE® Linux Enterprise Desktop provides various fonts commonly
available in different file formats (Bitmap, TrueType, etc.). These
are known as system fonts. Users can additionally
install their own fonts from various collections on CD-ROM. Such
user-installed fonts are, however, only visible and available to the
corresponding user.
The KDE control center provides a comfortable tool for
administering system and user fonts. It is shown in Figure 1-20.
To check which fonts are currently available, type the URL
fonts:/ into the address field of a Konqueror session.
This displays two windows: Personal and
System. User-installed fonts are installed to
the folder Personal. Only root can install to the
System folder.
To install fonts as a user, follow these steps:
-
Start the Control Center and access the appropriate module
with .
-
Choose from the toolbar or from
the menu available when right-clicking the list.
-
In the dialog that opens, select one or more fonts for
installation.
-
The marked fonts are then installed to your personal font
folder. Selecting a font shows a preview.
To update system fonts, first select and enter your root password. Then proceed as described
for user font installation.
1.11.7 Controlling Sound with KMix
YaST identifies and configures the sound cards of your
computer automatically. Otherwise, start the YaST
module and configure the sound card
manually. When your sound card has been configured, you can control
the volume and balance of the sound with a mixer.
HINT: Starting the Mixer
If the mixer icon (a loudspeaker symbol) is not visible in
the panel of your desktop, press
F2
and enter kmix or start the mixer
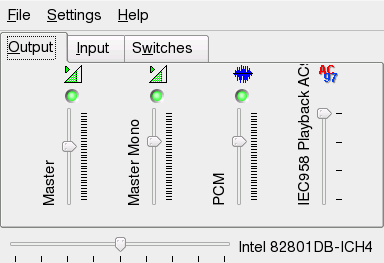
from the main menu. You usually find it under . By default, clicking the KMix icon in the system tray shows
the master controller where you can increase or decrease the
overall volume. To switch off the sound, click the green LED, which
darkens when it is muted. Toggle this option by
clicking the LED again. To fine-tune your sound settings for
several channels, right-click the KMix icon and select
. In the main window, you can
configure , , and
. Each of the devices featured there
has its own context menu that is opened by right-clicking the
device icon. You can mute or hide each one of them separately. For
further information about KMix, refer to the online help.
|
|
|