SUSE Linux Enterprise Desktop comes with a set of small helper applications that assist you in
managing your software collection. You can install, remove and update
software packages with just a few clicks.
1.12.1 Obtaining Software Updates
Novell offers a continuous stream of software security updates for
your product. Using the Software Updater applet in your desktop panel,
you can easily apply security updates with just a few clicks. Whenever
you connect to the Internet, Software Updater automatically checks
whether updates for your system are available from the updated sources
specified in the Software Updater configuration and those set up during
installation.
The Software Updater resides in the notification area (GNOME) or the
system tray (KDE) of your panel as an icon depicting a globe, which
changes color depending on the availability of a network link and new
updates.
Left-click the panel icon to launch the updater window where you can
select the software updates to be applied. Right-click the panel icon to
access a menu with the following items:
- Configure
-
Select and configure additional update services and subscribe to
additional catalogs. See
Configuring Additional Packages Sources and
Selecting Update Catalogs.
- Refresh
-
Poll the update server for pending
updates.
HINT:For background information on the underlying rug command and its
configuration options, see “Update from the Command Line” (Chapter “System Configuration with YaST”, ↑Deployment Guide) or
refer to the rug man page.
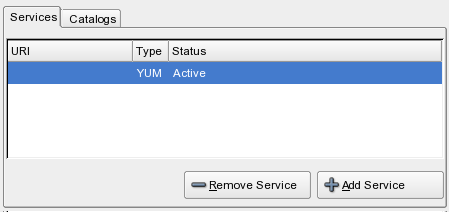
Configuring Additional Packages Sources
Apart from the official update source provided by Novell, you can
configure Software Updater to check additional package sources for updates. Ask
your system administrator for additional package sources that are
available for your product and for connection details.
To add a new package source, proceed as follows:
-
Right-click the Software Updater icon and click
.
-
Click .
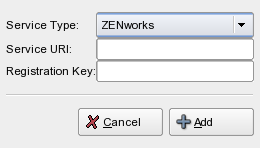
-
Select the type of update repository from the drop-down list.
Software Updater currently supports YUM, RCE, ZENworks, and
user-mounted sources.
-
Add the connection details for the source type you selected
(server URI and registration key) and click
.
The source is listed in the Services tab and is ready to be
used and checked for available update
packages.
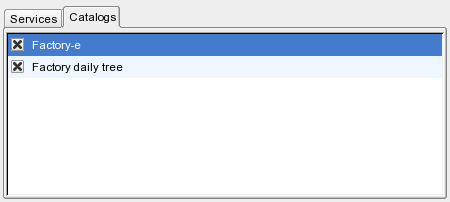
Selecting Update Catalogs
The officially supported update catalogs were automatically
selected when you registered at the Novell update server. However, if
you have added any custom installation sources, you can select a set of
catalogs from those sources to be checked in addition to the
preselected ones. There may be, for example, a catalog containing all
the software that came with the original release of the product and
another one containing all the update packages released since.
To select additional update catalogs, proceed as follows:
-
Right-click Software Updater and select
.
-
Select the tab.
-
Select the catalogs you want or deselect
those you do not need and close the configuration window by
clicking the X in the upper right
corner.
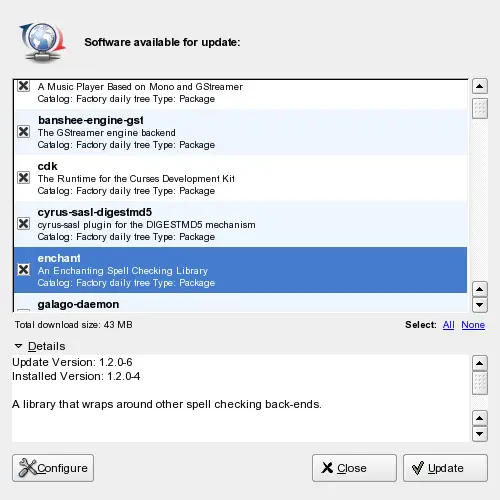
Selecting and Applying Updates
When updates are available, the panel icon changes color.
To review and apply updates, proceed as follows:
-
Click the panel icon.
-
Select from the list which updates you want to apply. Click
for more information about the selected
update.
-
Click .
1.12.2 Installing Software
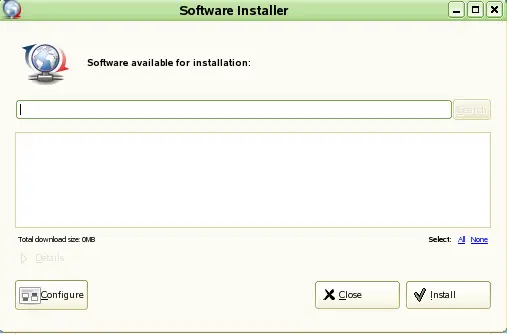
Software Installer lets you install software on your machine.
To install software, proceed as follows:
-
Select from the main
menu.
-
Select the software from the list that you want to install or
search for software by typing a search term in the search field and
clicking . Click
for information about the selected software. You can select all
available software by clicking .
-
Click .
Configuring Additional Packages Sources
You can add package sources from which you can install
software.
To add a package source, proceed as follows:
-
Select from the main
menu.
-
Click .
-
Click .
-
Select the type of the update repository
from the drop-down list. Software Installer currently supports YUM,
RCE, ZENworks, and user-mounted sources.
-
Add the connection details for the source type you selected
(server URI and registration key) and click
.
The source is listed in the tab and
is ready to be used and checked for available packages.
Selecting Installation Catalogs
You can configure your Software Installer to accept additional
catalogs.
To select additional installation catalogs, proceed as
follows:
-
Select from the main
menu.
-
Click .
-
Select the tab.
-
Select the catalogs you want or deselect
those you do not need and close the configuration window by
clicking the X in the upper right
corner.
1.12.3 Removing Software
Software Remover lets you remove software from your machine.
To remove software, proceed as follows:
-
Select from the main
menu.
-
Select the software you want to remove. You can
click for more information about the
selected software.
-
Click .