|
 |
|
| |
1.4 Managing Folders and Files with Konqueror
Konqueror is a unified Web browser, file manager, document
viewer, and image viewer. The following sections cover using
Konqueror for file management. For information about Konqueror as a
Web browser, see Section 13.0,
Browsing with Konqueror.
Start Konqueror as a file manager by clicking the house icon in
the panel. Konqueror displays the contents of your home directory.
Figure 1-10 The File Manager Konqueror
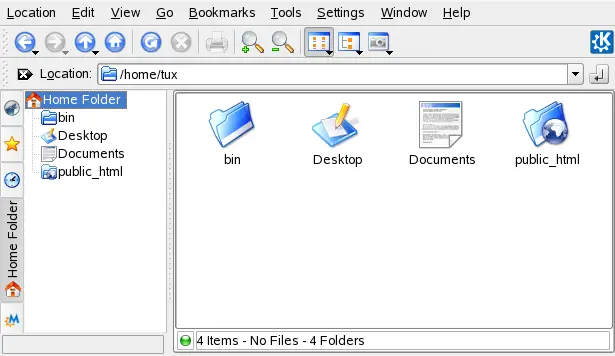
The Konqueror file manager window consists of the following
elements:
- Menu Bar
-
The menu bar holds menu items for actions like copying,
moving, or deleting files, changing views, starting additional
tools, defining your settings, and getting help.
- Toolbar
-
The toolbar provides quick access to frequently used
functions that can also be accessed through the menu. If you hover
the pointer over an icon, a short description is displayed. To the
right, the toolbar features the Konqueror icon, which is animated
while a directory or Web page is loaded.
- Location Bar
-
The location bar shows the path to the directory or file in
your file system. You can enter a path to a directory directly by
typing it in or by clicking one of the directories in the display
field. Delete the contents of the line by clicking the black
symbol with a white X located left of the location bar. After
typing an address, press or
click to the right of the input line.
Unlike a Windows operating system, Linux does not use drive
letters. In Windows, you would address the floppy drive as
A:\, Windows system data is under
C:\, and so on. In Linux, all files and
directories are located in a tree-like structure. The topmost
directory is referred to as the file system root or just
/. All other directories can be accessed from
it. In the following, find a short overview of the most important
directories in a Linux file system:
/home holds the private data of every user
who has an account on your system. The files located here can only
be modified by their owner or the system administrator. Your
e-mail directory is located here, for example.
NOTE: Home Directory in a Network Environment
If you are working in a network environment, your home
directory may not be called /home but can be
mapped to any directory in the file system.
/media generally holds any type of drive
except the hard drive of your system. Your USB flash drive appears
under /media once you have connected it, as
do your digital camera (if it uses USB) and DVD or CD drive.
Under /usr/share/doc, find any kind of
documentation on your Linux system and the installed packages. The
manual subdirectory holds a digital copy of
this manual as well as the other manuals and the release notes of
the installed version of your Linux system. The
packages directory holds the documentation
included in the software packages.
/windows only appears if you have both MS
Windows and Linux installed on your system. It holds the MS
Windows data.
Learn more about the Linux file system
concept and find a more comprehensive list of directories in “Linux Directory Structure” (Chapter “Working with the Shell”, ↑Deployment Guide).
- Navigation Panel
-
You can hide and show the navigation panel by pressing
F9. The navigation panel displays your
information in a tree view. Determine which contents you want to
see by clicking one of the symbols in the tab at the left of the
navigation panel. If you hold your mouse pointer over an icon, a
short description is displayed. For example, you can show the file
system as a tree starting at the root folder or at your home
folder.
- Display Field
-
The display field shows the contents of the selected
directory or file. In the menu, choose
between different view modes to display the contents, such as
, , or
. If you click a file,
Konqueror shows a preview of the contents or loads the file into
an application for further processing. If you hold the mouse
pointer over the file, Konqueror shows a tool tip with detailed
information about the file, such as owner, permissions, or last
modification date.
By default, Konqueror does not show any hidden files, which
are often system files that you usually do not want to access or
see. In Linux, hidden files are indicated by a dot in front. You
can toggle the view to see or hide hidden files by selecting .
1.4.1 Copying, Moving, or Deleting Files
For performing actions like copying, moving, or deleting files,
you need appropriate permissions to the folders and files involved
in your action. Read more about changing access permissions in Section 1.4.3,
Changing Access Permissions.
HINT: Selecting Objects in Konqueror
Clicking a file or a folder in Konqueror directly starts an
action: a preview of the file is displayed or the folder is opened.
To former users of MS Windows, this behavior may be rather unusual.
If you just want to select one or several files without any other
action, press then click the
object. Alternatively, alter your mouse settings in the KDE Control
Center (see Section 2.2.6,
Regional & Accessibility). To copy or move a file or folder, proceed as follows:
-
Right-click the object and select or
from the context menu. The object is kept
in the clipboard.
-
Navigate to your destination folder under which you want to
insert the object. Right-click the destination folder and select
. The object is copied or moved there.
The quickest way to perform actions like copying or moving
objects in Konqueror is the drag-and-drop method. For instance, you
can easily move objects from one window to another by simply
dragging them. When dropping the object, you are asked whether the
objects should be moved or copied.
To delete a file or folder, proceed as follows:
-
Select the object and press or right-click the file then select from the context menu. The object is moved to the
trash bin. If necessary, you can restore the file or folder from
there or delete it completely. See also Section 1.3.4,
Managing the Trash Bin.
-
To delete the object irretrievably, click or press
. If you want to add to the
context menu, configure this behavior in Konqueror by clicking and activating the respective check box.
1.4.2 Creating a New Folder
To create a new folder in Konqueror, proceed as follows:
-
Right-click the folder to which to add a subfolder.
-
Select .
-
In the dialog, enter a name for
the new folder and click .
1.4.3 Changing Access Permissions
Because Linux is a multiuser system, every file in a Linux file
system belongs to a user and a group. All users, including the
superuser, have their own home directories where private data, like
documents, bookmarks, or e-mail, are stored. Write access to these
home directories is strictly limited to the owner by default. As an
owner of a file or directory, you can change the access permissions
to your files. For example, you can protect files holding sensitive
data against read access by other users and you can authorize other
users to write, read, or execute several of your files where
appropriate.
Traditionally, three permission sets are defined for each file
object on a Linux system. These sets include the read
(r), write (w), and execute
(x) permissions for each of three types of
users—the file owner, the group, and other users. For
detailed information about the user concept of Linux, refer to “Users and Access Permissions” (Chapter “Working with the Shell”, ↑Deployment Guide). Instead of using the
traditional way to change access permissions in a
shell, you can also use the graphical user interface Konqueror
provides.
To set permissions for a file, choose from the following
options in Konqueror:
-
-
Users can see the filename in the file system but cannot
open the file and read it.
-
-
Users can open and read the file but cannot change
it.
-
-
Users can open, read, and change the file.
To set permissions for a folder, the following options are
available in Konqueror:
-
-
Users can see the folder name in the file system but cannot
open the folder.
-
-
Users can see the folder contents.
-
-
Users can see the folder contents and create new files or
subfolders.
To change access permissions:
-
Open Konqueror and select the file or folder for which to
change access permissions.
-
Right-click the file and select
. A new dialog opens.
-
Click the tab. It shows the
ownership of the file or folder in the lower part. The upper part
shows the current access permissions.
-
From the lists for ,
, and , select
the permissions to set for the file or folder.
-
Click to apply the changes.
Apart from this traditional permission concept for file system
objects, you can also use access permission lists (ACLs) with
Konqueror. With ACLs, permissions can be defined more flexibly than
the traditional permission concept allows. They allow assigning
permissions to individual users or groups even if these do not
correspond to the original owner or the owning group. For more
in-depth information about ACLs, refer to “Access Control Lists in Linux” (↑Deployment Guide).
To grant certain users or groups access permission to a file
or folder, proceed as follows:
-
Open Konqueror and select the file or folder for which to
change access permissions.
-
Open the dialog for the file or
folder and click the tab.
-
Click . The following
dialog shows the current permissions for the object.
-
Click .
-
To grant a certain user access permission to the file or
folder, select and select a user
from the list.
To grant a certain group access permission to the file or
folder, select and select a group
from the list.
-
In the dialog, the
added user or group appears in the list showing the current
permissions. The green check marks in the columns
, , and
indicate that the user has read, write, and
execute access to the file or folder.
-
You can modify the access rights for the user by clicking the
corresponding check marks for this user in the column
, , or
.
-
When all access permissions are set according to your wishes,
click to close the dialog.
-
Click to apply your changes and to
close the dialog.
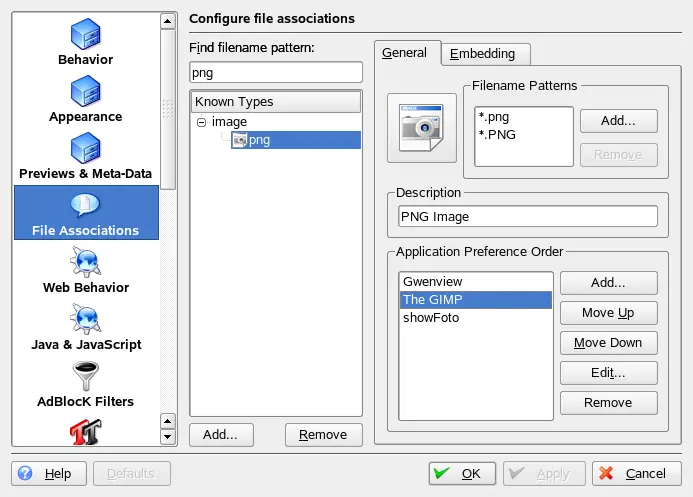
1.4.4 Changing File Associations
With Konqueror, you can decide which application should be used
to open a file.
-
In Konqueror, click .
-
To search for an extension, enter the extension in
. Only file types with a
matching file pattern appear in the list. For example, to modify
the application for *.png files, enter png in
.
-
In the list, click the file
type to open the setting dialog for this file type. You can change
the icon, the filename patterns, description, and the order of the
applications.
If your tool is not listed, click in
then enter the
command.
To change the order of the list entries, click the program to
move then give it a higher or lower priority by clicking
or . The
application listed at the top is used by default when you click a
file of this type.
-
If you need a file type that is not listed in the
list, click
to open a dialog where you can select a group and enter a type
name. The group determines the main type, for example, audio,
image, text, or video. Your file type can usually be assigned to
one of these.
-
Click then determine the extensions
of the filename.
-
Specify a description in the text field and select which
application to use.
-
Click .
1.4.5 Saving View Profiles
You can temporarily change the view of certain folders by
selecting a different in the
menu. To apply these changes to all
folders, you can save your options to a view profile. To do so,
change the view according to your wishes and click . Enter a name for the profile to save and click
. The view is changed for all folders and
saved in this profile. You can now load this profile at any time by
clicking . By default, Konqueror contains several view profiles
designed for various tasks. You can also take one of these profiles
as a draft and modify it according to your needs.
1.4.6 Accessing Digital Cameras with Konqueror
With Konqueror, you can also access your digital camera.
Connect your camera to the USB port. A camera icon should appear on
the desktop. Click this icon to open the camera in Konqueror. The
camera can also be accessed by entering the URL camera:/ in Konqueror. Navigate through the camera's
directory structure until the files are shown. Use the usual
Konqueror file management features to copy the files as desired.
1.4.7 Viewing Images with Konqueror
You can also easily use Konqueror as image viewer. For a quick
and comfortable overview of all images in a directory, select the
directory and click the icon in the
toolbar. Konqueror generates thumbnails and shows them on the
left-hand side of the window. Click a thumbnail to see the full-size
view of the picture on the right-hand side of the window. A number
of additional icons appears in the toolbar for navigating back and
forth, zooming or rotating the pictures, or creating a slide show.
To toggle to normal view again, click or in the toolbar.
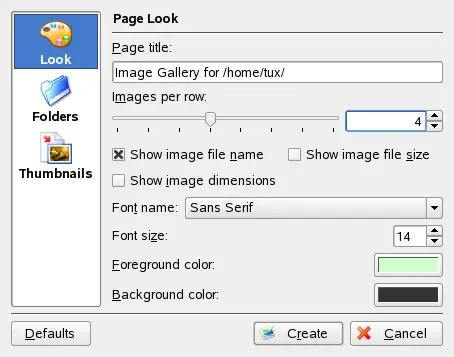
Apart from this functionality, you can also create
image galleries that show your images in an album-like fashion. Open
your image directory in Konqueror and click . A dialog opens where you can specify the background
and foreground colors, the page title, the location to save the
gallery, and other settings. Click to start
the action. By default, a file called
index.html is created. If you click this file
in Konqueror, your images are displayed in a miniaturized, organized
view. Click an image to access its full-size view.
For viewing your images, you can also use Gwenview. To start
Gwenview, press
F2
and enter gwenview. For further
information about Gwenview, see the Gwenview online help.
For downloading photographs from digital cameras, you can use
Digikam as described in Section 18.0,
Using Digital Cameras with Linux.
|
|
|