Follow Techotopia on Twitter

On-line Guides
All Guides
eBook Store
iOS / Android
Linux for Beginners
Office Productivity
Linux Installation
Linux Security
Linux Utilities
Linux Virtualization
Linux Kernel
System/Network Admin
Programming
Scripting Languages
Development Tools
Web Development
GUI Toolkits/Desktop
Databases
Mail Systems
openSolaris
Eclipse Documentation
Techotopia.com
Virtuatopia.com
Answertopia.com

How To Guides
Virtualization
General System Admin
Linux Security
Linux Filesystems
Web Servers
Graphics & Desktop
PC Hardware
Windows
Problem Solutions
Privacy Policy


Red Hat Enterprise Linux 9 Essentials Book now available.

Purchase a copy of Red Hat Enterprise Linux 9 (RHEL 9) Essentials

Red Hat Enterprise Linux 9 Essentials Print and eBook (PDF) editions contain 34 chapters and 298 pages

Preview Book

34.3. Create User

Create a user account for yourself with this screen. Always use this account to log in to your Red Hat Enterprise Linux system, rather than using the root account.
Firstboot create user screen
Figure 34.9. Firstboot create user screen

Enter a user name and your full name, and then enter your chosen password. Type your password once more in the Confirm Password box to ensure that it is correct.
To configure Red Hat Enterprise Linux to use network services for authentication of user information, click Use Network Login. Refer to Section 34.3.1, “Authentication Configuration” for further details.

Important — Create at least one user account

If you do not create at least one user account in this step, you will not be able to log in to the Red Hat Enterprise Linux graphical environment. If you skipped this step during installation, refer to Section 10.4.2, “Booting into a Graphical Environment”.

Note — Creating Extra User Accounts

To add additional user accounts to your system after the installation is complete, choose SystemAdministrationUsers & Groups.

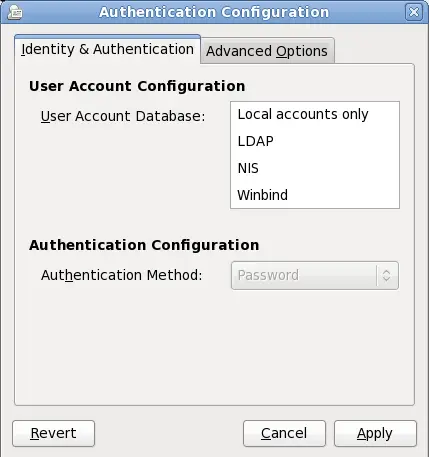
34.3.1. Authentication Configuration

If you clicked Use Network Login on the Create User screen, you must now specify how users are to be authenticated on the system. Use the drop-down menu to select from the following types of user database:
  • Local accounts only (for use when the user database on the network is not accessible)
  • LDAP (Lightweight Directory Access Protocol)
  • NIS (Network Information Service)
  • Winbind (for use with Microsoft Active Directory)
Firstboot Authentication Configuration screen
Figure 34.10. Firstboot Authentication Configuration screen

When you select the type of user database appropriate for your network, you must provide additional details relevant to that database type. For example, if you select LDAP, you must specify the base distinguished name for LDAP searches, and the address of the LDAP server. You must also select an Authentication Method relevant to the type of user database that you chose, for example, a Kerberos password, LDAP password, or NIS password.
The Advanced Options tab lets you enable other authentication mechanisms, including fingerprint readers, smart cards, and local access control in /etc/security/access.conf.
Firstboot authentication Advanced Options screen
Figure 34.11. Firstboot authentication Advanced Options screen


  Published under the terms of the Creative Commons License Design by Interspire