| |
|
|
Red Hat Enterprise Linux 9 Essentials Book now available.
Purchase a copy of Red Hat Enterprise Linux 9 (RHEL 9) Essentials Red Hat Enterprise Linux 9 Essentials Print and eBook (PDF) editions contain 34 chapters and 298 pages
|
Chapter 24. The kdump Crash Recovery Service
kdump is an advanced crash dumping mechanism. When enabled, the system is booted from the context of another kernel. This second kernel reserves a small amount of memory, and its only purpose is to capture the core dump image in case the system crashes. Since being able to analyze the core dump helps significantly to determine the exact cause of the system failure, it is strongly recommended to have this feature enabled.
This chapter explains how to configure, test, and use the kdump service in Red Hat Enterprise Linux, and provides a brief overview of how to analyze the resulting core dump using the crash debugging utility.
24.1. Configuring the kdump Service
This section covers three common means of configuring the kdump service: at the first boot, using the Kernel Dump Configuration graphical utility, and doing so manually on the command line. It also describes how to test the configuration to verify that everything works as expected.
To use the kdump service, you must have the kexec-tools package installed. Refer to Section 1.2.2, “Installing” for more information on how to install new packages in Red Hat Enterprise Linux.
24.1.1. Configuring the kdump at First Boot
When the system boots for the first time, the firstboot application is launched to guide a user through the initial configuration of the freshly installed system. To configure kdump, navigate to the Kdump section, and follow the instructions below.
Unless the system has enough memory, this option will not be available. For the information on minimum memory requirements, refer to the Required minimums section of the Red Hat Enterprise Linux comparison chart. Note that when the kdump crash recovery is enabled, the minimum memory requirements increase by the amount of memory reserved for it. This value is determined by a user, and defaults to 128 MB.
24.1.1.1. Enabling the Service
To start the kdump daemon at boot time, select the Enable kdump? check box. This will enable the service for runlevels 2, 3, 4, and 5, and start it for the current session. Similarly, unselecting the check box will disable it for all runlevels and stop the service immediately.
24.1.1.2. Configuring the Memory Usage
To configure the amount of memory that is reserved for the kdump kernel, click the up and down arrow buttons next to the Kdump Memory field to increase or decrease the value. Notice that the Usable System Memory field changes accordingly showing you the remaining memory that will be available to the system.
24.1.2. Using the Kernel Dump Configuration Utility
To start the Kernel Dump Configuration utility, select → → from the panel, or type system-config-kdump at a shell prompt (for example, xterm or GNOME Terminal). You will be presented with a window as shown in Figure 24.1, “Basic Settings”. The utility allows you to configure kdump as well as to enable or disable starting the service at boot time. When you are done, click Apply to save the changes. The system reboot will be requested, and unless you are already authenticated, you will be prompted to enter the superuser password.
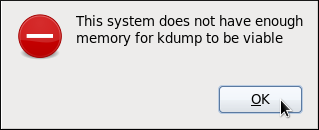
Unless the system has enough memory, the utility will not start, and you will be presented with the following error message:
For the information on minimum memory requirements, refer to the Required minimums section of the Red Hat Enterprise Linux comparison chart. Note that when the kdump crash recovery is enabled, the minimum memory requirements increase by the amount of memory reserved for it. This value is determined by a user, and defaults to 128 MB.
24.1.2.1. Enabling the Service
To start the kdump daemon at boot time, click the Apply button on the toolbar. This will enable the service for runlevels 2, 3, 4, and 5, and start it for the current session. Similarly, clicking the Disable button will disable it for all runlevels and stop the service immediately.
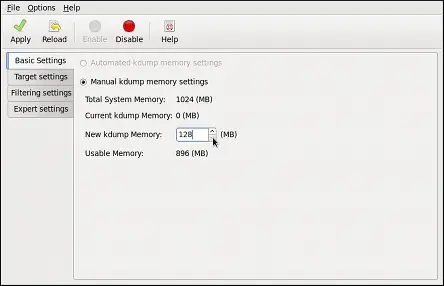
24.1.2.2. The Basic Settings Tab
The Basic Settings tab enables you to configure the amount of memory that is reserved for the kdump kernel. To do so, select the Manual kdump memory settings radio button, and click the up and down arrow buttons next to the New kdump Memory field to increase or decrease the value. Notice that the Usable Memory field changes accordingly showing you the remaining memory that will be available to the system.
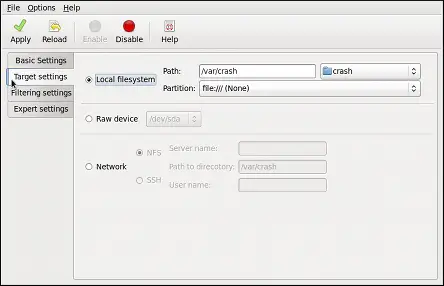
24.1.2.3. The Target Settings Tab
The Target Settings tab enables you to specify the target location for the vmcore dump. It can be either stored as a file in a local file system, written directly to a device, or sent over a network using the NFS (Network File System) or SSH (Secure Shell) protocol.
To save the dump to the local file system, select the Local filesystem radio button. Optionally, you can customize the settings by choosing a different partition from the Partition, and a target directory from the Path pulldown lists.
To write the dump directly to a device, select the Raw device radio button, and choose the desired target device from the pulldown list next to it.
To store the dump to a remote machine, select the Network radio button. To use the NFS protocol, select the NFS radio button, and fill the Server name and Path to directory fields. To use the SSH protocol, select the SSH radio button, and fill the Server name, Path to directory, and User name fields with the remote server address, target directory, and a valid remote user name respectively.
Refer to Chapter 9, OpenSSH for information on how to configure an SSH server, and how to set up a key-based authentication.
Due to known issue with the hpsa driver, kdump is unable to save the dump to a storage that uses this driver for HP Smart Array Controllers. If this applies to your machine, it is advised that you save the dump to a remote system using the NFS or SSH protocol instead.
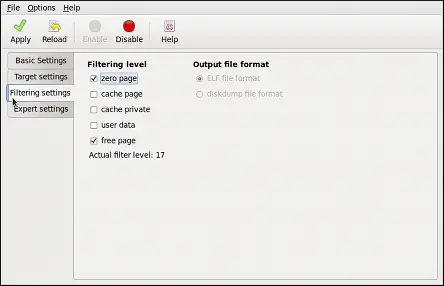
24.1.2.4. The Filtering Settings Tab
The Filtering Settings tab enables you to select the filtering level for the vmcore dump.
To exclude the zero page, cache page, cache private, user data, or free page from the dump, select the check box next to the appropriate label.
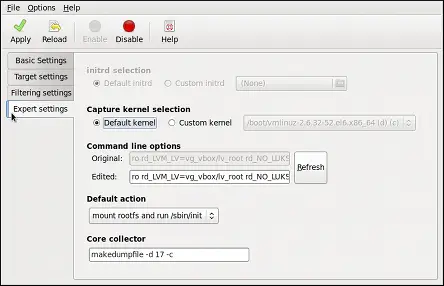
24.1.2.5. The Expert Settings Tab
The Expert Settings tab enables you to choose which kernel and initial RAM disk to use, as well as to customize the options that are passed to the kernel and the core collector program.
To use a different initial RAM disk, select the Custom initrd radio button, and choose the desired RAM disk from the pulldown list next to it.
To capture a different kernel, select the Custom kernel radio button, and choose the desired kernel image from the pulldown list on the right.
To adjust the list of options that are passed to the kernel at boot time, edit the content of the Edited text field. Note that you can always revert your changes by clicking the Refresh button.
To choose what steps should be taken when the kernel crash is captured, select the appropriate option from the Default action pulldown list. Available options are (the default action), (to reboot the system), (to present a user with an interactive shell prompt), (to halt the system), and (to power the system off).
24.1.3. Configuring kdump on the Command Line
To perform actions described in this section, you have to be logged in as a superuser:
~]$ su -
Password:
24.1.3.1. Configuring the Memory Usage
To configure the amount of memory that is reserved for the kdump kernel, open the /boot/grub/grub.conf file in a text editor such as vi or nano, and add the crashkernel=<size>M parameter to the list of kernel options as shown in Example 24.1, “A sample /boot/grub/grub.conf file”.
Example 24.1. A sample /boot/grub/grub.conf file
# grub.conf generated by anaconda
#
# Note that you do not have to rerun grub after making changes to this file
# NOTICE:  You have a /boot partition.  This means that
#          all kernel and initrd paths are relative to /boot/, eg.
#          root (hd0,0)
#          kernel /vmlinuz-version ro root=/dev/sda3
#          initrd /initrd
#boot=/dev/sda
default=0
timeout=5
splashimage=(hd0,0)/grub/splash.xpm.gz
hiddenmenu
title Red Hat Enterprise Linux (2.6.32-54.el6.i686)
        root (hd0,0)
        kernel /boot/vmlinuz-2.6.32-54.el6.i686 root=/dev/sda3 ro crashkernel=128M
        initrd /initramfs-2.6.32-54.el6.i686.img
When the kdump crash recovery is enabled, the minimum memory requirements increase by the amount of memory reserved for it. This value is determined by a user, and defaults to 128 MB, as lower values proved to be unreliable. For more information on minimum memory requirements for Red Hat Enterprise Linux 6, refer to the Required minimums section of the Red Hat Enterprise Linux comparison chart.
24.1.3.2. Configuring the Target Type
When a kernel crash is captured, the core dump can be either stored as a file in a local file system, written directly to a device, or sent over a network using the NFS (Network File System) or SSH (Secure Shell) protocol. Note that only one of these options can be set at the moment. The default option is to store the vmcore file in the /var/crash/ directory of the local file system. To change this, open the /etc/kdump.conf configuration file in a text editor such as vi or nano, and edit the options as described below.
To change the local directory in which the core dump is to be saved, remove the hash sign (“#”) from the beginning of the #path /var/crash line, and replace the value with a desired directory path. Optionally, if you wish to write the file to a different partition, follow the same procedure with the #ext4 /dev/sda3 line as well, and change both the file system type and the device (a device name, a file system label, and UUID are all supported) accordingly. For example:
ext3 /dev/sda4
path /usr/local/cores
To write the dump directly to a device, remove the hash sign (“#”) from the beginning of the #raw /dev/sda5 line, and replace the value with a desired device name. For example:
raw /dev/sdb1
To store the dump to a remote machine using the NFS protocol, remove the hash sign (“#”) from the beginning of the #net my.server.com:/export/tmp line, and replace the value with a valid hostname and directory path. For example:
net penguin.example.com:/export/cores
To store the dump to a remote machine using the SSH protocol, remove the hash sign ( “#”) from the beginning of the #net [email protected] line, and replace the value with a valid username and hostname. For example: net [email protected]
Refer to Chapter 9, OpenSSH for information on how to configure an SSH server, and how to set up a key-based authentication.
Due to known issue with the hpsa driver, kdump is unable to save the dump to a storage that uses this driver for HP Smart Array Controllers. If this applies to your machine, it is advised that you save the dump to a remote system using the NFS or SSH protocol instead.
24.1.3.3. Configuring the Core Collector
To reduce the size of the vmcore dump file, kdump allows you to specify an external application (that is, a core collector) to compress the data, and optionally leave out all irrelevant information. Currently, the only fully supported core collector is makedumpfile.
To enable the core collector, open the /etc/kdump.conf configuration file in a text editor such as vi or nano, remove the hash sign (“#”) from the beginning of the #core_collector makedumpfile -c --message-level 1 -d 31 line, and edit the command line options as described below.
To enable the dump file compression, add the -c parameter. For example:
core_collector makedumpfile -c
To remove certain pages from the dump, add the -d value parameter, where value is a sum of values of pages you want to omit as described in Table 24.1, “Supported filtering levels”. For example, to remove both zero and free pages, use the following: core_collector makedumpfile -d 17 -c
Refer to the manual page for makedumpfile for a complete list of available options.
Table 24.1. Supported filtering levels
| Option |
Description |
1 |
Zero pages |
2 |
Cache pages |
4 |
Cache private |
8 |
User pages |
16 |
Free pages |
24.1.3.4. Changing the Default Action
By default, when the kernel crash is captured, the root file system is mounted, and /sbin/init is run. To change this behavior, open the /etc/kdump.conf configuration file in a text editor such as vi or nano, remove the hash sign ( “#”) from the beginning of the #default shell line, and replace the value with a desired action as described in Table 24.2, “Supported actions”. For example: default halt
Table 24.2. Supported actions
| Option |
Description |
reboot |
Reboot the system, losing the core in the process. |
halt |
After attempting to capture a core, halt the system no matter if it succeeded. |
poweroff |
Power off the system. |
shell |
Run the msh session from within the initramfs, allowing a user to record the core manually. |
24.1.3.5. Enabling the Service
To start the kdump daemon at boot time, type the following at a shell prompt:
~]# chkconfig kdump on
This will enable the service for runlevels 2, 3, 4, and 5. Similarly, typing chkconfig kdump off will disable it for all runlevels. To start the service in the current session, use the following command:
~]# service kdump start
No kdump initial ramdisk found.                            [WARNING]
Rebuilding /boot/initrd-2.6.32-54.el6.i686kdump.img
Starting kdump:                                            [  OK  ]
24.1.4. Testing the Configuration
The commands below will cause the kernel to crash. Use caution when following these steps, and by no means use them on a production machine.
To test the configuration, reboot the system with kdump enabled, and make sure that the service is running (refer to Section 7.3, “Running the Services” for more information on how to run a service in Red Hat Enterprise Linux): ~]# service kdump status
Kdump is operational
Then type the following commands at a shell prompt:
~]# echo 1 > /proc/sys/kernel/sysrq
~]# echo c > /proc/sysrq-trigger
This will force the Linux kernel to crash, and the address-YYYY-MM-DD-HH:MM:SS/vmcore/var/crash/ by default).
Example 24.2. Listing a content of /var/crash/ after a crash
~]# tree --charset=ascii /var/crash
/var/crash
`-- 127.0.0.1-2010-08-25-08:45:02
    `-- vmcore

1 directory, 1 file
|
|