|
 |
|
| |
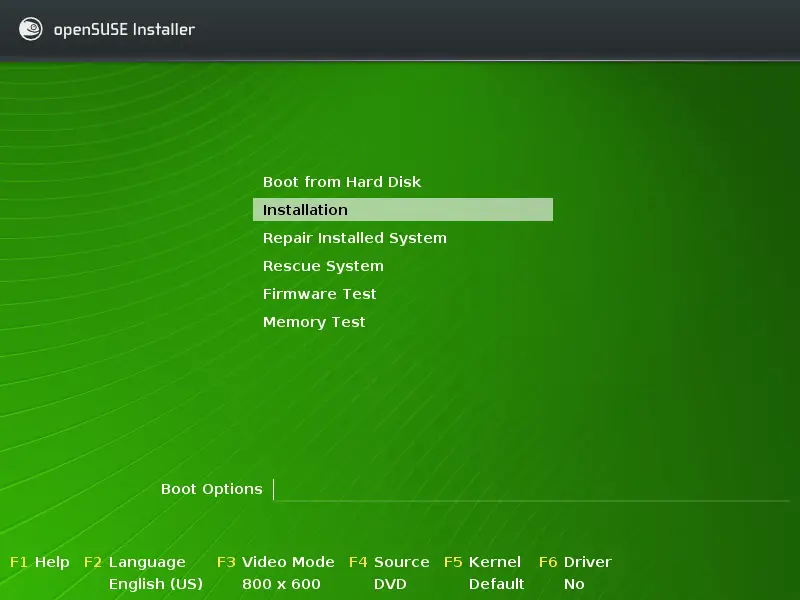
1.5 The Boot Screen
The boot screen displays a number of options for the installation
procedure. boots the installed
system and is selected default, because the CD is often left in the
drive. Select one of the other options with the arrow keys and press
Enter to boot it. The relevant options are:
-
-
The normal installation mode. All modern hardware functions are
enabled. In case the installation fails, see
for boot options that
disable potentially problematic functions.
-
-
Boots into the graphical repair system. More information on repairing
an installed system is available in
Section 13.6.3, Recovering a Corrupted System. This option is not
available when installing from CD.
-
-
Starts a minimal Linux system without a graphical user interface. For
more information, see
Using the Rescue System.
-
-
This option is only available when you install from media created from
downloaded ISOs. In this case it is recommended to check the integrity
of the installation medium. This option starts the installation system
before automatically checking the media. In case the check was
successful, the normal installation routine starts. If a corrupt media
is detected, the installation routine aborts.
-
-
Starts a BIOS checker that validates ACPI and other parts of your
BIOS. This option is not available with the CD-KDE and CD-GNOME media.
-
-
Tests your system RAM using repeated read and write cycles. Terminate
the test by rebooting. For more information, see
Section 13.2.5, Fails to Boot. This option is not
available with the CD-KDE and CD-GNOME media.
Use the function keys indicated in the bar at the bottom of the screen to
change the language, screen resolution, installation source or to add
additional driver from your hardware vendor:
- F1
-
Get context-sensitive help for the active element of the boot screen.
Use the arrow keys to navigate, Enter to follow a
link, and Esc to leave the help screen.
- F2
-
Select the display language and a corresponding keyboard layout for
the installation. The default language is English (US).
- F3
-
Select various graphical display modes for the installation. Select
if the graphical installation causes
problems.
- F4
-
Normally, the installation is performed from the inserted installation
medium. Here, select other sources, like FTP or NFS servers. If the
installation is carried out in a network with an SLP server, select
one of the installation sources available on the server with this
option. Find information about SLP in Section 21.0, SLP Services in the Network, (↑ Reference ).
- F5
-
In case you encounter problems with the regular installation, this
menu offers to disable a few potentially problematic functions. If
your hardware does not support ACPI (advanced configuration and power
interface) select to install without ACPI
support. disables support for APIC
(Advanced Programmable Interrupt Controllers) which may cause problems
with some hardware. boots the system
with the DMA mode (for CD/DVD-ROM drives) and power management
functions disabled.
If you are not sure, try the following options first:
or
. Experts can also
use the command line () to enter or
change kernel parameters.
- F6
-
Press this key to tell the system that you have an optional driver
update for openSUSE. With or
, load drivers directly before the installation
starts. If you select , you are prompted to
insert the update disk at the appropriate point in the installation
process.
- F7
-
If you install from an installation medium supporting 32bit and 64bit
architectures and have an AMD or Intel processor with 64-bit support,
select whether to install a 64-bit or 32-bit system. By default, a
64-bit system is installed on a computer with 64-bit support. To
install a 32-bit system, press F7 then select
.
After starting the installation, openSUSE loads and configures a
minimal Linux system to run the installation procedure. To view the boot
messages and copyright notices during this process, press
Esc. On completion of this process, the YaST
installation program starts and displays the graphical installer.
HINT: Installation without a Mouse
If the installer does not detect your mouse correctly, use
Tab for navigation, arrow keys to scroll, and
Enter to confirm a selection. Various buttons or
selection fields contain a letter with an underscore. Use
Alt+Letter
to select a button or a selection directly instead of navigating there
with Tab.
|
|
|