Using outline-numbering styles
Outline numbering (sometimes called multi-level numbering) is a numbered list with indented numbered sections. Rather than just a list of numbered items (1,2,3...), an outline-numbered list may have item 1, then indented items numbered 1,2,3; or i,ii,iii; or some other numbering method before the main number 2.
With outline-numbering styles you can achieve any combination of numbering formats you want. To set up outline numbering styles assigned to paragraph styles, follow the procedure for ordinary numbered lists but use the Outline tab.
|
TIP
|
The selections under Tools > Outline Numbering may be sufficient; you may not need to use outline-numbering styles.
|
You can modify the predefined style, or define a new style. This example uses one of the supplied styles, Numbering 1.
As an example, we will use outline-numbering to produce the following effect:
I. Level-1 list item
A. Level-2 list item
i. Level-3 list item
a) Level-4 list item
Instructions:
-
In the Styles and Formatting window, choose Numbering Styles and select a style such as Numbering 1. Right-click on the style and select Modify.
-
On the Numbering Style dialog box, go to the Outline page (Figure 219), where you will find that one style matches our requirements. Click once on that style.

-
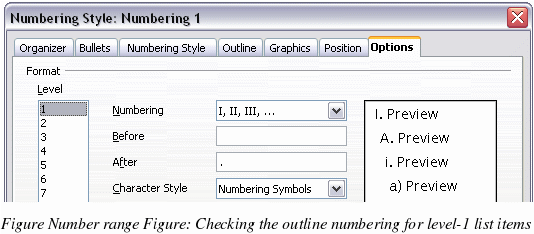
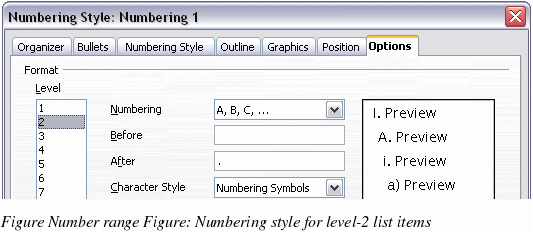
To modify the layout of the list, use the Options tab (Figures 220 and 221). Notice that the preview on the right shows the outline selected. In the Level box on the left, select 1, then 2, 3, and 4 and see how the information in the Numbering and After boxes changes.
Use the Options page to set different punctuation; for example, a period (full stop) after “a†on level 4 instead of a parenthesis.
-
To make the indentation at each level greater or less than the default, change it on the Position page (Figure 217). Select the heading level, then make any changes in the indentation, spacing, or numbering alignment.
-
Repeat for each heading level as required, then click OK to save the style.
|
TIP
|
With outline numbering you can define different bullet styles for the different levels of a bullet list. Use the Bullets tab of the Numbering Style dialog box (not shown) to select the basic style. Return to the Options tab to customize the bullet for each indent level. Here you can set bullets to any character. See the Graphics tab for more bullets.
|


