|
 |
|
| |
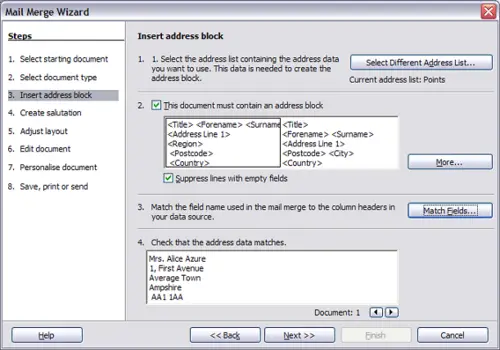
Step 3: Insert address block
This is the most complex step in the wizard. In this step you will do three things:
- Tell the wizard which data source to use. The data source must be an existing file; in this example it is the "Points" spreadsheet created earlier.
- Select the address block to use in the document. This means choosing which fields appear (for example, whether the country is included) and how they look.
- Make sure that the fields all match correctly. This is very important. For example, the wizard has a field called <Last Name>. If your spreadsheet has a column called "Surname", you need to tell the wizard that <Last Name> and “Surname” are the same thing. This is described in
Matching the fields.
-
 Insert address block.
Selecting the data source (address list)
- If the current address list (identified beneath the Select Different Address List... button in section 1) is not the one you wish to use, click the button to open the Select Address List dialog for choosing a data source.
- If you have not already created the address list, you may click Create to do so now. This step allows you to create a CSV (Comma Separated Values) file with a new list of address records. If you already have an address list, as we have in the "Points" spreadsheet example, click Add and select the file in which it resides. In each of the above cases a new data source will be created and registered.
- Select the address list and click OK to return to step 3 of the wizard. For this example, the preceding steps are all you need to do. The wizard can also exclude certain records; click Filter to choose them.
-
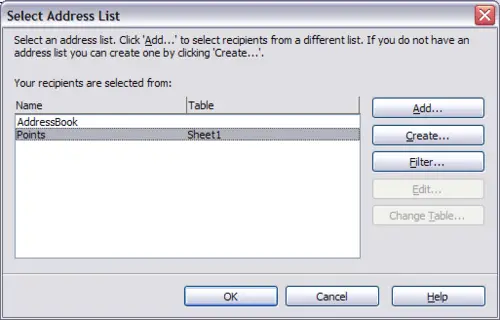 Select address list dialog.
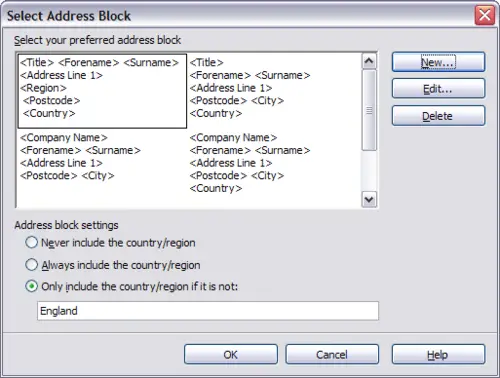
Selecting the address block
- In step 3 of the wizard (shown in
Step 3: Insert address block), look at section 2. This is where you select the address block to appear on the letter, and define its appearance and the fields it contains. The main page gives two examples. If neither of those is exactly what you want, click More to see more choices, in the Select Address Block dialog box (shown below).
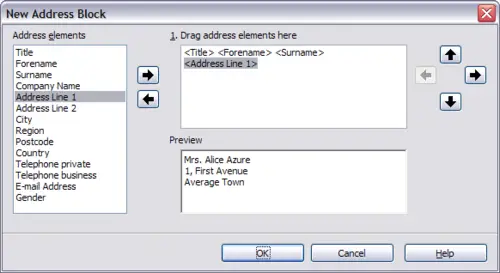
- The Select Address Block dialog box offers six choices for the format of the addresss block (scroll down to see the last two choices). You can also optionally include or exclude the country (for example, only include the country if it is not USA). The six formats provided are relatively common, but they might not exactly match your preference. If this is the case, select the address block that is closest to what you want and click Edit, which opens the New Address Block dialog box.
 Select address block. - In the New Address Block dialog, you can add or delete address elements using the arrow buttons on the left. To move elements around, use the arrow buttons on the right. For example, to add an extra space between first and last names, click <Last Name> and then click the right arrow button.
 New address block.
Matching the fields
Finally, it is time to match the wizard’s fields with the spreadsheet fields, so that items like <Last Name> and “Surname” match correctly.
- Look at section 3 of step 3 of the wizard. The box at the bottom displays one record at a time, using the address block format you selected. Use the right and left arrow buttons below that address box to step through the addresses, checking that they display correctly. Do not assume that all the records display correctly, just because one or two do. Check them all if you can, or at least a good proportion.
- If the addresses do not display correctly (and they probably will not right away), click Match Fields. The Match Fields dialog box opens.
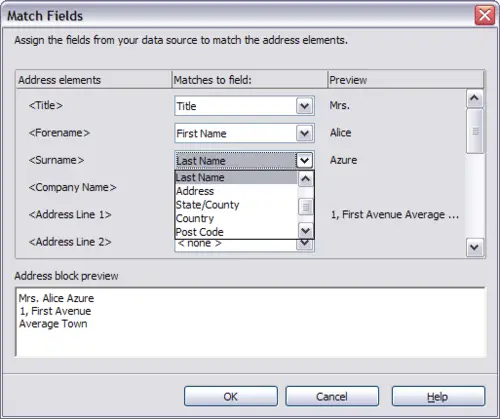 Match fields dialog box. The Match Fields dialog box has three columns.
- Address Elements are the terms the wizard uses for each field, such as <First Name> and <Last Name>.
- The Matches to Field column allows you to select, for each address element, the field from your data source that matches it.
- The Preview column shows what will be shown for this field from the selected address block, so you can double-check that the match is correct.
- When you have matched all the fields, click OK to return to step 3 of the wizard. Now, when you use the arrow buttons to look at all the addresses, they should all look correct. If not, go back and change anything you’re not happy with, before clicking Next to move to step 4. Note that you will not be able to continue until you have correctly matched all the fields in your chosen address block. If you see <not available> in a field position it indicates that the field in question is not correctly matched.
|
|
|


