Modifying the Appearance of Files and Folders
The Nautilus file manager enables you to modify the appearance of your files and folders in several ways. You may customize the way files or folders look by attaching emblems or backgrounds to them. You can also change format in which Nautilus displays these items to you. The following sections describe how to do so.
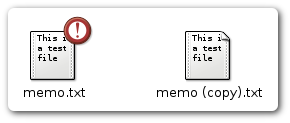
The file manager displays your files and folders as icons. Depending on the type of the file the icon may be a image representative of the file type, a small thumbnail or preview showing the files contents. You can also add emblems to your file and folder icons. Such emblems appear in addition to the file icon and provide another means to manage your files. For example you can mark a file as important by adding an Important emblem to it, creating the following visual effect:
Notice how the file on the left is distinguished from the file on the right by the addition of the Important (!) emblem to its icon. See the section called “Adding an Emblem to a File or Folder” for more on adding emblems.
The file manager automatically applies emblems for the following types of files:
The following table shows the default emblems:
Changing the Icon for a File or Folder
To change the icon that represents an
individual file or folder, perform the following steps:
Select the file or folder that you want to change.
Choose ->. The properties window for the is displayed.
On the Basic tabbed section, click on
the current Icon. A Select custom
icon dialog is displayed.
Use the Select custom icon dialog to choose
the icon to represent the file or folder.
Click Close to close the properties
dialog.
To restore an icon from a custom icon to the default icon,
Select the file or folder that you want to change, choose ->.
click on the Icon button, in the Select custom
icon dialog click Revert.
Adding an Emblem to a File or Folder
To add an emblem to an item perform the following
steps:
Select the item to which you want to add an emblem.
Right-click on the item, then choose . The properties window for the item is displayed.
Click on the Emblems tab to display the Emblems tabbed section.
Select the emblem to add to the item.
Click Close to close the properties
dialog.
In browser windows you may also add emblems to items by dragging them from the emblem side pane.
To Create a new emblem, perform the following steps:
Choose ->.
Click on the Emblem button, then click
on the Add a New Emblem button. A Create
a New Emblem dialog is displayed.
Type a name for the emblem in the Keyword
text box.
Click on the Image button. A dialog is
displayed, click Browse. When you choose an emblem,
click OK.
Click OK on the Create a
New Emblem dialog.
The file manager includes
backgrounds that you can use to change the look-and-feel of the following
screen components:
To change the background of a screen component perform the following
steps:
Choose ->. The Backgrounds
and Emblems dialog is displayed.
To display a list of patterns that you can use on the background,
click on the Patterns button. To display a list of
the colors that you can use on the background, click on the Colors button.
To change the background to a pattern, drag the pattern to
the screen component. To change the background to a color, drag the color
to the screen component.
Click Close to close the dialog.
To reset the background of the view pane or side pane to the default
background, right-click on the background of the pane, then choose .
To add a pattern to the patterns that you can use on your
screen components, choose ->. Click on the Patterns button, then click on the Add a New Pattern button. A dialog is displayed. Use the dialog to find the new
pattern. Click OK to add the new pattern to the Backgrounds and Emblems dialog.
To add a color to the colors that you can use on your screen
components, choose ->. Click on the Colors button, then click on the Add a New Color
button. A color selector dialog is displayed. Use the color wheel or the sliders
to choose the color. Click OK to add the new color
to the Backgrounds and Emblems dialog.