You can find this filter from the image menu
Filters->M->Displace
This filter uses a 'displace-map' to displace corresponding pixels of
the image. This filter displaces the content of the specified drawable
(active layer or selection) by the amounts specified in X and Y
Displacement multiplied by the intensity of the corresponding pixel in
the 'displace map' drawables. Both X and Y
displace maps must be gray-scale images and have the same size as the
drawable . This filter allows interesting distortion effects.
12.3.2.
Options
Preview
Uncheck this option if your processor is slow.
X/Y Displacements
When you select one or both options, active layer pixels
corresponding to pixels different from 128 in displacement map,
will be displaced horizontally (X) or/and vertically (Y).
Why 128 ? Because map, that must be grey-level, has 256 gray
levels: 128 intensity corresponds to medium gray
(R128, V128, B128). Filter displaces image pixels,
corresponding to pixels higher than 128 in
map, to the left for X and upwards for Y. Likewise, filter
displaces image pixels, corresponding to pixels lesser
then 128 in map, to the right for X and downwards for
Y.
Input boxes
“X/Y Displacement” should be called
X/Y Displacement Coefficient. What you
enter in input boxes, directly or by using arrow-head buttons,
is not the actual displacement. This coefficient is used in
a displacement = (intensity x coefficient)
/128 formula which gives the pixel actual
displacement according to the intensity of the corresponding
pixel in map, modulated by the coefficient you enter.
Introducing intensity into formula is important: this allows
progressive displacement by using a gradient map.
This value varies in limits equal to image dimensions double.
That corresponds to maximum displacement, from an image edge
to the other.
This value may be positive or negative. A negative
displacement is reverse of a positive one.
To complicate stuff, intensity used in formula is not
directly pixel intensity. Actual intensity is plotted on a
-128 +128 scale, where 0 corresponds to null displacement as
we have seen higher. Transformation is done by subtracting
128 from the pixel intensity and adding +1. So, in previous
example, 75 associated to a white pixel (value 255 reported
to 255-128+1= 128) gives a (128*75)/128=75 pixels
displacement. And a black (0) pixel gives a -75 pixels
displacement.
Selecting displacement maps
When you click on the drop-down list button, a list appears
where you can select a displacement map. To be present in this
list, an image must respect two conditions. First, this image
must be present on your screen when you call filter. Then, this
image must have the same dimensions as the original image. Most
often, it will be a duplicate original image, which is
transformed to grey scale and modified appropriately,with a
gradient. It may be possible to use RGB images, but color
luminosity is used making result prevision difficult. Map may
be different in horizontal and vertical directions.
Map gradient must be horizontal for a vertical displacement,
and vertical for a horizontal displacement.
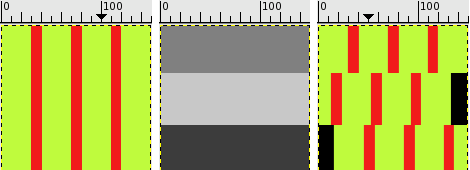
Figure 11.156.
Displacement examples
X displacement coefficient is 30 (with a negative
coefficient displacement would be inverse). Vacated pixels
are black. Displacement map has three grey stripes, from top
to bottom: medium gray (128), light gray 200), dark gray
(60).
You can see that the image area corresponding to medium gray
in map was not displaced. The image area corresponding to
light gray (>128) was displaced 17 pixels to the left.
The image area corresponding to dark gray (<128) was
displaced -15 pixels, to the right.
On Edges
These options allow you to set displacement behaviour on active
layer or selection edges:
Wrap:
With this option, what disappears on one edge reappears on the
opposite edge.
Smear:
With this option, pixels vacated by displacement are replaced
with pixels stretched from the adjacent part of the image.
Black:
With this option, pixels vacated by deplacement are replaced
with black.
12.3.3.
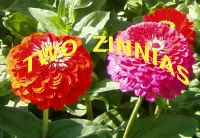
Using gradient to bend a text
Follow following steps:
Start with opening your image.
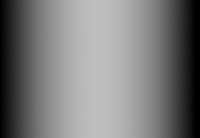
Duplicate this image. Activate this duplicate and make it
gray-scaled (<IMAGE>/Image/Mode/GrayScale). Fill it with
the wanted gradient. This image will be your
Displacement map, with the dimensions of
original image.
Activate original image. Create a Text Layer
with your text. Set layer to image size: right-click on the layer
in layer dialog and, in the pop-menu, click on “Layer to
image size”. Note that letters in text layer lie on
transparent background; now this filter doesn't displace
transparent pixels. Only letters will be displaced.
Activate text layer. Open Displace filter window. Set parameters
particularly displacement coefficient according to the result in
Preview. OK.
This method also applies to standard layers:
Note
To get the wanted gradient, first draw a black to white gradient.
Then use the Curves tool to
modify the gradient curve.
Published under the terms of the GNU General Public License


![[Note]](../images/note.png)

