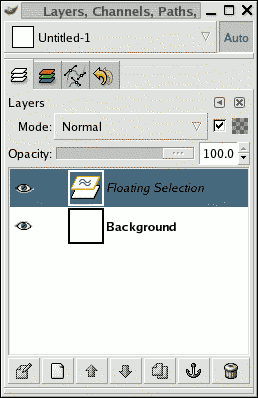
Figure 3.1.
Layers dialog showing a floating selection.
How to tell:
If there is a floating selection, many actions are impossible
until it is anchored. To check, look at the Layers dialog (making
sure it's set to the image you're working on) and see whether the
top layer is called “Floating Selection”.
How to solve:
Either anchor the floating selection, or convert it into an
ordinary (non-floating) layer. If you need help on how to do this,
see
Floating Selections
.
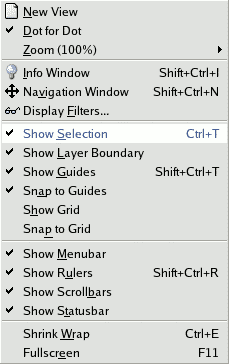
The selection is hidden
Figure 3.2.
Unstuck show selection menu
In the View menu, make sure that "Show Selection" is checked.
How to tell:
If this is the problem, merely reading this will already have made
you realize it, probably, but to explain in any case: sometimes
the flickering line that outlines the selection is annoying
because it makes it hard to see important details of the image, so
GIMP gives you the option of hiding the selection, by unchecking
Show Selection
in the View
menu. It is easy to forget that you have done this, though.
How to fix: If this
hasn't rung any bells, it isn't the problem, and if it has,
you probably know how to fix it, because it doesn't happen
unless you explicitly tell it to; but anyway: just go to
the View menu for the image and, if
Show Selection is
unchecked, click on it..
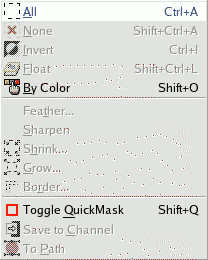
You are acting outside of the selection
Figure 3.3.
Unstuck select all
Click “All”
in the Select menu to make sure that everything is selected.
How to fix:
If doing this has destroyed a selection that you wanted to keep,
hit Ctrl-Z (undo) a couple of times to restore it, and then we'll
figure out what the problem is. There are a couple of
possibilities. If you couldn't see any selection, there may have
been a very tiny one, or even one that contained no pixels. If
this was the case, it surely is not a selection that you wanted to
keep, so why have you gotten this far in the first place? If you
can see a selection but thought you were inside it, it might be
inverted from what you think. The easiest way to tell is to hit
the Quick Mask button: the selected area will be clear and the
unselected area will be masked. If this was the problem, then you
can solve it by toggling Quick Mask off and choosing Invert in the
Select menu.
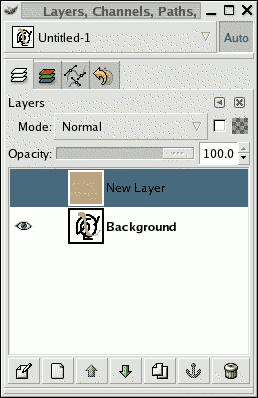
The active drawable is not visible
Figure 3.4.
Unstuck layer invisibility
Layers dialog with visibility off for the active layer.
How to tell:
The Layers dialog gives you ability to toggle the visibility of
each layer on or off. Look at the Layers dialog, and see whether
the layer you are trying to act on is active (i.e., darkened) and
has an eye symbol to the left of it. If not, this is your problem.
How to fix:
If your intended target layer is not active, click on it in the
Layers dialog to activate it. (If none of the layers there is
active, the active drawable might be a channel -- you can look at
the Channels tab in the Layers dialog to see. This does not change
the solution, though.) If the eye symbol does not appear, click in
the Layers dialog at the left edge to toggle it: this should make
the layer visible. See the Help section for the
Layers Dialog
if you need more help.
The active drawable is transparent
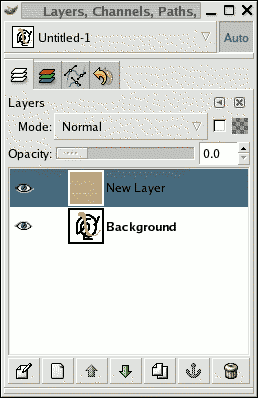
Figure 3.5.
Unstuck layer transparency
Layers dialog with opacity set to zero for the active layer.
How to fix: Move the
slider.
You are trying to act outside the layer
How to tell:
In GIMP, layers don't need to have the same dimensions as the
image: they can be larger or smaller. If you try to paint outside
the borders of a layer, nothing happens. To see if this is
happening, look for a black-and-yellow dashed rectangle that does
not enclose the area you're trying to draw at.
How to fix:
You need to enlarge the layer. There are two commands at the
bottom of the Layer menu that will let you do this: Layer to Image
Size, which sets the layer bounds to match the image borders; and
Layer Boundary Size, which brings up a dialog that allows you to
set the layer dimensions to whatever you please.
The image is in indexed color mode.
How to tell:GIMP can handle three different color
modes: RGB(A), Indexed
and Grayscale. The indexed colormode uses a colormap,
where all used colors on the image are indexed. The color pickerin
GIMP however, let you choose RGB colors.
That means, if you try to paint with a different color than
it is indexed in the colormap, you end up in very
undetermined results (e.g. it paints with the wrong color or
you can't paint).
How to fix: Always use the
RGB Color mode to paint on images. You can verify and select
another color mode from the Mode menuitem in the
Image menu.
Published under the terms of the GNU General Public License