A gradient
is a set of colors arranged in a linear order. The most basic use of
gradients is by the Blend tool,
sometimes known as the “gradient tool” or “gradient
fill tool”: it works
by filling the selection with colors from a gradient. You have many
options to choose from for controlling the way the gradient colors are
arranged within the selection. There are also other important ways to use
gradients, including:
-
Painting with a gradient
-
Each of GIMP's basic painting tools allows you the option of using
colors from a gradient. This enables you to create brushstrokes that
change color from one end to the other.
-
The Gradient Map filter
-
This filter is now in the Colors menu, and allows you to
“colorize”
an image, using the color intensity of each point with the
corresponding color from the active gradient (the intensity 0, very
dark, is replaced by the color at most left end of the gradient,
progressively until the intensity is 255, very light, replaced by
the most right color of the gradient. See
Section 8.23, “
Gradient Map
” for more information.
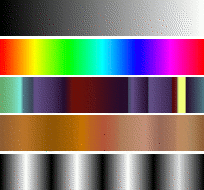
When you install GIMP, it comes presupplied with a large number of
interesting gradients, and you can add new ones that you create or
download from other sources. You can access the full set of available
gradients using the
Gradients dialog,
a dockable dialog that you can either activate when you need it, or keep
around as a tab in a dock. The “current gradient”, used in
most gradient-related operations, is shown in the Brush/Pattern/Gradient
area of the Toolbox. Clicking on the gradient symbol in the Toolbox is an
alternative way of bringing up the Gradients dialog.
Many quickly examples of working with gradient (for more information
see Blend Tool):
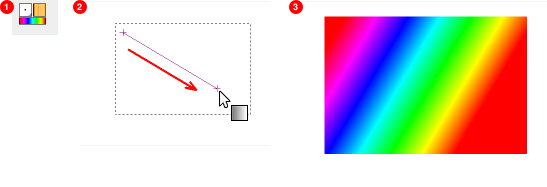
-
Put a gradient in a selection:
-
Choose a gradient.
-
With the Blend Tool click and drag with the mouse between
two points of a selection.
-
Colors will distributed perpendicularly to the direction
of the drag of the mouse and according to the length
of it.
-
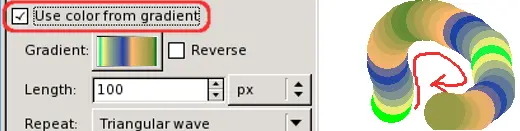
Use a gradient with a drawing tool:
You can also use a gradient with pencil, brush or airbrush tools
if you check Use color from gradient
In the example below the option is checked for a pencil tool. You
see in the drawing in the right side the succession of the colors
of the gradient (to infinity...).
-
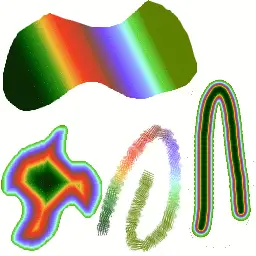
Different productions with the same gradient:
A few useful things to know about GIMP's gradients:
-
The first four gradients in the list are special: they use the
Foreground and Background colors from the Toolbox Color Area,
instead of being fixed. FG to BG (RGB) is the
RGB representation of the gradient from the Foreground color to the
Background color in Toolbox. FG to BG (HSV
counter-clockwise) represents the hue succession in
Color Circle from the selected hue to 360°. FG to BG
(HSV clockwise represents the hue succession in Color
Circle from the selected hue to 0°. With FG to transparent
, the selected hue becomes more and more transparent. You
can modify these colors by using the Color Selector. Thus, by
altering the foreground and background colors, you can make these
gradients transition smoothly between any two colors you want.
-
Gradients can involve not just color changes, but also changes in
opacity. Some of the gradients are completely opaque; others include
transparent or translucent parts. When you fill or paint with a
non-opaque gradient, the existing contents of the layer will show
through behind it.
-
You can create new custom gradients,
using the Gradient
Editor. You cannot modify the gradients that are
supplied with GIMP, but you can duplicate them or create new
ones, and then edit those.
The gradients that are supplied with GIMP are stored in a system
gradients folder. By default, gradients that
you create are stored in a folder called
gradients in your personal GIMP directory.
Any gradient files (ending with the extension
.ggr) found in one of these folders, will
automatically be loaded when you start GIMP. You can add more
directories to the gradient search path, if you want to, in the
Gradients tab of the Data
Folders pages of the Preferences dialog.
New in GIMP 2.2 is the ability to load gradient files in SVG format, used
by many vector graphics programs. To make GIMP load an SVG gradient file,
all you need to do is place it in the gradients
folder of your personal GIMP directory, or any other folder in your
gradient search path.
![[Tip]](images/tip.png)
|
Tip |
|
You can find a large number of interesting SVG gradients on the web, in
particular at OpenClipArt Gradients
[OPENCLIPART-GRADIENT].
You won't be able to see what these gradients look like unless your
browser supports SVG, but that won't prevent you from downloading them.
|