|
 |
|
| |
Creating a custom filtered items selection dialog
In this example, we will contribute a basic search dialog to illustrate the steps
needed to create a custom subclass of
FilteredItemsSelectionDialog.
-
Create a new Plug-in Project using Hello, world template.
-
Create a class extending org.eclipse.ui.dialogs.FilteredItemsSelectionDialog.
Let's name it FilteredResourcesSelectionDialogExample.
-
Choose a source of the resources that will be used during filtering. In our
example we will generate our own set of random strings as follows:
   private static ArrayList resources = new ArrayList();

   static {
      generateRescourcesTestCases('A', 'C', 8, ""); //$NON-NLS-1$
      generateRescourcesTestCases('a', 'c', 4, ""); //$NON-NLS-1$
   }

   private static void generateRescourcesTestCases(char startChar, char endChar, int length, String resource){
      for (char ch = startChar; ch <= endChar; ch++) {
         String res = resource + String.valueOf(ch);
         if (length == res.length())
            resources.add(res);
         else if ((res.trim().length() % 2) == 0)
            generateRescourcesTestCases(Character.toUpperCase((char)(startChar + 1)), Character.toUpperCase((char)(endChar + 1)), length, res);
         else
            generateRescourcesTestCases(Character.toLowerCase((char)(startChar + 1)), Character.toLowerCase((char)(endChar + 1)), length, res);
      }
   }
-
Now, let's implement abstract methods from the FilteredItemsSelectionDialog
class.
-
createExtendedContentArea(Composite): This method
creates an extra content area located above the details. For now,
we will just return null because we don't need any extra fields for this simple
example:
   protected Control createExtendedContentArea(Composite parent) {
      return null;
   }
-
createFilter(): Creates a new instance of a filter.
In the simplest implementation you should also extend
FilteredItemsSelectionDialog.ItemsFilter and implement the abstract
methods. Eg.:
   protected ItemsFilter createFilter() {
      return new ItemsFilter() {
         public boolean matchItem(Object item) {
            return matches(item.toString());
         }
         public boolean isConsistentItem(Object item) {
            return true;
         }
      };
   }
-
fillContentProvider(FilteredItemsSelectionDialog.AbstractContentProvider,
FilteredItemsSelectionDialog.ItemsFilter,
org.eclipse.core.runtime.IProgressMonitor): Fills the content provider
with matching items. Eg.:
   protected void fillContentProvider(AbstractContentProvider contentProvider,
      ItemsFilter itemsFilter, IProgressMonitor progressMonitor)
         throws CoreException {
      progressMonitor.beginTask("Searching", resources.size()); //$NON-NLS-1$
      for (Iterator iter = resources.iterator(); iter.hasNext();) {
         contentProvider.add(iter.next(), itemsFilter);
         progressMonitor.worked(1);
      }
      progressMonitor.done();
   }
-
getDialogSettings(): Returns the settings object that stores
information about how the dialog information is persisted. This method can't
return null, so we'll just return a simple settings object:
   private static final String DIALOG_SETTINGS = "FilteredResourcesSelectionDialogExampleSettings";

   protected IDialogSettings getDialogSettings() {
      	IDialogSettings settings = Activator.getDefault().getDialogSettings()
				.getSection(DIALOG_SETTINGS);
		if (settings == null) {
			settings = Activator.getDefault().getDialogSettings()
					.addNewSection(DIALOG_SETTINGS);
		}
		return settings;
   }
-
getElementName(Object): Returns a name for the given
object. This is used to check duplicates.
   public String getElementName(Object item) {
      return item.toString();
   }
-
getItemsComparator(): Returns a comparator used to
sort items. In our example we will just use standard string comparison:
   protected Comparator getItemsComparator() {
      return new Comparator() {
         public int compare(Object arg0, Object arg1) {
            return arg0.toString().compareTo(arg1.toString());
         }
      };
   }
-
validateItem(Object): Validates that the item is a valid
selection. In our example we just return an OK status, because all items
are valid:
   protected IStatus validateItem(Object item) {
      return Status.OK_STATUS;
   }
-
Add title of dialog and set simple implementation of SelectionHistory on dialog:
	public FilteredResourcesSelectionDialogExample(Shell shell, boolean multi) {
	   super(shell, multi);
	   setTitle("Filtered Resources Selection Dialog Example");
	   setSelectionHistory(new ResourceSelectionHistory());
	}

	private class ResourceSelectionHistory extends SelectionHistory {
	   protected Object restoreItemFromMemento(IMemento element) {
		  return null;
	   }
	   protected void storeItemToMemento(Object item, IMemento element) {
	   }
	}
-
Change run(IAction) method from SimpleAction to:
	public void run(IAction action) {
	   Shell shell = new Shell();
	   FilteredItemsSelectionDialog dialog = new FilteredResourcesSelectionDialogExample(shell, true);
	   dialog.setInitialPattern("a");
	   dialog.open();
	}
-
Change tooltip of SimpleAction from "Hello, Eclipse world" to "Filtered Items Selection Dialog Example".
-
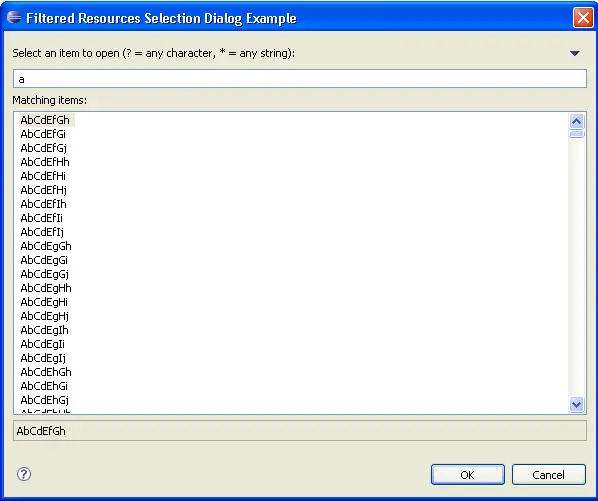
Run Eclipse with created plug-in.
-
The resulting dialog looks as follows:
|
|
|


