Chapter 25. Apache HTTP Server
Configuration
Red Hat Enterprise Linux provides version 2.0 of the Apache HTTP
Server. If you want to migrate an existing configuration file by
hand, refer to the migration guide at /usr/share/doc/httpd-<ver>/migration.html or the
Red Hat Enterprise Linux Reference Guide
for details.
If you configured the Apache HTTP Server with the HTTP Configuration Tool in previous versions of
Red Hat Enterprise Linux and then performed an upgrade, you can use
the HTTP Configuration Tool to migrate
the configuration file to the new format for version 2.0. Start the
HTTP Configuration Tool, make any
changes to the configuration, and save it. The configuration file
saved will be compatible with version 2.0.
The httpd and system-config-httpd RPM packages need to be
installed to use the HTTP Configuration
Tool. It also requires the X Window System and root access. To
start the application, go to the => =>
=> or type the command system-config-httpd at a shell prompt (for example,
in an XTerm or GNOME Terminal).
The HTTP Configuration Tool allows
you to configure the /etc/httpd/conf/httpd.conf configuration file for
the Apache HTTP Server. It does not use the old srm.conf or access.conf
configuration files; leave them empty. Through the graphical
interface, you can configure directives such as virtual hosts,
logging attributes, and maximum number of connections.
Only modules provided with Red Hat Enterprise Linux can be
configured with the HTTP Configuration
Tool. If additional modules are installed, they can not be
configured using this tool.
 |
Caution |
| |
Do not edit the /etc/httpd/conf/httpd.conf configuration file by
hand if you wish to use this tool. The HTTP
Configuration Tool generates this file after you save your
changes and exit the program. If you want to add additional modules
or configuration options that are not available in HTTP Configuration Tool, you cannot use this
tool.
|
The general steps for configuring the Apache HTTP Server using
the HTTP Configuration Tool are as
follows:
-
Configure the basic settings under the Main tab.
-
Click on the Virtual Hosts tab and
configure the default settings.
-
Under the Virtual Hosts tab, configure
the Default Virtual Host.
-
To serve more than one URL or virtual host, add any additional
virtual hosts.
-
Configure the server settings under the Server tab.
-
Configure the connections settings under the Performance Tuning tab.
-
Copy all necessary files to the DocumentRoot and cgi-bin
directories.
-
Exit the application and select to save your settings.
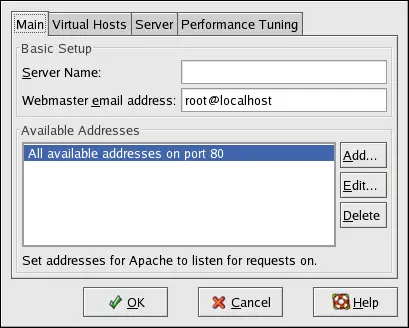
Use the Main tab to configure the basic
server settings.
Enter a fully qualified domain name that you have the right to
use in the Server Name text area. This
option corresponds to the ServerName directive in
httpd.conf. The ServerName directive sets the hostname of the Web
server. It is used when creating redirection URLs. If you do not
define a server name, the Web server attempts to resolve it from
the IP address of the system. The server name does not have to be
the domain name resolved from the IP address of the server. For
example, you might set the server name to www.example.com while the
server's real DNS name is foo.example.com.
Enter the email address of the person who maintains the Web
server in the Webmaster email address text
area. This option corresponds to the ServerAdmin directive in
httpd.conf. If you configure the server's
error pages to contain an email address, this email address is used
so that users can report a problem to the server's administrator.
The default value is root@localhost.
Use the Available Addresses area to
define the ports on which the server accepts incoming requests.
This option corresponds to the Listen directive in
httpd.conf. By default, Red Hat
configures the Apache HTTP Server to listen to port 80 for
non-secure Web communications.
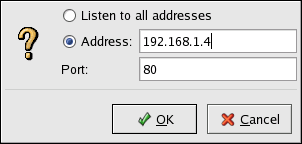
Click the Add button to define
additional ports on which to accept requests. A window as shown in
Figure 25-2 appears.
Either choose the Listen to all addresses
option to listen to all IP addresses on the defined port or specify
a particular IP address over which the server accepts connections
in the Address field. Only specify one IP
address per port number. To specify more than one IP address with
the same port number, create an entry for each IP address. If at
all possible, use an IP address instead of a domain name to prevent
a DNS lookup failure. Refer to https://httpd.apache.org/docs-2.0/dns-caveats.html for
more information about Issues Regarding DNS
and Apache.
Entering an asterisk (*) in the Address
field is the same as choosing Listen to all
addresses. Clicking the Edit button in
the Available Addresses frame shows the
same window as the Add button except with
the fields populated for the selected entry. To delete an entry,
select it and click the Delete button.
 |
Tip |
| |
If you set the server to listen to a port under 1024, you must
be root to start it. For port 1024 and above, httpd can be started as a regular user.
|