|
 |
|
| |
2.4 System
System settings include the following:
2.4.1 Configuring Search with Beagle Settings
Beagle is the search engine used on the SLED GNOME Desktop.
By default, Beagle is configured to start automatically and index
your home directory. If you want to change these settings, specify the
number of results displayed after a search or change the Beagle
privacy settings, click > > > .
2.4.2 Configuring Date and Time
To change your date and time configuration, for example to
change your time zone or the way the date and time are displayed,
click > > > . This opens the YaST Date and Time module, which
requires root privileges. Enter the root password and follow the
instructions on the YaST pages.
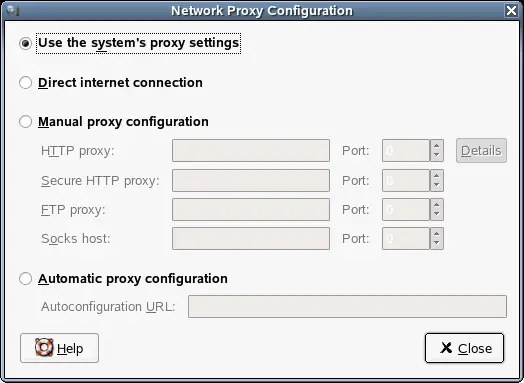
2.4.3 Configuring Network Proxies
The Network Proxy Configuration tool lets you configure how
your system connects to the Internet. You can configure the desktop
to connect to a proxy server and specify the details of the server.
A proxy server is a server that intercepts requests to another server
and fulfills the request itself, if it can. You can specify the
Domain Name Service (DNS) name or the Internet Protocol (IP) address
of the proxy server. A DNS name is a unique alphabetic identifier
for a computer on a network. An IP address is a unique numeric identifier
for a computer on a network.
Click > > > .
The following table lists the Internet connection options
that you can modify.
Table 2-8 Internet
Connection Options
|
|
Connects directly to the Internet, without
a proxy server. |
|
|
Connects to the Internet through a proxy
server and lets you configure the proxy server manually. |
|
|
The DNS name or IP address of the proxy
server to use when you request a HTTP service. Specify the port
number of the HTTP service on the proxy server in the Port box. |
|
|
The DNS name or IP address of the proxy
server to use when you request a Secure HTTP service. Specify the
port number of the Secure HTTP service on the proxy server in the
Port box. |
|
|
The DNS name or IP address of the proxy
server to use when you request an FTP service. Specify the port
number of the FTP service on the proxy server in the Port box. |
|
|
The DNS name or IP address of the Socks
host to use. Specify the port number for the Socks protocol on the
proxy server in the Port spin box. |
|
|
Connects to the Internet through a proxy
server and lets you configure the proxy server automatically. |
|
|
The URL that contains the information
required to configure the proxy server automatically. |
2.4.4 Configuring Power Management
This module lets you manage your system’s power-saving
options. It is especially useful for extending the life of a laptop’s
battery charge. However, several options also help to save electricity when
using a computer that is plugged in to an electricity source.
Click > > > .
Specifying Sleep Mode Times
Sleep mode shuts down the computer when it is unused for a
specified amount of time. Whether under battery or AC power, you
can specify the amount of time that the computer remains unused before
it is put to sleep.You can also put the computer’s display
to sleep without shutting down the computer, saving the power required
by the display.
Sleep mode is especially important when the computer is operating
under battery power. Both the screen and the computer draw power
from the battery, so you can save a significant amount of battery
power by shutting down one or both. It is common to put the display
to sleep after a shorter period of time. (The default is five minutes.)
Then, if the computer remains unused for a further amount of time
(default 20 minutes), it is also put to sleep.
To specify your computer’s sleep settings, open the
Power Management module and click the tab.
Then, specify the amount of time that should pass before the display
and computer are put to sleep, for both AC power and battery power.
Setting Power Options
To set the type of sleep mode used by your computer and the
action to take when the battery power reaches the critical level,
open the Power Management module and click the tab.
There are two available types of sleep mode:
- Standby
Standby mode turns off power-consuming computer components
such as the display and the hard drive without saving the contents
of RAM. Any unsaved data is lost.
- Hibernate
Hibernate mode saves all contents of RAM to the hard disk
before shutting off power to the system. When you start the system
again, the saved data is put back into RAM, restoring your computer
to the state it was in before it shut off. Hibernate requires an
amount of free hard disk space equal to the amount of RAM installed
on the computer.
Choose the type of sleep mode you prefer by selecting it from
the menu. If you have sufficient free disk space, Hibernate is the
better choice.
You can also specify what your computer does when the battery
reaches the critical level. The available options are:
- Do Nothing
The computer does not shut down or automatically go into any
kind of power-saving mode.
- Hibernate
The computer saves the contents of RAM to the hard disk, then
shuts down. When you turn the computer on again, the saved data
is put back into RAM, restoring your computer to the state it was
in before it shut off. Hibernate requires an amount of free hard
disk space equal to the amount of RAM installed on the computer.
- Shut Down
The computer turns off without saving anything. All unsaved
data is lost.
Choose the option you prefer by selecting it from the menu.
If you have sufficient free disk space, Hibernate is the better
choice.
Setting Advanced Power Options
The available advanced power options allow you to display
how and when the Power icon displays, and at what point the battery
is considered low or critical. Open the Power Management module, then
click the tab to set these options.
You can specify whether the power icon is always or never
displayed in the System Tray, or that it is present only when the
battery is low, or when it is either charging or discharging.
You can also select the percentage of battery power remaining
that is to be considered low or critical. Slide the slider for each
option until the desired percentage is specified.
2.4.5 Setting Preferred Applications
The Preferred Applications module allows you to specify which
applications to use for various common tasks:
To change any of these settings:
-
Click > > > .
-
Click the tab for the type of application
you want to set.
The following list shows the options and default settings.
- Web browser
Default: Firefox
- Mail reader
Default: Evolution
- FTP
Default: Nautilus
- News
Default: Thunderbird
- Terminal
GNOME Terminal
-
Select one of the available from the
applications from the menu or enter the
command used to start the application.
-
Click .
The changes take effect immediately.
2.4.6 Setting Session Sharing Preferences
The preference tool enables
you to share a GNOME desktop session between multiple users, and
to set session-sharing preferences. To open this tool, click > > > .
The table below shows the session sharing preferences that
can be set with this tool. These settings have a direct impact on
the security of your system.
Table 2-9 Session Sharing Preferences
|
Allow other users to view your desktop |
Select this option to enable remote users
to view your session. All keyboard, pointer, and clipboard events
from the remote user are ignored. |
|
Allow other users to control your desktop |
Select this option to allow other users
to access and control your session from a remote location. |
|
Users can view your desktop using this
command |
Click on the highlighted text to send
the system address to remote user by e-mail. |
|
When a user tries to view or control your
desktop |
Select from the following security considerations
when a user tries to view or control your desktop:
- Ask you for confirmation
Select this option if you want remote users to ask you for confirmation
when they want to share your session. This option enables you to
be aware when other users connect to your session. You can also
decide what time is suitable for the remote user to connect to your
session.
- Require the user to enter this password
Select this option to authenticate the remote user if authentication
is used. This option provides an extra level of security.
|
|
Password |
Enter the password that the remote user
who wants to view or control your session must enter. |
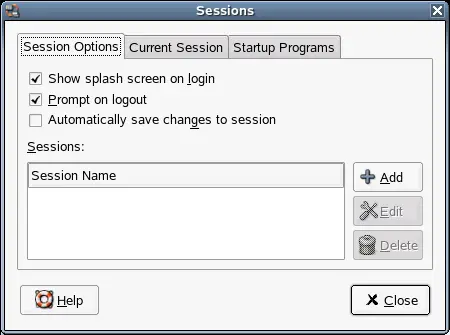
2.4.7 Managing Sessions
This module lets you manage your sessions. A session occurs
between the time that you log in to the desktop environment and
the time that you log out. You can set session preferences and specify which
applications to start when you begin a session. You can configure
sessions to save the state of applications and then restore the
state when you start another session.
You can also use this preference tool to manage multiple sessions.
For example, you might have a mobile session which starts applications
you use most frequently when traveling, a demo session that starts
applications used to present a demonstration or slide show to a
customer, and a work session that uses a different set of applications
when you are working in the office.
Click > > > .
This module consists of three tabbed pages:
Setting Session Preferences
Use the Session Options tabbed page to manage multiple sessions
and set preferences for the current session.
The following table lists the session options that you can
modify.
Table 2-10 Session
Preferences for Current Session
|
|
Displays a splash screen when you start
a session. |
|
|
Displays a confirmation dialog when you
end a session. |
|
|
Automatically saves the current state
of your session. The session manager saves the session-managed applications that
are open and the settings associated with the session-managed applications.
The next time you start a session, the applications start automatically
with the saved settings.
If you do not select this option, the Logout Confirmation dialog
displays a option when you
end your session. |
|
|
Lets you manage multiple sessions in
the desktop, as follows:
- To create a new session, click .
The Add a New Session dialog is displayed, letting you specify a name
for your session.
- To change the name of a session, select the session and
then click Edit. The Edit Session Name dialog
is displayed, letting you specify a new name for your session.
- To delete a session, select the session and then
click .
|
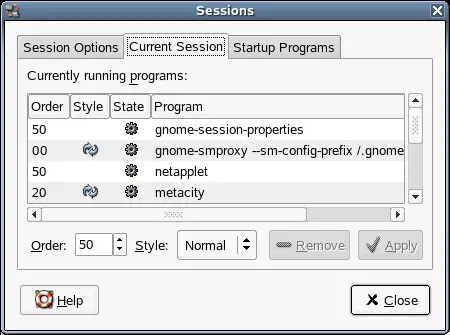
Setting Session Properties
Use the Current Session tabbed page to specify startup order
values and to choose restart styles for the session-managed applications
in your current session.
The following table lists the session properties that you
can configure.
Table 2-11 Session
Properties for Session-Managed Applications
|
|
Specifies the order in which the session
manager starts session-managed startup applications. The session
manager starts applications with lower order values first. The default
value is 50.
To set the startup order of an application, select the application
in the table. Use the box to specify the
startup order value. |
|
|
Determines the restart style of an application.
To select a restart style for an application, select the application
in the table and then select one of the following styles:
|
|
|
Deletes the selected application from
the list. The application is removed from the session manager and
closed. Applications that you delete are not started the next time
you start a session. |
|
|
Applies changes made to the startup order
and the restart style. |
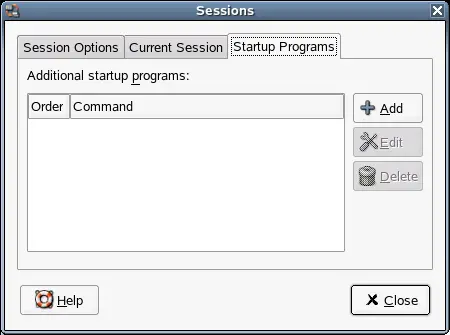
Configuring Startup Applications
Use the Startup Programs tabbed page to specify non-session-managed
startup applications.
Startup applications are applications that start automatically
when you begin a session. You specify the commands that run these
applications and the commands execute automatically when you log
in.
You can also start session-managed applications automatically.
For more information, see Setting Session Preferences.
To add a startup application, click .
The Add Startup Program dialog is displayed. Specify the command
to start the application in the field.
If you specify more than one startup application, use the box
to specify the startup order of the each application.
To edit a startup application, select the startup application
and then click . The Edit Startup Program
dialog is displayed. Modify the command and the startup order for
the startup application.
To delete a startup application, select the startup application
and then click .
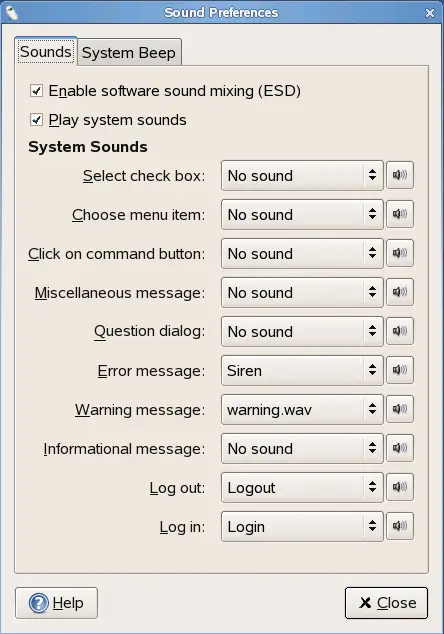
2.4.8 Setting Sound Preferences
The Sound Preference tool lets you control when the sound
server starts. You can also specify which sounds to play when particular
events occur.
Click > > > .
Setting General Sound Preferences
Use the tab to specify when to launch
the sound server. You can also enable sound event functions.
Click to
start the sound server when you start a session. When the sound
server is active, the desktop can play sounds.
Click to play sounds
when particular events occur in the desktop.
Finally, select the sound to play at each of the specified
events.
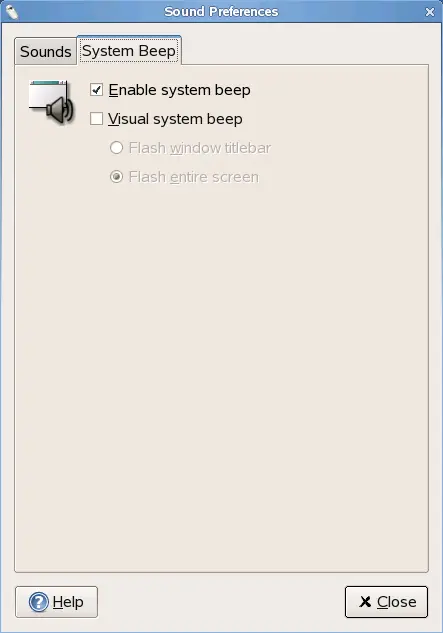
Setting System Beep Preferences
Some applications play a beep sound to indicate a keyboard
input error. Use the tab to set preferences
for the system beep.
2.4.9 Managing Users and Groups
Use the tool to manage
users and groups, including user and group names, group membership,
password and password encryption, and other options.
Click > > > . The tool
opens the User and Group Administration module in YaST.
NOTE:Root privileges are required to manage users and groups.
Follow the directions in YaST for information on changing
settings.
|
|
|