23.15. Creating a Custom Layout or Modifying the Default Layout
If you chose to create a custom layout, you must tell the installation program where to install Red Hat Enterprise Linux. This is done by defining mount points for one or more disk partitions in which Red Hat Enterprise Linux is installed.
Anaconda can handle the partitioning requirements for a typical installation.
Figure 23.28. Partitioning on System z
The partitioning screen contains two panes. The top pane contains a graphical representation of the DASD, FCP LUN, or logical volume selected in the lower pane.
Above the display, you can review the Drive name (such as /dev/dasda), the Geom (which shows the hard disk's geometry and consists of three numbers representing the number of cylinders, heads, and sectors as reported by the hard disk), and the Model of the hard drive as detected by the installation program.
Using your mouse, click once to highlight a particular field in the graphical display. Double-click to edit an existing partition or to create a partition out of existing free space.
The lower pane contains a list of all DASDs, FCP LUNs, and logical volumess to be used during installation, as specified earlier in the installation process — refer to
Section 23.10, “ Assign Storage Devices ”. Note that if you specified a CMSDASD in your parameter file, DASD names begin at
dasdb;
dasda was assigned to the CMSDASD and this name is no longer available at this point in the installation process.
Devices are grouped by type. Click on the small triangles to the left of each device type to view or hide devices of that type.
Anaconda displays several details for each device listed:
- Device
-
the name of the device, logical volume, or partition
- Size (MB)
-
the size of the device, logical volume, or partition (in MB)
- Mount Point/RAID/Volume
-
the mount point (location within a file system) on which a partition is to be mounted, or the name of the RAID or logical volume group of which it is a part
- Type
-
the type of partition. If the partition is a standard partition, this field displays the type of file system on the partition (for example, ext4). Otherwise, it indicates that the partition is a physical volume (LVM), or part of a software RAID
- Format
-
A check mark in this column indicates that the partition will be formatted during installation.
Beneath the lower pane are four buttons: Create, Edit, Delete, and Reset.
Select a device or partition by clicking on it in either the graphical representation in the upper pane of in the list in the lower pane, then click one of the four buttons to carry out the following actions:
- Create
-
create a new partition, logical volume, or software RAID
- Edit
-
change an existing new partition, logical volume, or software RAID
- Delete
-
remove a partition, logical volume, or software RAID
- Reset
-
undo all changes made in this screen
Finally, note which device is associated with /boot. The kernel files and bootloader sector will be associated with this device. The first DASD or SCSI LUN will be used, and the device number will be used when re-IPLing the post-installed system.
The screenshots in the following subsections of this manual sometimes show hard disk types and device names that do not appear as such on System z. These screenshots are only intended to illustrate the installation interface itself and apply equally to DASDs and FCP-attached SCSI disks.
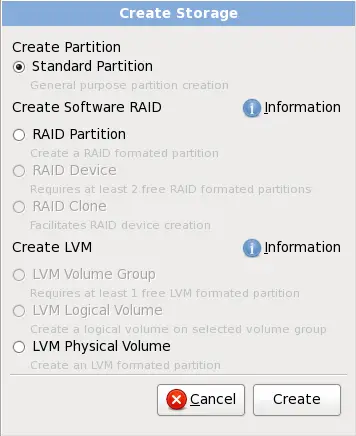
The Create Storage dialog allows you to create new storage partitions, logical volumes, and software RAIDs. Anaconda presents options as available or unavailable depending on the storage already present on the system or configured to transfer to the system.
Options are grouped under Create Partition, Create Software RAID and Create LVM as follows:
Create Software RAID
On System z, the storage subsystem uses RAID transparently, and you do not need to set it up.
-
RAID Partition — create a partition in unallocated space to form part of a software RAID device. To form a software RAID device, two or more RAID partitions must be available on the system.
-
RAID Device — combine two or more RAID partitions into a software RAID device. When you choose this option, you can specify the type of RAID device to create (the RAID level). This option is only available when two or more RAID partitions are available on the system.
-
RAID Clone — create a mirror of a RAID partition on one storage device on another storage device. This option is only available when at least one RAID partition is available on the system.
Create LVM Logical Volume
-
LVM Physical Volume — create a physical volume in unallocated space.
-
LVM Volume Group — create a volume group from one or more physical volumes. This option is only available when at least one physical volume is available on the system.
-
LVM Logical Volume — create a logical volume on a volume group. This option is only available when at least one volume group is available on the system.