IPsec can also be configured to connect an entire network (such as a
LAN or WAN) to a remote network by way of a network-to-network
connection. A network-to-network connection requires the setup of IPsec
routers on each side of the connecting networks to transparently process
and route information from one node on a LAN to a node on a remote LAN.
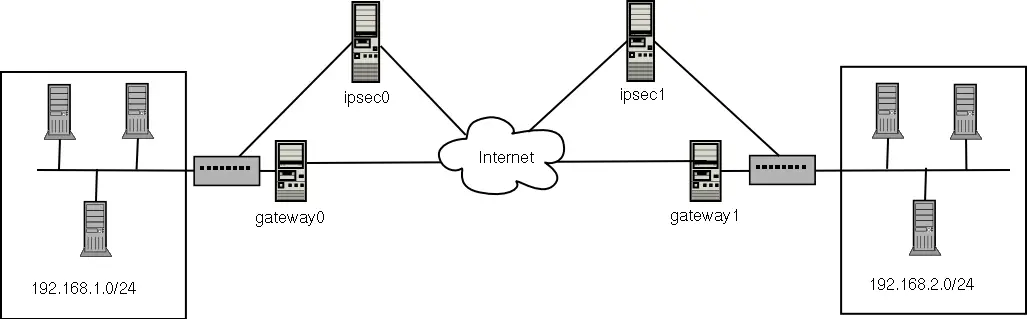
Figure 6-1 shows a network-to-network IPsec
tunneled connection.
This diagram shows two separate LANs separated by the
Internet. These LANs use IPsec routers to authenticate and initiate a
connection using a secure tunnel through the Internet. Packets that are
intercepted in transit would require brute-force decryption in order to
crack the cipher protecting the packets between these LANs. The process
of communicating from one node on the 192.168.1.0/24 IP range to another
on 192.168.2.0/24 is completely transparent to the nodes as the
processing, encryption/decryption, and routing of the IPsec packets are
completely handled by the IPsec router.
The information needed for a network-to-network connection include:
The externally-accessible IP addresses of the dedicated IPsec
routers
The network address ranges of the LAN/WAN served by the IPsec
routers (such as 192.168.0.0/24 or 10.0.1.0/24)
The IP addresses of the gateway devices that route the data from
the network nodes to the Internet
A unique name to identify the IPsec connection and distinguish
it from other devices or connections (for example,
ipsec0)
A fixed encryption key or one automatically generated by
racoon
A pre-shared authentication key that initiates the connection
and exchange encryption keys during the session
For example, suppose LAN A (lana.example.com) and LAN B
(lanb.example.com) want to connect to each other through an IPsec
tunnel. The network address for LAN A is in the 192.168.1.0/24 range,
while LAN B uses the 192.168.2.0/24 range. The gateway IP address is
192.168.1.254 for LAN A and 192.168.2.254 for LAN B. The IPsec routers
are separate from each LAN gateway and uses two network devices: eth0 is
assigned to an externally-accessible static IP address which accesses
the Internet, while eth1 acts as a routing point to process and transmit
LAN packets from one network node to the remote network nodes.
The IPsec connection between each network uses a pre-shared key with
the value of r3dh4tl1nux, and the
administrators of A and B agree to let racoon
automatically generate and share an authentication key between each
IPsec router. The administrator of LAN A decides to name the IPsec
connection ipsec0, while the
administrator of LAN B names the IPsec connection
ipsec1..
The following example are the contents the
ifcfg file for a network-to-network IPsec
connection for LAN A. The unique name to identify the connection in this
example is ipsec1, so the resulting file is
named
/etc/sysconfig/network-scripts/ifcfg-ipsec1.
TYPE=IPSEC
ONBOOT=yes
IKE_METHOD=PSK
SRCGW=192.168.1.254
DSTGW=192.168.2.254
SRCNET=192.168.1.0/24
DSTNET=192.168.2.0/24
DST=X.X.X.X |
The connection is set to initiate upon boot-up
(ONBOOT=yes) and uses the pre-shared
key method of authentication
(IKE_METHOD=PSK). The administrator for
LAN A enters the destination gateway, which is the gateway for LAN B
(DSTGW=192.168.2.254) as well as the
source gateway, which is the gateway IP address for LAN A
(SRCGW=192.168.1.254). The
administrator then enters the destination network, which is the network
range for LAN B (DSTNET=192.168.2.0/24)
as well as the source network
(SRCNET=192.168.1.0/24). Finally, the
administrator enters the destination IP address, which is the
externally-accessible IP address for LAN B
(X.X.X.X).
The following example is the content of the pre-shared key file
called
/etc/sysconfig/network-scripts/keys-ipsecX
(where X is 0 for LAN A and 1 for LAN B) that
both networks use to authenticate each other. The contents of this file
should be identical and only the root user should be able to read or
write this file.
 | Important |
|---|
| | To change the
keys-ipsecX file so
that only the root user can read or edit the file, perform the
following command after creating the file: chmod 600 /etc/sysconfig/network-scripts/keys-ipsec1 |
|
To change the authentication key at any time, edit the
keys-ipsecX file on both
IPsec routers. Both keys must be identical for proper
connectivity.
The following example is the contents of the
/etc/racoon/racoon.conf configuration file for the
IPsec connection. Note that the include
line at the bottom of the file is automatically generated and only
appears if the IPsec tunnel is running.
# Racoon IKE daemon configuration file.
# See 'man racoon.conf' for a description of the format and entries.

path include "/etc/racoon";
path pre_shared_key "/etc/racoon/psk.txt";
path certificate "/etc/racoon/certs";

sainfo anonymous
{
	pfs_group 2;
	lifetime time 1 hour ;
	encryption_algorithm 3des, blowfish 448, rijndael ;
	authentication_algorithm hmac_sha1, hmac_md5 ;
	compression_algorithm deflate ;
}
include "/etc/racoon/X.X.X.X.conf" |
The following is the specific configuration for the connection to
the remote network. The file is named
X.X.X.X.conf (replace
X.X.X.X with the IP address of the remote
IPsec router). Note that this file is automatically generated once the
IPsec tunnel is activated and should not be edited directly.
;
remote X.X.X.X
{
        exchange_mode aggressive, main;
        my_identifier address;
        proposal {
                encryption_algorithm 3des;
                hash_algorithm sha1;
                authentication_method pre_shared_key;
                dh_group 2 ;
        }
} |
Prior to starting the IPsec connection, IP forwarding should be
enabled in the kernel. As root at a shell prompt, enable IP forwarding:
Edit /etc/sysctl.conf and set
net.ipv4.ip_forward to
1.
Execute the following command to enable the change:
sysctl -p /etc/sysctl.conf |
To start the IPsec connection, either reboot the IPsec routers or
execute the following command as root on each router:
The connections are activated, and both LAN A and B are able to
communicate with each other. The routes are created automatically via the
initialization script called by running ifup on the
IPsec connection. To show a list of routes for the network, run the
following command:
To test the IPsec connection, run the tcpdump
utility on the externally-routable device (eth0 in this example) to view
the network packets being transfered between the hosts (or networks) and
verify that they are encrypted via IPsec. For example, to check the
IPsec connectivity of LAN A, type the following:
tcpdump -n -i eth0 host lana.example.com |
The packet should include an AH header and should be shown as ESP
packets. ESP means it is encrypted. For example (back slashes denote a
continuation of one line):
12:24:26.155529 lanb.example.com > lana.example.com: AH(spi=0x021c9834,seq=0x358): \
	  lanb.example.com > lana.example.com: ESP(spi=0x00c887ad,seq=0x358) (DF) \
(ipip-proto-4) |