|
 |
|
| |
2.1 Using the YaST Partitioner
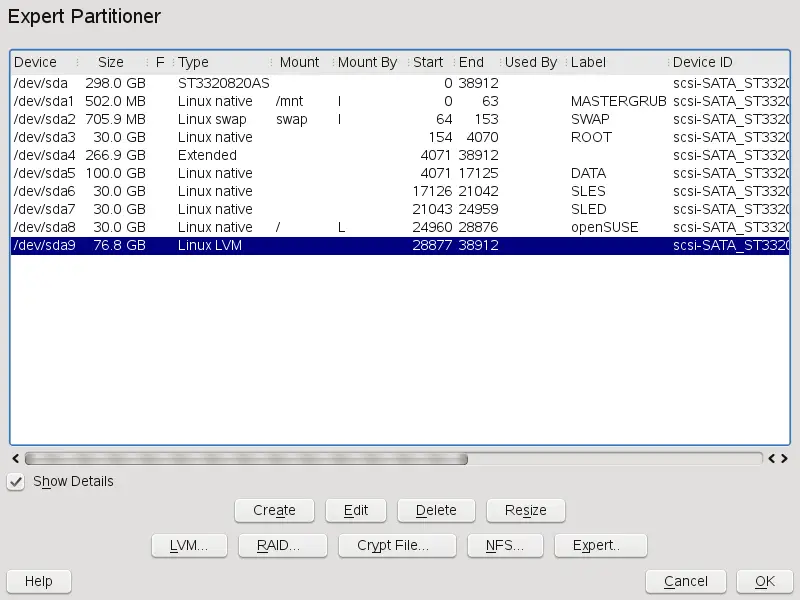
With the expert partitioner, shown in
Figure 2-1, manually modify the
partitioning of one or several hard disks. Partitions can be added,
deleted, resized, and edited. Also access the soft RAID and LVM configuration from this YaST module.
WARNING: Repartitioning the Running System
Although it is possible to repartition your system while it is running,
the risk of making a mistake that causes data loss is very high. Try to
avoid repartitioning your installed system and always do a complete
backup of your data before attempting to do so.
All existing or suggested partitions on all connected hard disks are
displayed in the list of in the
YaST dialog. Entire hard disks are
listed as devices without numbers, such as
/dev/sda. Partitions are listed as parts
of these devices, such as
/dev/sda1. The size, type,
file system, and mount point of the hard disks and their partitions are
also displayed. The mount point describes where the partition appears in
the Linux file system tree.
Several functional views are available on the lefthand . Use these views to gather information about existing
storage configurations, or to configure functions like
RAID, Volume Management,
Crypt Files, or NFS.
If you run the expert dialog during installation, any free hard disk space
is also listed and automatically selected. To provide more disk space to
openSUSE®, free the needed space starting from the bottom toward
the top of the list (starting from the last partition of a hard disk
toward the first). For example, if you have three partitions, you cannot
use the second exclusively for openSUSE and retain the third and
first for other operating systems.
2.1.1 Partition Types
Every hard disk has a partition table with space for four entries. Every
entry in the partition table corresponds to a primary partition or an
extended partition. Only one extended partition entry is allowed,
however.
A primary partition simply consists of a continuous range of cylinders
(physical disk areas) assigned to a particular operating system. With
primary partitions only, you would be limited to four partitions per hard
disk, because more do not fit in the partition table. This is why
extended partitions are used. Extended partitions are also continuous
ranges of disk cylinders, but an extended partition may be subdivided
into logical partitions itself. Logical partitions
do not require entries in the partition table. In other words, an
extended partition is a container for logical partitions.
If you need more than four partitions, create an extended partition as
the fourth partition or earlier. This extended partition should span the
entire remaining free cylinder range. Then create multiple logical
partitions within the extended partition. The maximum number of logical
partitions is 15 on SCSI, SATA, and Firewire disks and 63 on (E)IDE
disks. It does not matter which types of partitions are used for Linux.
Primary and logical partitions both work fine.
2.1.2 Creating a Partition
To create a partition from scratch select
and then a hard disk with free space. The actual modification can be done
in the tab:
-
Select . If several hard disks are connected, a
selection dialog appears in which to select a hard disk for the new
partition.
-
Specify the partition type (primary or extended). Create up to four
primary partitions or up to three primary partitions and one extended
partition. Within the extended partition, create several logical
partitions (see Section 2.1.1, Partition Types).
-
Select the file system to use and a mount point. YaST suggests a
mount point for each partition created. To use a different mount
method, like mount by label, select .
-
Specify additional file system options if your setup requires them.
This is necessary, for example, if you need persistent device names.
For details on the available options, refer to
Section 2.1.3, Editing a Partition.
-
Click to apply your partitioning setup and leave the
partitioning module.
If you created the partition during installation, you are returned to
the installation overview screen.
2.1.3 Editing a Partition
When you create a new partition or modify an existing partition, set
various parameters. For new partitions, suitable parameters are set by
YaST and usually do not require any modification. To edit your
partition setup manually, proceed as follows:
-
Select the partition.
-
Click to edit the partition and set the
parameters:
- File System ID
-
Even if you do not want to format the partition at this stage,
assign it a file system ID to ensure that the partition is
registered correctly. Possible values include
, ,
, and .
-
File System
-
Change the file system or format the partition here. Changing the
file system or reformatting partitions irreversibly deletes all data
from the partition.
Swap is a special format that allows the partition to be used as
virtual memory. Create a swap partition of at least 256 MB.
However, if you use up your swap space, consider adding more memory
to your system instead of adding more swap space.
Ext3 is the default file system for the Linux partitions. ReiserFS,
JFS, XFS, and Ext3 are journaling file systems. These file systems
are able to restore the system very quickly after a system crash,
because write processes are logged during the operation.
Furthermore, ReiserFS is very fast in handling lots of small files.
Ext2 is not a journaling file system. However, it is rock solid and
good for smaller partitions, because it does not require much disk
space for management.
-
Encrypt File System
-
If you activate the encryption, all data is written to the hard disk
in encrypted form. This increases the security of sensitive data,
but slightly reduces the system speed, because the encryption takes
some time. More information about the encryption of file systems is
provided in Section 36.0, Encrypting Partitions and Files.
-
Fstab Options
-
Specify various parameters contained in the global file system
administration file (/etc/fstab). The default
settings should suffice for most setups. You can, for example,
change the file system identification from the device name to a
volume label. In the volume label, use all characters except
/ and space.
To get persistent devices names, use the mount option
, or
. In openSUSE, persistent device names
are enabled by default.
When using the mount option to mount a
partition, define an appropriate label for the selected partition.
For example, you could use the partition label
HOME for a partition intended to mount to
/home.
If you intend to use quota on the file system, use the mount option
. This must be done before
you can define quotas for users in the YaST module. For further information on how to
configure user quota, refer to
Section 5.3.5, Managing Quotas, (↑ Start-Up ).
-
Mount Point
-
Specify the directory at which the partition should be mounted in
the file system tree. Select from various YaST proposals or enter
any other name.
-
Select to activate the partition.
NOTE: Resize Filesystems
To resize an existing file system, select the partition and use
. Note, that it is not possible to resize
partitions while mounted. To resize partitions, unmount the respective
partition before running the partitioner.
2.1.4 More Partitioning Tips
The following section comprises a few hints and tips on partitioning that
should help you in taking the right decisions while setting up your
system.
HINT: Cylinder Numbers
Note, that different partitioning tools may start counting the cylinders
of a partition with 0 or with 1.
When calculating the number of cylinders, you should always use the
difference between the last and the first cylinder number and add one.
Using swap
Swap is used to extend the physically available memory. This makes it
possible to use more memory than physical ram available. The memory
management system of kernels before 2.4.10 needed swap as a safety
measure. In those times, if you did not have twice the size of your ram
in swap, the performance of the system suffered. This does not hold true
anymore as these limitations no longer exist.
Linux uses a page called Least Recently Used (LRU) to
select pages that might be moved from memory to disk. Therefore, the
running applications have more memory available and even their caching
works more smoothly.
If an application tries to allocate as much memory as it can possibly
get, there are some problems with swap. There are three major cases to
look at:
- System with no swap
-
The application gets all memory that can be freed by any means. All
caches are freed, and thus all other applications are slowed down.
After a few minutes, the out of memory killer mechanism of the kernel
will become active and kill the process.
- System with medіum sized swap (128 MB–512 MB)
-
At first, the system is slowed down like a system without swap. After
all physical ram has been used up, swap space is used as well. At
this point, the system becomes very slow and it becomes impossible to
run commands from remote. Depending on the speed of the hard disks
that run the swap space, the system stays in this condition for about
10 to 15 minutes until the out of memory killer of the kernel
resolves the issue. Note, that you will need a certain amount of swap
if the computer should perform a suspend to disk . In
that case, the swap size should be reasonably big to contain the
necessary data from memory (512 MB–1GB).
- System with lots of swap (several GB)
-
It is better to not have an application that is running wild and
swapping frantically, in this case. If you do have this problem, the
system will need many hours to recover. In the process, it is likely
that other processes get timeouts and faults, leaving the system in
an undefined state, even if the faulty process is killed. In this
case, reboot the machine hard and try to get it running again. Lots
of swap is only useful if you have an application that relies on this
feature. Such applications (like databases or graphics manipulation
programs) often have an option to directly use hard disk space for
their needs. It is advisable to use this option instead of using lots
of swap space.
If your system does not run wild, but needs more swap after some time,
it is possible to extend the swap space online. If you prepared a
partition for swap space, just add this partition with YaST. If you do
not have a partition available, you may also just use a swap file to
extend the swap. Swap files are generally slower than partitions, but
compared to physical ram, both are extremely slow and the actual speed
difference is not as important as one would think in the first place.
Adding a Swap File Manually
To add a swap file in the running system, proceed as follows:
-
Create an empty file in your system. For example, if you want to add a
swap file with 128 MB swap at
/var/lib/swap/swapfile, use the commands:
mkdir -p /var/lib/swap
dd if=/dev/zero of=/var/lib/swap/swapfile bs=1M count=128
-
Initialize this swap file with the command
mkswap /var/lib/swap/swapfile
-
Activate the swap with the command
swapon /var/lib/swap/swapfile
To disable this swap file, use the command
swapoff /var/lib/swap/swapfile
-
Check the current available swap spaces with the command
cat /proc/swaps
Note, that at this point this is only temporary swap space. After the
next reboot, it is not used anymore.
-
To enable this swap file permanently, add the following line to
/etc/fstab:
/var/lib/swap/swapfile swap swap defaults 0 0
2.1.5 Partitioning and LVM
From the expert partitioner, access the LVM configuration with
. However, if a working LVM configuration already exists on your system,
it is automatically activated as soon as you enter the LVM configuration
for the first time in a session. In this case, any disks containing a
partition belonging to an activated volume group cannot be repartitioned
because the Linux kernel cannot reread the modified partition table of a
hard disk when any partition on this disk is in use. However, if you
already have a functioning LVM configuration on your system, physical
repartitioning should not be necessary. Instead, change the configuration
of the logical volumes.
At the beginning of the physical volumes (PVs), information about the
volume is written to the partition. To reuse such a partition for other
non-LVM purposes, it is advisable to delete the beginning of this volume.
For example, in the VG system and PV
/dev/sda2, do this with the command
dd if=/dev/zero of=/dev/sda2 bs=512
count=1.
WARNING: File System for Booting
The file system used for booting (the root file system or
/boot) must not be stored on an LVM logical volume.
Instead, store it on a normal physical partition.
|
|
|