|
 |
|
| |
Setting up envelopes for printing
To set up envelopes to be printed with your letters:
- Click Insert > Envelope from the menu bar.
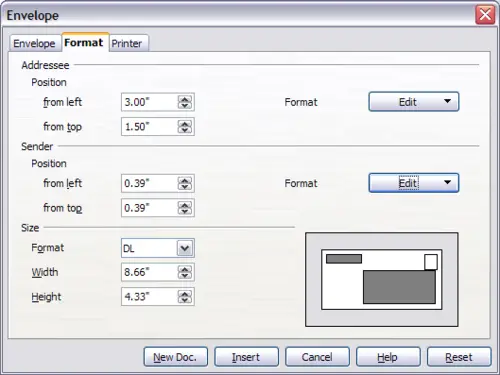
- In the Envelope dialog box, select the Format tab (shown below), where you can select the envelope format to use. You can then arrange the layout of the envelope to suit your requirements, together with the character and paragraph attributes to be used in the Sender and Addressee areas. These attributes are accessed using the Edit buttons to the right of the dialog, next to the word Format.
 | At this stage it is not possible to vary the dimensions of the frames that will hold the Sender and Addressee information, but once the envelope has been created this will become possible and you may wish to make some cosmetic adjustments.
|
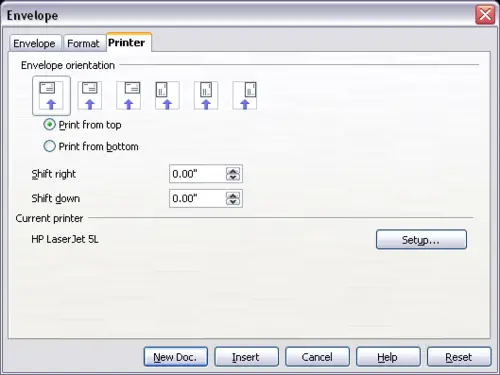
 Envelope formatting dialog. - The next step is to select the Printer tab, from where you may choose the printer you intend to use, its setup—for example, specification of the tray holding envelopes—and other printer-related options such as envelope orientation and shifting. You may need to experiment with these settings to achieve the best results with your printer.
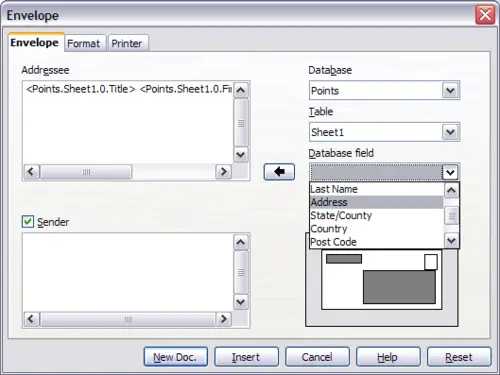
 Choosing printer options for an envelope. - You now have the choice of creating the Addressee fields by dragging and dropping from the data source headings (as described in
Creating a form letter, or using the facilities of the Envelope tab.
If you prefer dragging and dropping, than click New Doc., drag your data source headings into the Addressee area on your new envelope and skip to step 7), otherwise continue with steps 5 and 6.
- Select the Envelope tab. Verify, add, or edit the information in the Addressee and Sender boxes (Sender is the “from” on the envelope). You can use the right-hand dropdown lists to select the database and table from which you can access the Addressee information, in a similar fashion to that described for
Printing mailing labels, paragraphs 3, 4 and 5. The similarity of the method with the figures in that section will be clear.
 Choosing addressee and sender information for envelopes. - When you have finished formatting, click either the New Doc. or Insert button to finish. As might be expected, New Doc creates only the envelope template in a new document, whereas Insert inserts the envelope into your current document as page 1.
If you don’t want to proceed with this envelope, click Cancel or press the Esc key. You can also click Reset to remove your changes and return to the original settings when the dialog box opened.
- Quite often some of the fields in your address data source will be unused, leading to blank lines in your envelope Addressee area. If this is not important, you can skip the next few paragraphs and go straight to
Merging and printing the envelopes, otherwise continue as described here.
|
| The following procedure is very similar to that used for a similar purpose in the section on printing mailing labels. It is reproduced here for purposes of clarity.
|
- First ensure that the envelope is showing the field contents (data source headings), rather than their underlying field names. If this is not the case, then either press Ctrl+F9 or select View > Field Names to toggle the view.
- Next, ensure that you can see non‑printing characters, such as paragraph marks, line breaks and so on. If these are not already visible, select View > Nonprinting Characters from the menu bar, or press Ctrl+F10, or click on the large paragraph icon
 in the Standard toolbar. in the Standard toolbar.
You will now see that address field separation is created by line breaks
 , rather than paragraphs , rather than paragraphs
 . As the suppression of blank address fields depends on hiding paragraphs, not lines, you need to replace line breaks with paragraphs as follows. . As the suppression of blank address fields depends on hiding paragraphs, not lines, you need to replace line breaks with paragraphs as follows.
- Click at the end of the first data source address field. Press Delete to remove the new line and then press Return (or the Enter key) to insert a paragraph. Repeat this action for each data source address field.
If the line spacing in the Addressee area is not satisfactory, you may wish to correct this before proceeding, by modifying the paragraph style associated with the address. Unless you have changed it, the address uses the Default style.
- Click again at the end of the first paragraph to be suppressed and then select Insert > Fields > Other. Select the Functions tab and then click on Hidden Paragraph in the Type column. Now click in the Condition box and enter the details of the condition that defines a blank address field. It has the general form of:
![Database.Table.Database field]
where the ‘!’ (NOT) character indicates the negative case and the square brackets delineate the condition.
For example, in our Points database the condition to test if the Last Name field is empty would be:
![Points.Sheet1.Last Name].
To test for multiple conditions, use the operators AND and/or OR between the conditional statements, for example:
![Points.Sheet1.Title]AND![Points.Sheet1.Last Name].
Click Insert, but do not close the dialog until all lines have been amended.
- Repeat for each paragraph to be conditionally suppressed, remembering to advance the cursor to the end of the line in question before changing the last element of the condition and Inserting the result.
|
|
|


