Example: configuring a nested list
We will use a numbering style to produce the following effect:
  I. Level-1 list item

     A. Level-2 list item

        i. Level-3 list item

           a) Level-4 list item
This example uses one of the supplied styles, Numbering 1, however if you intend to reuse this type of nested list you can also create a new style as illustrated in
Chapter 7 (Working with Styles).
- Create the first item and apply the Numbering 1 style from the Styles and Formatting window.
- Select Format > Bullets and Numbering to open the dialog that controls the appearance of the list.
- Go to the Outline page, where you will find that one style matches our requirements. Click once on that style.
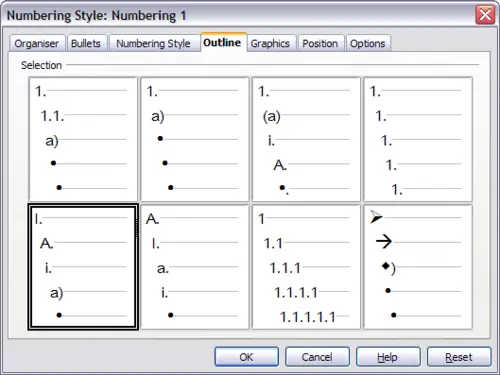
Choosing a predefined outline-numbering style
- To modify the layout of the list, use the Options tab. Notice that the preview on the right shows the outline selected. In the Level box on the left, select 1, then 2, 3, and 4 and see how the information in the Numbering and After boxes changes.
Use the Options page to set different punctuation; for example, a period (full stop) after “a” on level 4 instead of a parenthesis.
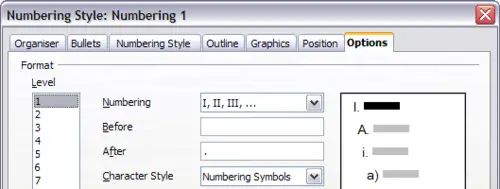
Checking the outline numbering for level-1 list items
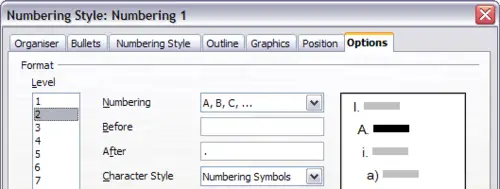
Numbering style for level-2 list items
To make the indentation at each level greater or less than the default, change it on the Position page. Select the level, then make any changes in the indentation, spacing, or numbering alignment.
- Repeat for each level as required, then click OK.
 | With outline numbering you can define different bullet styles for the different levels of a bullet list. Use the Bullets tab of the Bullets and Numbering dialog box (not shown) to select the basic style. Return to the Options tab to customize the bullet for each indent level. Here you can set bullets to any character. See the Graphics tab for more bullets.
|


