Example 1: page wrapping
The figure below shows an example of page wrapping in action. The process to obtain this is the following:
- Insert the image into the document, then anchor it to the first paragraph. To move the anchor, select the image and move it until the anchor symbol is at the beginning of the paragraph. Do not worry about the position as that will be fixed in the next step.
- Align the image so that the left margin of the image is in line with the paragraph indentation. This can be done with the mouse or using the advanced settings. In the example, the image is placed at 1 cm from the left of the paragraph area.
- Change the wrap to Page Wrap. It starts out OK; however, there is still too little space between the image and the text. To correct it, access the Wrap page of the Picture dialog box and set the gap between the image and text to 0.2 cm in the Right and Bottom boxes.
- The last touch is to change the position so that the image is below the first line of the paragraph. Again, you can use the mouse to drag the image or use the advanced settings, which require a bit of trial and error. It turns out that the particular line height used in this guide—0.75 cm from the top margin of the paragraph—is a good value.
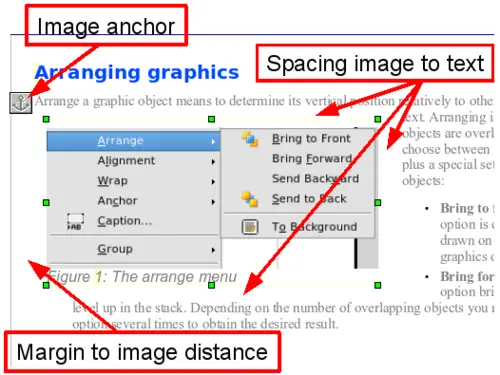
Example of image with Page Wrap formatting.
Example 2: simple contour wrapping in action
In this example we again apply page wrapping as in example 1, enabling this time the contour option. We will work on an image and on a drawing object as the contour option works slightly differently in the two cases.
The example below has been built following these steps, which you can use to practice:
- Create some text (a very quick way to do that is to use the dummy text AutoText. That is, type DT and then press the F3 key).
- Insert an image of your choice and anchor it to the first paragraph. Adjust the alignment as desired then change the wrap type to Page Wrap.
- Right-click on the picture to select the option Wrap > Contour, then right-click again and select Wrap > Edit Contour from the pop-up menu.
- Use the technique discussed in
Editing the contour to create a custom contour and click Apply. If needed, adjust the spacing between the edge of the image and the text.
- Insert an AutoShape of your choice (a rotated triangle in the example) and proceed as in step 2 above.
- Enable the contour wrap by selecting Format > Wrap > Contour from the main menu. As discussed previously, OOo automatically generates the contour. You may need to adjust the distance between the drawing object and the text.

Image and drawing object with contour wrapping.
Example 3: Wrap Through and In Background
This example shows how to use an image as a watermark by wrapping it through the text and adjusting the transparency. This is not the best way to create watermarks and it is presented here only for its illustration purposes. If you need to create a watermark, it is best to use a Fontworks object wrapped in the background.
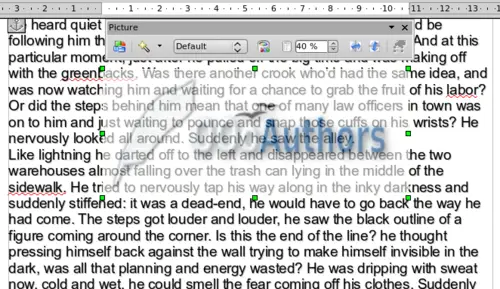
Transparent image added over the text.
The Wrap Through option inserts an image overlapping the text which as a result will be hidden. To make the text appear, change the transparency of the picture; although the words under the image become visible, they may be difficult to read and will appear lighter than the rest of the text.
To reproduce the example above, create some dummy text, then insert the image of your choice. Anchor the image (to the page in the example) and select the wrap through option from the Format > Wrap menu or right-clicking on the image and selecting Wrap > Wrap Through from the pop-up menu. Move the image into the desired position. The Picture toolbar should be displayed when the image is selected. Change the transparency to a suitable value (in the example this is 40%) so that the text can be read. In the example, a shadow effect is applied to the text (Format > Character then select Shadow in the Font Effects page).
You can obtain a better result if you set a graphic’s wrap to In Background. In this case all the text will be clearly readable, with characters that have the same intensity as long as the background is not too dark. Also in this case you may want to adjust the transparency of the image.


