Use the Entries page to define and format the entries in the table of contents. For each outline level, you can add and delete elements such as chapter (heading) numbers, and you can also apply character styles to individual elements.
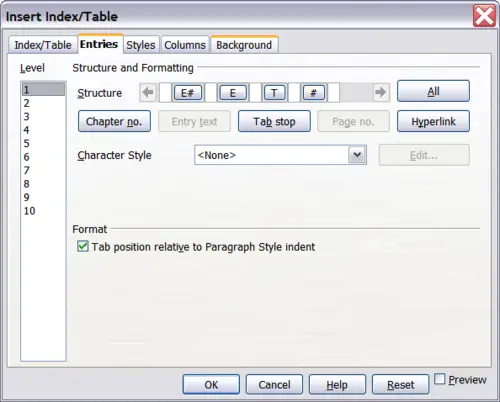
Entries page of Insert Index/Table dialog box.
To begin, click a level number in the Level column to select the outline level whose elements you want to format. (You will be able to apply changes to all outline levels later.) The Structure line displays the elements for entries in that level. Each button on the Structure line represents one element:
- The E# button represents the “chapter number”, which means the heading number, not just for chapters but also for other levels of headings.
- The E button represents the entry text.
- The T button represents a tab stop.
- The # button represents the page number.
- The LS button represents the start of a hyperlink. (This button does not appear on the default Structure line.)
- The LE button represents the end of a hyperlink. (This button does not appear on the default Structure line.)
Each white field on the Structure line represents a blank space. You can add custom text if you desire.
 | If the chapter number defined for your document includes the word “Chapter” before the number itself, then the E# field in the table of contents will also include the word “Chapter”. If you want to include the chapter number with the page number (for example, in the style “1-1, 1-2, ...”) , you will find that the page number appears in the table of contents as “Chapter 1-1”, which is probably not what you want.
|
Changing elements
To change an element in the Structure line, click the button representing that element and then click the element that you want to substitute in the row of buttons just below the Structure line. For example, to change a chapter number to a tab stop, click the E# button on the Structure line (it shows then as being pressed) and then click the Tab stop button in the row of available elements.
Deleting elements
To delete an element from the Structure line, click the button representing that element and then press the Delete key on your keyboard. For example, to delete a tab stop, click the T button and then press the Delete key.
Adding elements
To add an element to the Structure line:
- Place the cursor in the white field to the left of where you want to insert the element.
- Click one of the five buttons just below the Structure line. (For example, to add a tab stop, click the Tab stop button.) A button representing the new element appears on the Structure line.
Hyperlinking an entry
To change the default Structure line so that the chapter number and the entry text form a hyperlink, follow these steps:
- On the Structure line, place the cursor in the white field to the left of the E# button.
- Click the Hyperlink button. An LS button, representing the start of the hyperlink, appears on the Structure line.
- On the Structure line, place the cursor in the white field to the right of the E button.
- Click the Hyperlink button again. An LE button, representing the end of the hyperlink, appears on the Structure line.
The figure below represents the completion of the above steps. The number and the text of the entries on that level will now be hyperlinks.
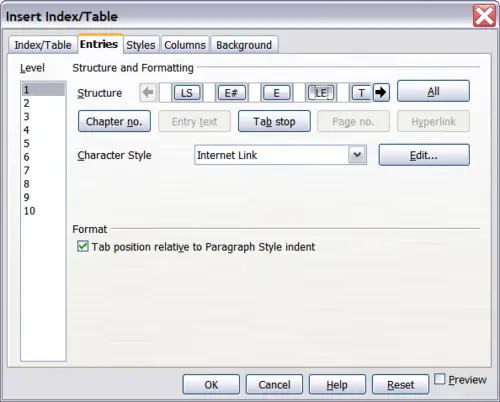
Hyperlink in table of contents.
Applying character styles
To apply a character style to an element:
- On the Structure line, click the button representing the element to which you want to apply a style.
- From the Character Style drop-down list, select the desired style. Writer applies the selected style to the selected element.
To view or edit the attributes of a character style, select the style from the Character Style drop-down list and then click the Edit button.
 | The default character style for hyperlinks is Internet Link, which by default is underlined and shown in blue. If you want the table of contents entries to work as hyperlinks, but not have them underlined and blue, you can change the attributes of the Internet Link character style. However, this changes the attributes of all hyperlinks in the document.
If you want other hyperlinks (for example, website addresses) to remain in the default style, change the character style selection for table of contents entries to Index Link. If necessary, change the attributes for Index Link to what you want.
|
Applying changes to all outline levels
To apply the displayed structure and formatting to all outline levels, click the All button.
Tab position relative to Paragraph Style indent
When this checkbox is selected, entries are indented according to the settings of their individual formats. Where a paragraph style with an indent on the left is in use, tab stops will be relative to this indent. If this checkbox is not selected, tab stops will be relative to the left margin position.


