When a slide master is opened for editing, it contains five areas, as shown below:
- Title area for AutoLayouts
- Object area for AutoLayouts
- Date area
- Footer area
- Slide number area

Slide master showing five editable areas
Click with the left mouse button on any of these areas to display eight green squares (handles) around the rectangle. Use these handles to modify the size and position of the area.
- To change the position, move the mouse towards one of the edges, away from the green handles, until the cursor changes shape, then click the left mouse button and drag the area to the desired position. (The shape of the cursor to move and resize objects is operating system specific, therefore no image is provided.)
- To modify the shape and size of one of the rectangular area, use one of the 8 green handles. Use the handles in the corners to modify both the sides of the rectangle simultaneously; the handles in the middle of the sides modify only one dimension at a time. The shape of the mouse cursor usually changes when over the handle, giving a clear visual indication of how it will affect the shape of the rectangular area.
 | To keep the ratio between the sides of the rectangular area constant, move the mouse to one of the 4 green handles at the corner of the area and keep the Shift key pressed while dragging the handle with the mouse.
|
To more accurately control the shape and size as well as the position of the default text area, instead of using the mouse it is better to access the Position and Size dialog box. To do that, first select the rectangular area by clicking on any point inside it, then either press F4 or from the main menu select Format > Position and Size. The dialog box shown below is displayed.
The functions of this dialog box are explained in the Draw Guide, so only a short description of the most important fields is provided in this chapter.
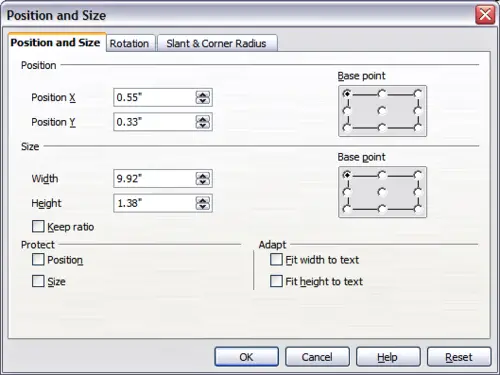
The Position and Size dialog box
Use the Position section to specify the X (horizontal) and Y (vertical) position of the rectangular area. The values represent the distance of the base point (selected on the right hand side) relative to the top left corner of the slide.
Use the Size section to specify the width and height of the rectangular are. Select as the base point the part of the rectangular area that remains fixed. The default setting (top left corner) means that the when resizing the area, the position of the top left corner of the area will not change.
You can also use the Rotation tab of the dialog box to rotate one of the axes by 90 degrees to obtain a modern looking layout. In general it is preferable to use only right angles for ease of editing, although the program does not impose restrictions on the values that can be used.


