Bitmaps
The last type of fill for an area is the bitmap fill.
On the Area page, chose Bitmap from the drop‑down list. Select from the list of bitmaps the one to be used to fill the area. Note that any imported bitmaps should be available in the list.
Set the size, position and offset parameters (as applicable) in the right hand side of the page, and then click OK to close the dialog.
As the figure below shows, when using a bitmap fill there are quite a number of parameters to be configured. These are described in Table 3.
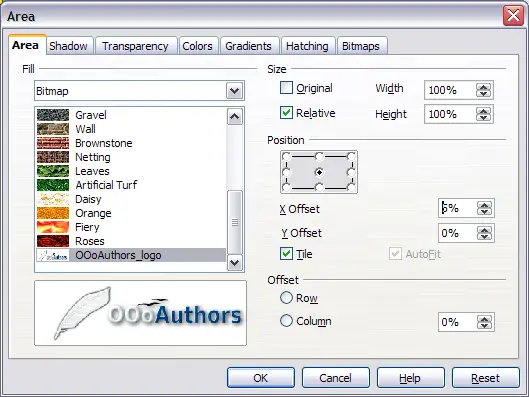
Advanced formatting for bitmap fill.
Table 3: Bitmap fill properties
| Property
| Meaning
|
| Size – Original
| Select this box to retain the original size of the bitmap.
|
| Size – Relative
| To rescale the object deselect the Original checkbox and select this one. The Width and Height edit boxes are enabled.
|
| Size – Width
| When Relative is selected 100% means that the bitmap original width will be resized to occupy the whole fill area width, 50% means that the width of the bitmap will be half that of the fill area.
|
| Size – Height
| When Relative is selected 100% means that the bitmap original height will be resized to occupy the whole fill area height, 50% means that the height of the bitmap will be half that of the fill area.
|
| Position – Anchor Map
| Select from the map the place of the area where the bitmap should be anchored to.
|
| Position – X offset
| When tiling is enabled, enter in this box the offset for the width of the bitmap in percentage values. 50% offset means that at the anchor point of the bitmap OOo will place the middle part of the bitmap and start tiling from there.
|
| Position – Y offset
| This will have the same effect of the X offset, but will work on the height of the bitmap.
|
| Position – Tile
| When this checkbox is selected the bitmap will be tiled to fill the area. The size of the bitmap used for the tiling is determined by the Size settings.
|
| Position – Autofit
| Stretches the bitmap to fill the whole area. Selecting this checkbox disables all the size settings.
|
| Offset – Row
| If tiling is enabled offsets the rows of tiled bitmaps by the percentage entered in the box so that two subsequent rows are not aligned.
|
| Offset – Column
| If tiling is enabled, offsets the columns of tiled bitmaps by the percentage entered in the box so that two subsequent columns of bitmaps are not aligned.
|
The way some of these parameters work is difficult to describe; the best way to understand them is to use them. Some examples of bitmap fills are shown below, along with the parameters used.

Some examples of bitmap fill.
Creating and importing bitmaps
As for the other types of fill, OOo comes with a number of predefined bitmaps, but you can also add (import) new ones or to create your own pattern on a 8x8 grid, using the Bitmaps page of the Area dialog.
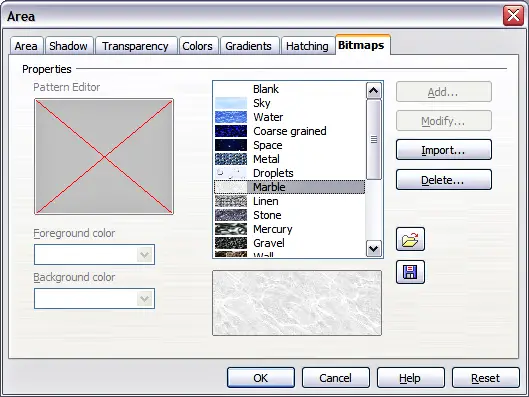
The Bitmaps page of the Area fill dialog.
To create a bitmap fill:
- Start with the Blank bitmap type on top of the list to activate the Pattern editor.
- Select the Foreground and Background colors.
- Start creating the pattern by clicking with the left mouse button the squares (pixels) that you want to be painted in the foreground color. Use the right mouse button to apply the background color. Check the preview window to see if the desired effect is achieved.
- When done, click Add to save the pattern.
To import a bitmap created in Draw or another program:
- Click the Import button.
- A file picker dialog is displayed. Browse to the directory containing the bitmap file and select it, then click Open.
- Type a name for the imported bitmap and click OK.


