An image map defines areas of the image (called hotspots) with a URI (a web address or a file on the computer). Hotspots are the graphic equivalent of text hyperlinks. Clicking on a hotspot causes Impress to open the linked page in the appropriate program (for example, the default browser for an HTML page; OOo Writer for a .ODT file; a PDF viewer for a PDF file). You can create hotspots of various shapes, and include several hotspots in the same image.
To use the image map tool:
- Select the picture where the hotspots will be defined.
- Choose Edit > ImageMap from the menu bar. The ImageMap Editor dialog opens.
- Use the tools and fields in the dialog to define the hotspots and links necessary.
- Click the Apply icon
 to apply the settings.
- When done, click the Save icon
 to save the imagemap to a file, then click the X in the upper right corner to close the dialog.
-
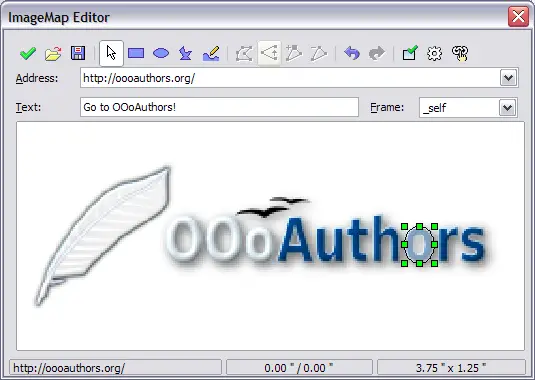
The dialog to create image maps. The last "o" is set as an active hotspot.
The top part of the dialog contains the following tools:
- Apply button: click this button to apply the changes.
- Load, Save, and Select icons.
- Tools for drawing a hotspot shape: these tools work in exactly the same way as the corresponding tools in the Drawing toolbar (described in
Chapter 5).
- Edit, Move, Insert, Delete Points: advanced editing tools to manipulate the shape of a polygon hotspot. Select the Edit Points tool to activate the other tools.
- Active icon: toggles the status of the hotspot activating a deactive the selected hotspot or deactivating it if active.
- Macro: associates a macro with the hotspot instead of just associating an hyperlink.
- Properties: sets the hyperlink properties and adds the Name attribute to the hyperlink.
Below the toolbar, specify for the selected hotspot:
- Address: the address pointed by the hyperlink. You can also point to an anchor in a document such as a specific slide number; to do this, write the address in this format: file:///<path>/document_name#anchor_name
- Text: enter the text that will be displayed when the mouse is moved over the hotspot.
- Frame: where the target of the hyperlink will open: pick among _blank (opens in a new browser window), _self (opens in the active browser window), _top or _parent.
 | The value _self for the target frame will work just fine in the vast majority of the occasions. It is therefore not recommended to use the other values unless absolutely necessary.
|
The main part of the dialog shows the image on which the hotspots will be defined and the hotspot itself. Note that an active hotspot is indicated by a white shading, while an inactive hotspot is identified by a red border but no shading.


