When Calc is started, the main window looks similar to the picture below.
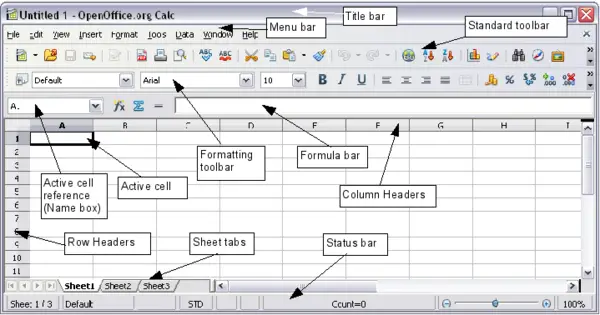
Parts of the Calc window
Title bar and Menu bar
The Title bar, at the top, shows the name of the current spreadsheet. If the spreadsheet is new, then its name is Untitled X, with X being a number. When you save a new spreadsheet for the first time, you will be prompted to enter a name.
Under the Title bar is the Menu bar. When you choose one of the menus, a submenu appears with other options. The Menu bar can be modified, as discussed in Appendix D (Setting up and Customizing Calc).
Toolbars
Under the Menu bar by default are three toolbars: the Standard toolbar, the Formatting toolbar, and the Formula Bar.
The icons on these toolbars provide a wide range of common commands and functions. You can also modify these toolbars, as discussed in Chapter 14 (Setting up and Customizing Calc).
Placing the mouse pointer over any of the icons displays a small box, called a tooltip. It gives a brief explanation of the icon’s function. For a more detailed explanation, select Help > What's This? and hover the mouse pointer over the icon. Tips and extended tips can now be turned on or off from Tools > Options > OpenOffice.org > General.
In the Formatting toolbar, the three boxes on the left are the Apply Style, Font Name, and Font Size lists. If there is something in these boxes, they show the current setting for the selected area. (The Apply Style list may not be visible by default.) Click the down-arrow to the right of each box to open the list.
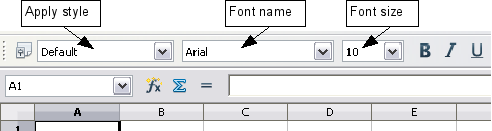
Font name and font size
Formula bar
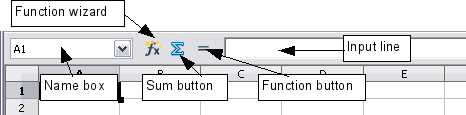
On the left of the Formula bar is a small text box, called the Name box, with a letter and number combination in it, such as D7. This is the column letter and row number, called the cell reference, of the current cell.
Formula bar
To the right of the Name box are the the Function Wizard, Sum, and Function buttons.
Clicking the Function Wizard button opens a dialog box from which you can search through a list of available functions. This can be very useful, because it also shows how the functions are formatted.
The Sum button inserts a formula into the current cell that totals the numbers in the cells above, or to the left if there are no numbers above, the current cell.
The Function button inserts an equals sign into the selected cell and the Input Line, thereby setting the cell ready to accept a formula.
When you enter new data into a cell, the Sum and Equals buttons change to Cancel and Accept buttons
 .
.
The contents of the current cell (data, formula, or function) are displayed in the Input Line, the remainder of the Formula bar. You can edit the cell contents of the current cell here, or you can do that in the current cell. To edit inside the Input Line area, click the appropriate part of the Input Line area, then type your changes. To edit within the current cell, just double-click the cell.
Individual cells
The main section of the screen displays the individual cells in the form of a grid, with each cell being at the intersection of a particular column and row.
At the top of the columns and at the left-hand end of the rows are a series of gray boxes containing letters and numbers. These are the column and row headers. The columns start at A and go on to the right and the rows start at 1 and go on down.
These column and row headers form the cell references that appear in the Sheet Area box on the Formula Bar. These headers can also be turned off by selecting View > Column & Row Headers.
Sheet tabs
At the bottom of the grid of cells are the sheet tabs (see below). These tabs enable access to each individual sheet, with the visible, or active, sheet having a white tab.
Clicking on another sheet tab displays that sheet and its tab turns white. You can also select multiple sheet tabs at once by holding down the Control key while you click the names.

Sheet tabs
Status bar
The Calc status bar provides information about the spreadsheet and convenient ways to quickly change some document features. From left to right, the fields are as follows.

Sheet sequence number
Shows the sequence number of the current sheet the total number of sheets in the spreadsheet. The sequence number may not correspond with the name on the sheet tab.
Page style
Shows the page style of the current sheet. To change the page style, right-click on this field. A list of page styles pops up; choose a different style by clicking on it.
To edit the page style, double-click on this field. The Page Style dialog opens.
Insert mode
Click to toggle between Insert and Overwrite modes when typing.
Selection mode
Click to toggle between STD (Standard), EXT (Extend), ADD (Add) and BLK (Block) selection. EXT is an alternative to Shift+click when selecting text.
Unsaved document flag
If changes have been made to the document since it was last saved, an asterisk (*) appears in this field.
Digital signature
If the document has not been digitally signed, double-clicking in this area opens the Digital Signatures dialog, where you can sign the document. See Chapter 5 for more about digital signatures.
If the document has been digitally signed, an icon [[Image:]] shows in this area. You can double-click the icon to view the certificate.
Cell or object information
Displays information about the selected items. When a group of cells is selected, the sum of the contents is displayed by default; you can right-click on this field and select other functions, such as the average value, maximum value, minimum value, or count (number of items selected).
When the cursor is on an object such as a picture or chart, the information shown includes the size of the object and its location.
Zoom—new in OOo 3.1
To change the view magnification, drag the Zoom slider or click on the + and – signs. You can also right-click on the zoom level percentage to select a magnification value.


