Named range
The most common usage of a named range is, as its name implies, to associate a range of cells to a meaningful name. For example, I created a range named Scores, and then I used the following equation: =SUM(Scores). To create a named range, select the range to define. Use Insert > Names > Define to open the Define Names dialog. Use the Define Names dialog to add and modify one named range at a time.
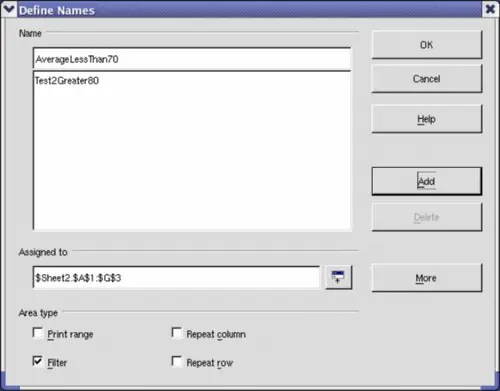
Define a named range.
In a macro, a named range is accessed, created, and deleted using the NamedRanges property of a Calc document. Use the methods hasByName(name) and getByName(name) to verify and retrieve a named range. The method getElementNames() returns an array containing the names of all named ranges. The NamedRanges object supports the method addNewByname, which accepts four arguments; the name, content, position, and type. The macro in Listing 1 creates a named range, if it does not exist, that references a range of cells.
Listing 1. Create a named range that references $Sheet1.$B$3:$D$6.
Sub AddNamedRange()
  Dim oRange     ' The created range.
  Dim oRanges    ' All named ranges.
  Dim sName$     ' Name of the named range to create.
  Dim oCell      ' Cell object.
  Dim s$

  sName$ = "MyNRange"
  oRanges = ThisComponent.NamedRanges
  If NOT oRanges.hasByName(sName$) Then
    REM I can obtain the cell address by obtaining the cell
    REM and then extracting the address from the cell.
    Dim oCellAddress As new com.sun.star.table.CellAddress
    oCellAddress.Sheet = 0     'The first sheet.
    oCellAddress.Column = 1    'Column B.
    oCellAddress.Row = 2       'Row 3.

    REM The first argument is the range name.
    REM The second argument is formula or expression to
    REM use. The second argument is usually a string that
    REM defines a range.
    REM The third argument specifies the base address for
    REM relative cell references.
    REM The fourth argument is a set of flags that define
    REM how the range is used, but most ranges use 0.
    REM The fourth argument uses values from the
    REM NamedRangeFlag constants (see Table 2).
    s$ = "$Sheet1.$B$3:$D$6"
    oRanges.addNewByName(sName$, s$, oCellAddress, 0)
  End If
  REM Get a range using the created named range.
  oRange = ThisComponent.NamedRanges.getByName(sName$)

  REM Print the string contained in cell $Sheet1.$B$3
  oCell = oRange.getReferredCells().getCellByPosition(0,0)
  Print oCell.getString()
End Sub
The method addNewByname() accepts four arguments; the name, content, position, and type. The fourth argument to the method addNewByName() is a combination of flags that specify how the named range will be used. The most common value is 0, which is not a defined constant value.
Table 2. com.sun.star.sheet.NamedRangeFlag constants.
| Value
| Name
| Description
|
| 1
| FILTER_CRITERIA
| The range contains filter criteria.
|
| 2
| PRINT_AREA
| The range can be used as a print range.
|
| 4
| COLUMN_HEADER
| The range can be used as column headers for printing.
|
| 8
| ROW_HEADER
| The range can be used as row headers for printing.
|
The third argument, a cell address, acts as the base address for cells referenced in a relative way. If the cell range is not specified as an absolute address, the referenced range will be different based on where in the spreadsheet the range is used. The relative behavior is illustrated in Listing 2, which also illustrates another usage of a named range—defining an equation. The macro in Listing 2 creates the named range AddLeft, which refers to the equation A3+B3 with C3 as the reference cell. The cells A3 and B3 are the two cells directly to the left of C3, so, the equation =AddLeft() calculates the sum of the two cells directly to the left of the cell that contains the equation. Changing the reference cell to C4, which is below A3 and B3, causes the AddLeft equation to calculate the sum of the two cells that are to the left on the previous row.
Listing 2. Create the AddLeft named range.
Sub AddNamedFunction()
  Dim oSheet          'Sheet that contains the named range.
  Dim oCellAddress    'Address for relative references.
  Dim oRanges         'The NamedRanges property.
  Dim oRange          'Single cell range.
  Dim sName As String 'Name of the equation to create.

  sName = "AddLeft"
  oRanges = ThisComponent.NamedRanges
  If NOT oRanges.hasByName(sName) Then
    oSheet = ThisComponent.getSheets().getByIndex(0)
    oRange = oSheet.getCellRangeByName("C3")
    oCellAddress = oRange.getCellAddress()
    oRanges.addNewByName(sName, "A3+B3", oCellAddress, 0)
  End If
End Sub
 | Listing 2 illustrates two capabilities that are not widely known. A named range can define a function. Also, the third argument acts as the base address for cells referenced in a relative way.
|
Select the range containing the headers and the data and then use Insert > Names > Create to open the Create Names dialog, which allows you to simultaneously create multiple named ranges based on the top row, bottom row, right column or left column. If you choose to create ranges based on the top row, one named range is created for each column header—the header is not included in the named range. Although the header is not included in the range, the text in the header is used to name the range.
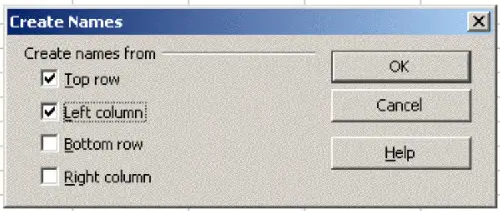
Define a named range.
The macro in Listing 3 creates three named ranges based on the top row of a named range.
Listing 3. Create many named ranges.
Sub AddManyNamedRanges()
  Dim oSheet    'Sheet that contains the named range.
  Dim oAddress  'Range address.
  Dim oRanges   'The NamedRanges property.
  Dim oRange    'Single cell range.

  oRanges = ThisComponent.NamedRanges
  oSheet = ThisComponent.getSheets().getByIndex(0)
  oRange = oSheet.getCellRangeByName("A1:C20")
  oAddress = oRange.getRangeAddress()
  oRanges.addNewFromTitles(oAddress, com.sun.star.sheet.Border.TOP)
End Sub
The constants in Table 3 determine the location of the headers when multiple ranges are created using the method addNewFromTitles().
Table 3. com.sun.star.sheet.Border constants.
| Value
| Name
| Description
|
| 0
| TOP
| Select the top border.
|
| 1
| BOTTOM
| Select the bottom border.
|
| 2
| RIGHT
| Select the right border.
|
| 3
| LEFT
| Select the left border.
|
 | It is possible to create multiple named ranges with the same name. Creating multiple ranges with a single command increases the likelihood that multiple ranges will be created with the same name—avoid this if possible.
|


