Selecting files using the file dialog
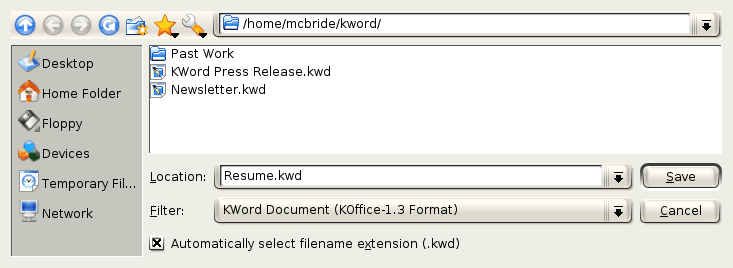
KWord uses a common dialog box for all file related actions (saving, loading, or selecting new files
for insertion into the document). An example is shown below.
This section will look more closely at this dialog and provided detailed information on its use.
We will begin at the top of the dialog.
Toolbar
The current location on the drive is listed at the top-center of the dialog. This example dialog shows the current folder is /home/mmcbride/kword. If you click on this drop
down box, you will see common and recently visited folders. By
selecting one of these folders, you will be immediately moved to
that folder and the dialog box will update the file list.
In the upper left corner, is a blue arrow pointed up. This
arrow will take you up one level in the folder structure.
The next two buttons are back and forward buttons. These
buttons work just like those in an Internet browser. You can use the Back
button to travel to the previous folder, and the Forward button to
advance into a folder you just came from.
Next to the arrow buttons, is a Reload button. Clicking this
button, causes KWord to reload the current folder if new files have been
added or deleted.
To the right of the Reload button, is a blue file folder with a starburst. This button
will let you create a new folder and name it.
Next to the new folder button, is a button with a star on it.
This button allows you to set and navigate through bookmarks. This is
a quick way to jump to commonly accessed folders. By clicking
this button, a submenu appears which allows you to add bookmarks or
jump to a new bookmark.
Next to the bookmark button, is a button with a wrench on it.
Clicking this button brings up a sub menu with several entries:
-
-
If this option is selected, a submenu will appear allowing you to sort your files by name, date or size. You can sort them forward or reversed. You can also determine if
folders should be listed before files, or mixed within the files.
-
-
If this option is selected, only the names of the files and folders will be shown.
Compare this to detailed view.
-
-
If this option is selected, the names, sizes, dates, permisions, file owners and group ownerships are shown.
Compare this to short view.
-
-
This will toggle between revealing and hiding normally hidden files. In most cases you will want to leave this option off.
-
-
The tall box along the left side of the dialog with a dark grey backround is the Quick Navigation Panel. You can use this option to toggle whether it is visible or not.
More detailed information about hte Quick Navigation Panel is avialable further down this page.
-
-
You can use this option to toggle whether the preview panel is visible or not. Typically, the preview panel is left off, but it can be useful when looking for a picture to insert into a document.
-
-
Use this option to toggle between a 2 pane view of the filesystem and a one pane view of the filesystem.
Most people will not need to worry about this option as most people prefer the one pane view.
Quick Navigation Bar
Along the left side of the dialog box, is a column that contains
several icons. You can think of each of these icons as a shortcut to
another subfolder. If you click on an icon, you will be immediately
moved to that location.
You can add/edit or delete entries from the Location Bar.
Simply click with the right mouse button and a small popup menu will appear.
File Name and Filters
The text box labeled
Location:
contains the current filename Resume.kwd. This text box will contain the
filename of the currently selected file when loading new documents or files into
KWord. When saving a file, you will enter the desired filename in this text box.
The text box labeled
Filter:
shows we are only looking
at KWord files. By clicking on the combo box, you can select from several
different file formats. You can also select
All Supported Files
to display
all files that are supported by KWord. The file types available will change depending on
the specific task at hand.
If there is a mark in the checkbox labeled
Automatically select filename extension
,
then KWord will add the correct filename extension based on your selection in the
Filter:
drop down box. If there is no mark in this box, you are responsible for providing an extension. Most users
will leave this box marked.
There is a
Cancel
button, if you click this
button, the action will be aborted, and you will return to editing the
document.
There is an
OK
button, which will be used
when we have selected the correct filename.
Using this dialog, you can move through the folder tree to find
any location on your computer.
To enter a folder click on that folder. To exit that folder,
click the blue up arrow button.
Note
This dialog box is used in many different tasks in KWord. The task will determine the exact effect
of the information you have entered into this dialog box. For more information on the exact effect, see the documentation on that task.