Whatever the ``Next'' menu selection is, you can use the down-arrow key to
select ``Partition a Hard Disk.'' Go ahead and do this now, then press Enter.
The ``Partition a Hard Disk'' menu item presents you with a list of disk drives
you can partition and runs a partitioning application called cfdisk.
You must create at least one ``Linux native'' (type 83) disk partition, and
you probably want at least one ``Linux swap'' (type 82) partition, as explained
in later in this section.
You will now create the partitions that you need to install Debian. For this
example, the assumption is that you are partitioning an empty hard disk.
The boot partition must reside within the first 1,024 of cylinders of your hard
disk (see section 2.3.3 on page ).
Keeping that in mind, use the right-arrow key to highlight the ``New'' menu
selection, and then press Enter. You will be presented with the choice
of creating a primary partition or a logical partition. To help
ensure that the partition containing the boot information is within the first
1,024 cylinders, create a primary partition first. This primary partition will
be your ``Linux native'' partition.
Highlight the ``Primary'' menu selection and press Enter. Next you
will need to enter how large you want that partition to be. Review section 2.3.2
on page if you're not sure how large it should be.
Remember to leave enough space for your swap partition (see section 2.3.5
on page ). Enter the parition size you
want and then press Enter. Next you will be asked if you want to place
the partition at the beginning of free space or at the end. Place it at the
beginning to help ensure that it lies within the first 1,024 cylinders. Highlight
``Beginning'' and press Enter. At this point you will be brought
back to the main screen. Notice that the partition you created is listed. By
default, a Linux native partition was created. This partition must now be made
bootable. Make sure that the ``Bootable'' menu selection is highlighted and
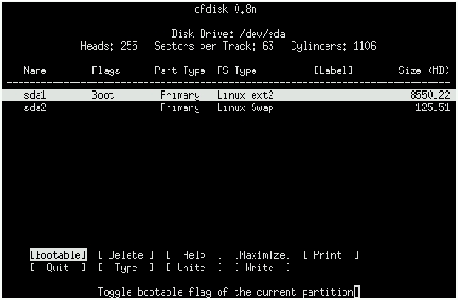
press Enter. The partition should now have the word ``Boot'' listed
under the ``Flags'' column.
With the remaining space, create another primary partition. Using the down-arrow
key, highlight the free space entry in the partition list. Now highlight
the ``New'' menu selection and proceed just as you did when you created the
first primary partition. Notice that the partition is listed as a Linux native
partition. Because this partition will be your swap partition, it must be denoted
as such. Make sure the partition you just created (your swap partition) is highlighted
and then press the left-arrow key until the ``Type'' menu selection is highlighted,
then press Enter. You will be presented with a list of supported partition
types. The Linux swap partition type should already be selected. If it is not,
enter the number from the list that corresponds to the Linux swap partition
(82), and then press Enter. Your swap partition should now be listed
as a Linux swap partition under the ``FS Type'' column in the main screen.
Your cfdisk screen should look something like the screenshot in Figure
3.1 on page . The numbers may not be the
same, but the Flags and FS Type column shoulds be similar.
Until now, nothing on your disk has been altered. If you are satisfied that
the partition scheme you created is what you want, press the left-arrow key
until ``Write'' is highlighted, and press Enter. Your hard disk has
now been partitioned. Quit the cfdisk application by selecting the
``Quit'' menu selection. Once you have left cfdisk, you should be
back in Debian's dbootstrap installation application.


![[*]](crossref.png)