CD-writable (CD-R) drives have grown in popularity as an inexpensive
way to backup and archive several megabytes of data, including
applications, personal files, and even multimedia (audio/video and still
image) presentations. Red Hat Linux includes several tools for using CD-Rs and
CD-rewritable (CD-RW) drives.
4.3.1. Using CD Creator
If you want to perform a quick file or directory backup to a CD-R
or CD-RW, there is a tool included in the
Nautilus file manager called
CD Creator.
CD
Creator allows you to drag and drop files from a
Nautilus window to the CD
Creator interface. To access the CD
Creator feature in Nautilus,
insert a blank CD-R(W) into your drive and the CD
Creator window will automatically display. You can also
double click your home directory icon from the desktop and choose
Go => CD Creator from
the window menus. You can also type burn: in
the Location bar to start CD
Creator.
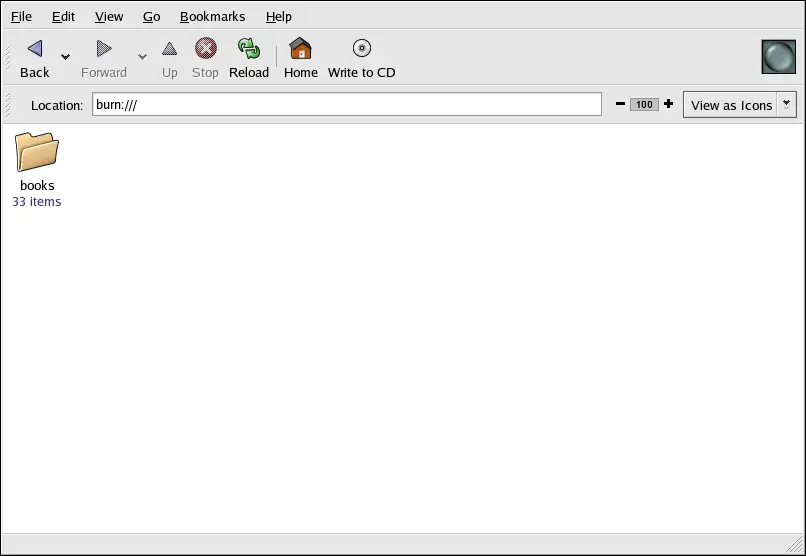
Figure 4-5. The CD Creator Interface in
Nautilus
Open a new Nautilus window and select
the files or directories you want to write to CD-R(W). To select
multiple files, press and hold the [Ctrl] key, and click
on the files and folders. Then release the [Ctrl] key,
press and hold the left mouse button, and drag the files and folders to
the CD Creator window.
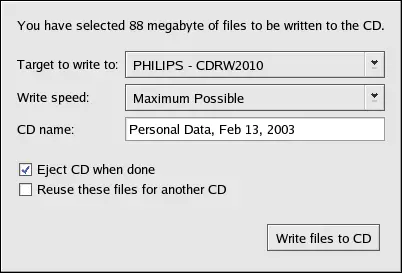
When you are ready to write the files to your CD-R(W), click the
Write to CD button in the CD
Creator window, which displays a dialog box where you
can select the writing speed, name the CD, and choose other
options.
Figure 4-6. The CD Creator Write Dialog Box
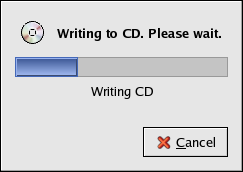
Click the Write files to CD button to
start burning. A status window displays the writing progress, as shown
in Figure 4-7.
Figure 4-7. The CD Creator Write Status Window
By default, the CD-R(W) should automatically eject from your drive
when it is finished. Since it is generally recommended to periodically
backup personal files, the CD Creator can
help you do so quickly.
4.3.2. Using X-CD-Roast
X-CD-Roast is a graphical application
for duplicating and creating (also known as mastering)
CD-ROMs. X-CD-Roast automates the process
of burning CD-Rs and CD-RWs and is highly configurable to many CD
mastering or duplicating needs.
To start X-CD-Roast choose
Main Menu => System Tools =>
CD Writer.
To start it at a shell prompt, type
/usr/bin/xcdroast.
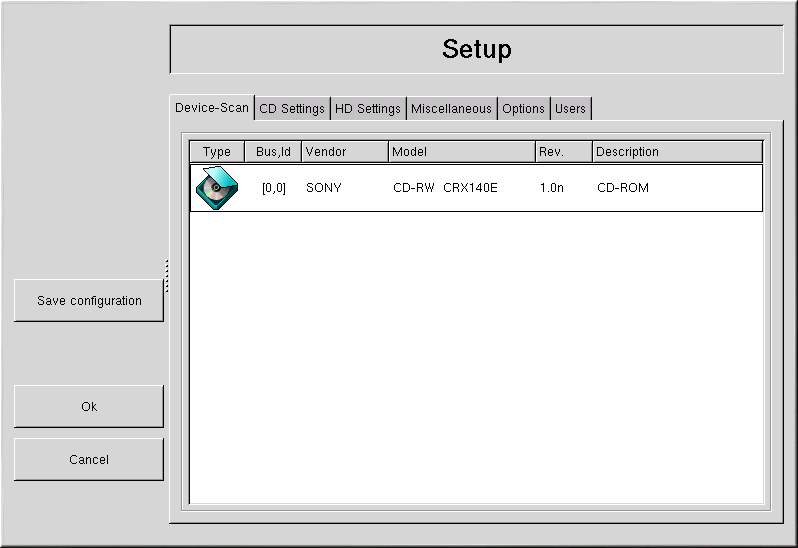
X-CD-Roast first scans your device
busses and find your CD-R(W) drive. It then allows you to
configure settings for CD-writer, CD-ROM drive, and more. Figure 4-8 illustrates the
Setup screen and its configuration options. Note
that your CD-R(W) drive brand may be different from the drive
shown.
Figure 4-8. X-CD-Roast Setup Screen
Check your CD-R(W) manufacturer documentation to set some of the
CD Settings options, such as CD Writer
Speed and CD Writer FIFO-Buffer
Size. All CD image (.iso or
.img) files need to be stored in a central
location accessible to X-CD-Roast. You must
specify a path on your hard drive's file system that has at least 700
Megabytes (MB) of free space available. You can configure the path
where you wish to store CD images in the HD
Settings tab under Path.
X-CD-Roast is well-documented within
the interface itself, as several of the options have long, descriptive
pop-up tips that informs you of the associated function in detail. You
can access these tooltips by leaving your mouse
pointer on a button or drop-down menu for at least two
seconds.
4.3.2.1. Using X-CD-Roast to Duplicate CD-ROMs
To duplicate an existing CD-ROM for backup purposes, click the
Duplicate CD button in the main panel. You
can read all of the tracks on a CD —
all CD-ROM information, including data and audio, is stored on
tracks — by clicking Read CD. You can
set the speed at which you read a CD-ROM as well as find out some
information about the CD-ROM track such as its type and size. If you
are copying tracks from an audio CD, you can preview each track with
Play Audio-Tracks. Since
X-CD-Roast reads all tracks of a CD-ROM
by default, you can delete unwanted tracks with Delete
Tracks.
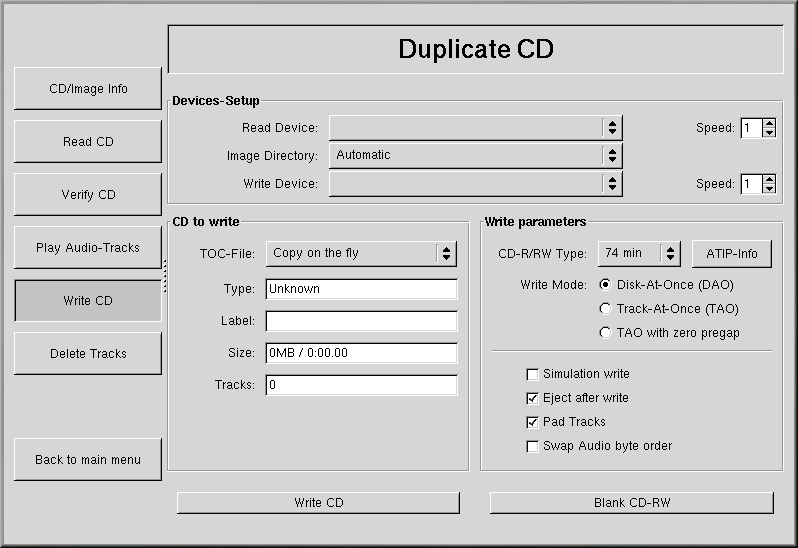
Finally, to burn your tracks onto CD-R(W) media, choose
Write CD. Figure 4-9
shows the Write CD dialog box, where you can
configure the speed at which you read and write the tracks to
CD-R(W), as well as whether you wish to copy the CD-ROM
on-the-fly or create an image file first
before burning (which is recommended to prevent write or read errors
from occurring during the duplication process). Click the
Write CD button to start the burning
process.
Figure 4-9. Using X-CD-Roast to Duplicate CDs
4.3.2.2. Using X-CD-Roast to Create a
CD
It is always recommended to backup personal data and information
often in case of hardware failure or file system
corruption. X-CD-Roast allows you to
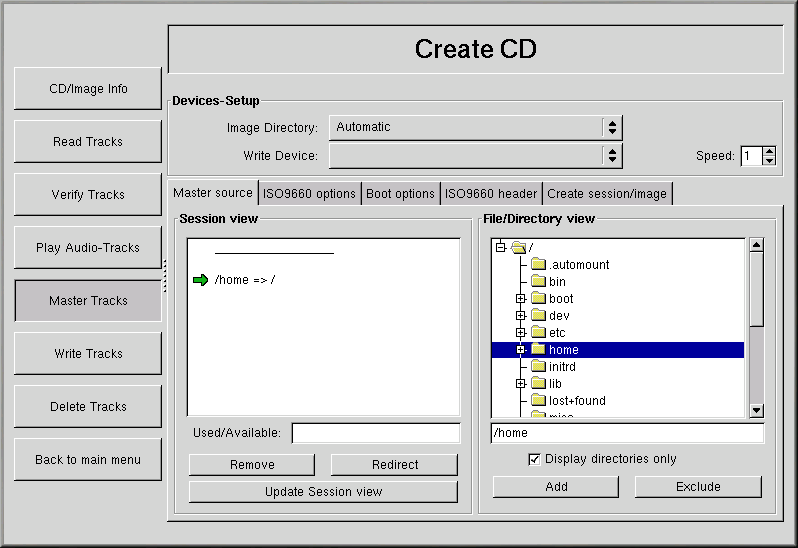
backup files on your hard drive partition using Create
CD. This facility allows you to add files and
directories into a CD session using
Master Tracks. There are other options within
the Master Tracks dialog that allows you to
configure advanced settings; however, the defaults are set correctly
to create data CD-ROMs, so no further configuration is
necessary. Figure 4-10 shows a session that
is preparing the entire /home directory for
backup.
Figure 4-10. Using X-CD-Roast to Back-up Hard
Drive Files
Highlight the files and directories that you wish to add to the
session and click Add. After you have added
all files and directories you want to write to the CD-R(W), click
the Create session/image tab to create the
.img file. You must first click
Calculate size, then click Master
to image file to create the image.
To write your tracks to the CD-R(W), click Write
Tracks from the panel on the left. In the
Layout Tracks tab, highlight the image file
you created in the box on the right, and click
Add. The image displays in the
Tracks to write box on the left side. Click
Accept track layout, and click the
Write Tracks tab to return to the main
writing dialog. Click Write tracks to write
the image to the CD-R(W).
Tip
You can also create and write the image to the CD-R(W) in
one step by clicking Master and write
on-the-fly in the Create session
image tab. This saves a few steps but can sometimes
cause read-write errors. It is recommended that you use the
multi-step method instead of the on-the-fly methods.
4.3.2.3. Writing ISOs with X-CD-Roast
Large files that end in .iso are known as
ISO9660 (or ISO) image files. For example,
Red Hat Linux is freely available as ISO images that you can download and
write to the CD-R(W). There are also other ISO image files available
on FTP and websites. There are other file types that can be burned
as images, such as .img and
.raw, but ISO images are the most common CD
image format.
To write an ISO image file to a CD-R(W) with
X-CD-Roast, move the ISO file to the path
specified during setup, then click Create
CD. In the Layout tracks tab,
highlight the ISO image file you wish to burn and click
Add, then Accept track
layout. This automatically loads the Write
Tracks tab, where you can click Write
Tracks to burn the image to the CD-R(W).
4.3.3. Using CD-Rs and CD-RWs with Command Line Tools
If you want to use a shell prompt to write images to CD-R or
CD-RWs, there are two utilities available: mkisofs
and cdrecord. These utilities have several advanced
options that are beyond the scope of this guide; however, for basic
image creation and writing, these tools save some time over the
graphical alternatives such as
X-CD-Roast.
4.3.3.1. Using mkisofs
The mkisofs utility creates ISO9660 image
files that can be written to a CD-R(W). The images created by
mkisofs can include all types of files. It is
most useful for archival and file backup purposes.
Suppose you wish to backup a directory called
/home/joeuser/, but exclude the subdirectory
/home/joeuser/junk/ because it contains
unnecessary files. You want to create an ISO image called
backup.iso and write it to CD-R(W) so that you
can use it on your Red Hat Linux PC at work and your Windows laptop for
trips. This can be done with mkisofs by running
the following command:
The image is created in the same directory that you ran the
command. Table 4-1 explains each command
line option. For more information on using
mkisofs, refer to the additional resources in
Section 4.4 Additional Resources.
Generates Joliet
naming records; useful if the CD is used in Windows
environments.
-R
Generates Rock Ridge (RR) naming records to preserve
filename length and casing, especially for UNIX/Linux
environments.
-A
Sets an Application ID — a text string that will
be written into the volume header of the image which can be
useful to determine what applications are on the CD.
-V
Sets a Volume ID — a name that is assigned to
it if the image is burned, and the disc is mounted in Solaris
and Windows environments.
-v
Sets verbose execution, which is useful for viewing the
status of the image as it is being made.
-x
Excludes any directory immediately following this
option; this option can be repeated (for example,
... -x /home/joe/trash -x /home/joe/delete
...).
Table 4-1. mkisofs Options
4.3.3.2. Using cdrecord
The cdrecord utility writes audio, data, and
mixed-mode (a combination of audio, video,
and/or data) CD-ROMs using options to configure several aspects of
the write process, including speed, device, and data
settings.
To use cdrecord, you must first establish the
device address of your CD-R(W) device by running the following
command as root at a shell prompt:
cdrecord -scanbus
This command shows all CD-R(W) devices on your computer. It is
important to remember the device address of the device used to write
your CD. The following is an example output from running
cdrecord -scanbus.
To write the backup file image created with
mkisofs in the previous section, switch to the
root user and type the following at a shell prompt:
cdrecord -v -eject speed=4 dev=0,3,0 backup.iso
The command sets the write speed (4), the device address
(0,3,0), and sets write output (verbose
[-v]), which is useful for tracking the status of the write
process. The -eject argument ejects the
CD-ROM after the write process is complete. The same command can
also be used for burning ISO image files downloaded from the
Internet, such as Red Hat Linux ISO images.
You can use cdrecord to blank CD-RW discs for
reuse by typing the following: