This filter is found in
Filters->Distorts->Curve Bend.
This filter allows you to create a curve that will be used to distort
the active layer or selection. The distortion is applied gradually
from an image or selection border to the other
10.3.2.
Options
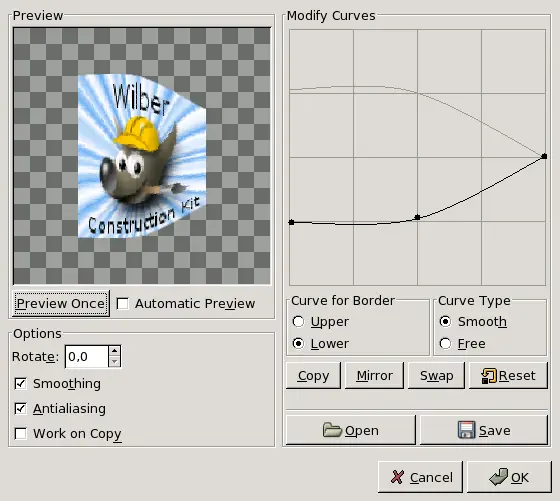
Preview
The preview displays changes to image or selection without
modifying the image until you press OK.
Preview Once
This button allows you to update the preview each time you
need it.
Automatic Preview
With this option, preview is changed in real time. This
needs much calculation and may lengthen work. It is
particularly evident when using "Rotation".
Options
Rotate
There, you can set the application angle of filter (0-360 counter-
clockwise). 0 is default setting: The curve will be applied from
the upper border and/or from the lower. Set to 90, it will be
applied from left border and/or from the right one.
Smoothing and Antialiasing
The distort process may create hard and stepped borders.
These two options improve this aspect.
Work on Copy
This option creates a new layer called "Curve_bend_dummy_layer_b"
which becomes the active layer, allowing you to see changes to your
image in normal size without modifying the original image until you
press the "OK" key.
Modify Curve
In this grid, you have a marked horizontal line, with a node at
both ends, which represents by default the upper border of image.
If you click on this curve, a new node appears, that you can drag
to modify the curve as you want. You can create several nodes on
the curve.
You can have only two curves on the grid, one for the so named
"upper" border and the other for the so named "lower" border. You
can activate one of them by checking the
Upper or Lower radio
button.
If you use the Curve Type Free option, the
curve you draw will replace the active curve.
Curve for Border
There you can select whether the active curve must be applied to
the Superior (or left) or the
Inferior (or right) border, according to the
rotation.
Curve Type
With the Smooth, you get automatically a well
rounded curve when you drag a node.
The Free option allows you to draw a curve
freely. It will replace the active curve.
Buttons
Copy
Copy: Copy the active curve to the
other border.
Mirror
Mirror: Mirror the active curve to the
other border.
Swap
Swap: Swap the "superior" and
"inferior" curves.
Reset
Reset: Reset the active curve.
Open
Open: Load the curve from a file.
Save
Save: Save the curve to a file.
10.3.3.
Example
Published under the terms of the GNU General Public License