Follow Techotopia on Twitter

On-line Guides
All Guides
eBook Store
iOS / Android
Linux for Beginners
Office Productivity
Linux Installation
Linux Security
Linux Utilities
Linux Virtualization
Linux Kernel
System/Network Admin
Programming
Scripting Languages
Development Tools
Web Development
GUI Toolkits/Desktop
Databases
Mail Systems
openSolaris
Eclipse Documentation
Techotopia.com
Virtuatopia.com
Answertopia.com

How To Guides
Virtualization
General System Admin
Linux Security
Linux Filesystems
Web Servers
Graphics & Desktop
PC Hardware
Windows
Problem Solutions
Privacy Policy


3.5. Pencil

Revision History
Revision $Revision: 1.51 $ 2006-02-15 j.h

Figure 8.23.  Pencil tool

Pencil tool

The Pencil tool is used to draw free hand lines with a hard edge. The pencil and paintbrush are similar tools. The main difference between the two tools is that although both use the same type of brush, the pencil tool will not produce fuzzy edges, even with a very fuzzy brush. It does not even do anti-aliasing.

Why would you want to work with such a crude tool? Perhaps the most important usage is when working with very small images, such as icons, where you operate at a high zoom level and need to get every pixel exactly right. With the pencil tool, you can be confident that every pixel within the brush outline will be changed in exactly the way you expect.

[Tip] Tip

If you want to draw straight lines with the Pencil (or any of several other paint tools), click at the starting point, then hold down Shift and click at the ending point.

3.5.1. Activate Tool

  • The Pencil Tool can be called in the following order, from the image-menu: Tools->Paint Tools->Pencil

  • The Tool can also be called by clicking the tool icon:

  • or by clicking on the N keyboard shortcut.

3.5.2. Key modifiers (Defaults)

Ctrl

This key changes the pencil to a Color Picker.

Shift

This key places the pencil tool into straight line mode. Holding Shift while clicking Button 1 will generate a straight line. Consecutive clicks will continue drawing straight lines that originate from the end of the last line.

3.5.3. Options

Figure 8.24.  Pencil Tool options

Pencil Tool options
[Note] Note

See the Brush Tools Overview for a description of tool options that apply to many or all brush tools.

Overview

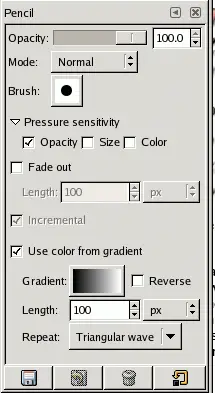
The available tool options can be accessed by double clicking the Pencil Tool icon.

Opacity

The Opacity slider sets the transparency level for the paint. A higher opacity setting results in a more opaque fill and a lower setting results in a more transparent fill.

Mode

The Mode dropdown list provides a selection of paint application modes. A list of these modes can be found in the Glossary.

Brush

Indicates the active brush. Clicking on the brush icon opens the brush selection dialog.

Gradient

The dropdown list allows to select a gradient that will be used if the Use Color from Gradient option is checked. This gradient can be reversed by checking the Reverse option.

Incremental

The Incremental checkbox activates incremental paint mode for the tool so that color opacity increases each time the pencil passes over the same place but cann't exceed the original color opacity. More information about incremental mode can be found in the glossary.

Pressure Sensitivity

The Pressure Sensitivity section sets the sensitivity levels for input devices that support this option.

  • Opacity: Drawing opacity increases with stylus pen pressure.

  • Size: Drawing width increases with stylus pressure.

  • Color: GIMP uses the active gradient colors in order as stylus pressure increases.

Fade Out

This option sets the stroke to fade out after the specified distance. The stroke will fade to transparency at the completion of the set distance.

Use Color from Gradient

Instead of using the Foreground or Background color, the color is based on the active gradient selection. By checking Reverse you can reverse the gradient direction.

The gradient is painted in a forward direction. The entire color sequence of the gradient will be rendered within the Length set.

Repeat

Sawtooth Wave: Renders the gradient repeatedly. At each expiry of the distance that has been set, the gradient will begin rerendering from the beginning.

Triangular Wave: Renders the gradient repeatedly. At each expiry of the distance that has been set, the gradient will reverse direction and render in that direction until the expiry of the distance once more. At this point, it will begin again until the stroke is complete.


  Published under the terms of the GNU General Public License Design by Interspire