The Ellipse Selection tool is designed to select circular and elliptical
regions from an image, with high-quality anti-aliasing if you want it. For
information on selections and how they are used in GIMP see
Selections;
for information on features common to all selection tools see
Selection Tools.
This tool is also used for rendering a circle or ellipse on an image. To
render a filled ellipse, create an elliptical selection, and then fill it
using the Bucket Fill tool.
To create an elliptical outline, the simplest and most flexible approach
is to create an elliptical selection and then
stroke
it. However, the quality of anti-aliasing with this approach is rather
crude. A higher quality outline can be obtained by creating two elliptical
selections with different sizes, subtracting the inner one from the outer
one; however this is not always easy to get right.
2.3.1.
How to Activate
The Ellipse Selection Tool can be activated from an image
menu as
Tools->Selection Tools->Ellipse Select;
from the Toolbox by clicking on the tool icon
;
or from the keyboard using the shortcut e.
2.3.2.
Key modifiers
Note
See Selection Tools
for help with modifier keys that affect all these tools in the same
way. Only effects that are specific to the Ellipse Select tool are
explained here.
Ctrl: Pressing the Ctrl key after starting
your selection, and holding it down until you are finished,
causes your starting point to be used as the center of the
selected ellipse, instead of a corner of the rectangle that
may contain it. Note that if you press the Ctrl key
before starting to make the selection,
the resulting selection will be subtracted from the existing
selection.
Shift: Pressing the Shift key after starting
your selection, and holding it down until you are finished,
constrains the selection to be a circle. Note that if you
press the Shift key before starting to
make the selection, the resulting selection will be
added to the existing selection.
Ctrl-Shift: Pressing both keys combines the two effects,
giving you a circular selection centered on your starting
point.
2.3.3.
Options
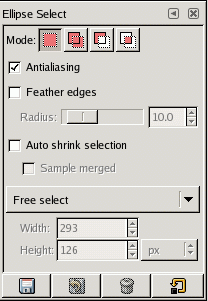
Figure 8.6.
Tool Options for the Ellipse Select tool
Note
See Selection Tools
for help with options that are common to all these tools. Only options
that are specific to the Ellipse Select tool are described here.
You can access to the Ellipse Selection options by double-clicking
on the
icon.
Antialiasing
Checking this option will make the edge of the selection appear
smoother, by partially selecting pixels that the edge passes
through. The idea of antialiasing is discussed in more detail under
the glossary entry
Antialiasing.
You will probably find that you get more satisfactory results by
using it, in most cases. The main situation where you might want not
to use it is in cutting and pasting, where partial selection can
sometimes create strange color fringes.
Auto Shrink Selection
The Auto Shrink Selection
checkbox will make your next selection automatically shrink to the
nearest elliptical shape available on the image layer. The algorithm
for finding the best ellipse to shrink to is "intelligent", which in
this case means that it sometimes does surprisingly sophisticated
things, and sometimes does surprisingly strange things. In any case,
if the region that you want to select has a solid-colored surround,
auto-shrinking will always pick it out correctly. Note that the
resulting elliptical selection does not need to have the same shape
as the one you sweep out.
If Sample Merged
is also enabled, then the Auto Shrink will use the pixel information
from all the layers of the image. For further information regarding
Sample Merge, see the glossary entry
Sample Merged.
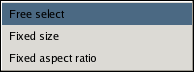
Size Constraints
Figure 8.7.
Size Constraint Option Menu for the Ellipse Select tool
This menu allows you the option of constraining the shape of
the ellipse in three different ways.
Free Select.
This option places no constraint on the ellipse.
Fixed Size.
This will allow you to manually specify a size for the
selection using the Width, Height, and Unit controls.
Fixed Aspect Ratio.
This option allows you to resize the selection while
keeping the aspect ratio fixed according to the two numbers
entered in the Width and Height controls.
Published under the terms of the GNU General Public License


![[Note]](../images/note.png)