Subsections
4.2 Layer Masks
Layer masks are special layers that are only 8 bits deep and that
represent the alpha channel
of an image layer. The main difference between channel and layer
masks is that the layer mask represents the alpha channel of the layer
it is linked to, whereas channel masks represent selections and exist
independently of any particular layer. Nevertheless, as will be seen
later in this chapter, there is an intimate relationship between alpha
channels and selections and, by extension, between layer masks and
channel masks.
The interpretation of white, black, and gray pixels in a layer mask is
slightly different than that for a channel mask. A layer mask
represents an alpha channel, which, in turn, controls the transparency
of a layer. In this context, for the layer mask, white represents
100% opacity, black 100% transparency, and gray an intermediate
level of opacity/transparency. This section describes the basic
operations that can be performed on layer masks.
4.2.1 Creating a Layer Mask
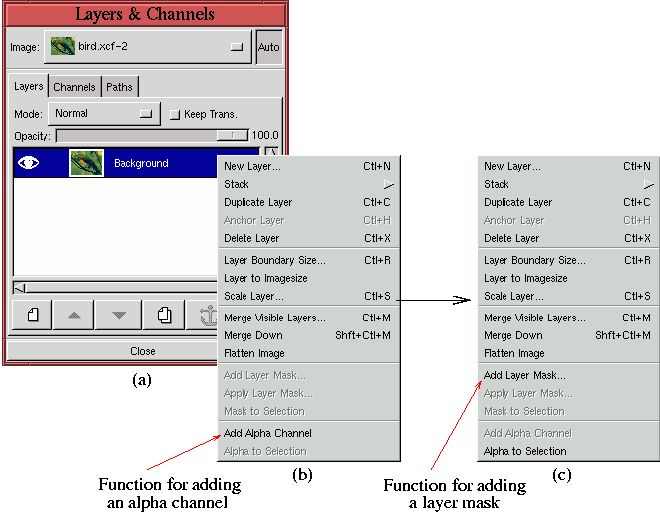
To create a layer mask, make the desired layer active in the Layers
dialog and choose Add Layer Mask
from the Layers menu. This creates the layer mask, but only if the
active layer already has an alpha channel. If it does not have an
alpha channel create one using Add
Alpha Channel from the Layers menu.
Figure
4.11(a)
Figure 4.11:
The Layers Menu
 |
illustrates the Layers dialog for an image consisting of an alpha-less
background layer, and Figure
4.11(b) shows the
associated Layers menu. As can be seen, all the functions in the two
lowest groups of the Layers menu, including
Add Layer Mask, are
grayed out except for the function
Add Alpha Channel. Selecting
this function, adds the required alpha channel, and bringing up the
Layers menu a second time now produces the Layers menu shown in
Figure
4.11(c). As can be seen, the function
Add Layer Mask is now available.
Selecting the Add Layer Mask function from the Layers menu
brings up the Add Mask Options
dialog. This dialog allows a choice of three initial states for the
new mask. The default is White (Full Opacity), which is what you will
choose most often. This choice produces a layer mask that leaves the
image layer fully opaque. It can sometimes be useful to choose the
second option, Black (Full Transparency), which creates a layer mask
that makes the image layer fully transparent. The final option is
Layer's Alpha Channel,
which loads the active layer's alpha channel into the layer mask.
Figure
4.12
Figure 4.12:
The Creation of a Layer Mask
 |
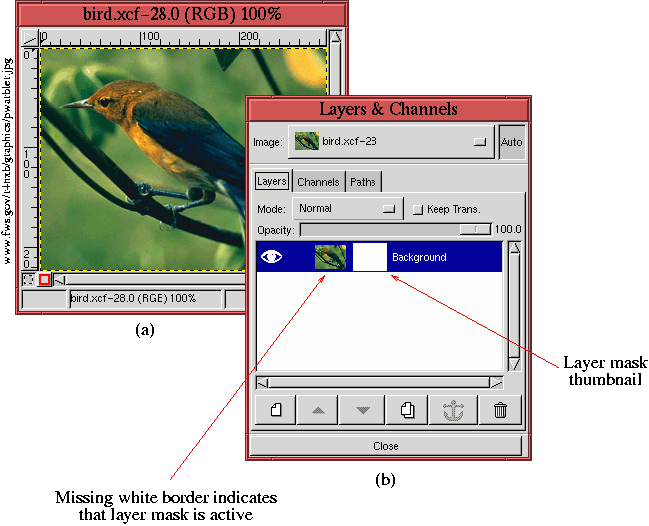
illustrates a layer mask created using the White (Full Opacity)
option. Figure
4.12(a) shows the image window,
and Figure
4.12(b) shows its associated Layers
dialog. The layer strip for the image shows the thumbnail of the
image and, next to it, the thumbnail of the newly created white layer
mask. That a layer mask is associated with a single image layer is
underscored by the fact that the mask's thumbnail appears in the same
layer strip as the image layer's thumbnail.
