 |
||
|
|
illustrates the basic operations of a Bezier path. The initial Bezier path shown in Figure 3.6(a) was created by clicking in the image window five times. The upper-left corner was the first point, and the lower-left, lower-right, and upper-right corners were the second, third, and fourth points added to the path. The final click of the mouse was made on the initial point, thus closing the path. As each point was added, the straight-line segments seen in the figure appeared between the control points. While constructing a Bezier path, the mouse cursor appears as an arrow, with a filled circle just below and slightly to the arrow's right. This circle indicates that the path is not closed and that the next mouse click will create a new control point. Note that Bezier paths need not be closed. This is discussed in more detail in Section 3.4, which describes the Paths dialog. The path segments between control points can be made to curve by manipulating the points' control handles. For a closed Bezier path, the control handles are made visible by clicking on a control point and dragging. Figure 3.6(b) shows how the control handles for the upper-left corner of the Bezier path have been pulled out of that control point. The dragging action of the mouse positions one of the control handles while the other moves in tandem with, but diametrically opposite, the first. As can be seen in Figure 3.6(b), the two path segments attached to the control point are made to curve by the action of the control handles. Note that the control handles do not disappear once the mouse button has been released and that the handles can be readjusted at any time by clicking the mouse on either handle and dragging. However, only one set of handles may be visible at once. Clicking on another control point displays its handles while toggling off the visibility of the handles for any other point. Also note that when the mouse cursor is close enough to a control point or control handle to manipulate it, the cursor changes from an arrow with a filled circle below it to an arrow with the outline of square. Because control handles resemble squares, this special cursor is a useful way to indicate that the mouse cursor is close enough to the control point for the handles to be active. The two control handles for a point can be moved independently of each other by using the Shift key. Pressing the Shift key while dragging a handle with the mouse makes that handle move while the other remains stationary. Moving a single control handle in this way allows the curvature of a single path segment to be manipulated. Figure 3.6(c) shows the result of using the Shift key to move one of the control handles independently of the other. Note how this changes the curve of the upper segment of the square while leaving the curve of the left segment as it was. It is also possible to reposition a control point. This is done by pressing the Control key before clicking on a control point. Dragging the mouse while the mouse button and Control key are pressed moves the control point. The result of repositioning a control point is shown in Figure 3.6(d). After creating a Bezier path with all the control points properly positioned and all the path segments appropriately curved, it may then be converted to a selection. This is done by clicking inside the closed path. Note that when the mouse cursor is moved inside the closed path, the cursor changes to an arrow with the outline of a dashed rectangle below it. The dashed rectangle resembles the Marching Ants, which will appear when the Bezier path is converted to a selection.
Figures
3.7 through
3.9
show the application of the Bezier Path tool in a practical
example. Figure
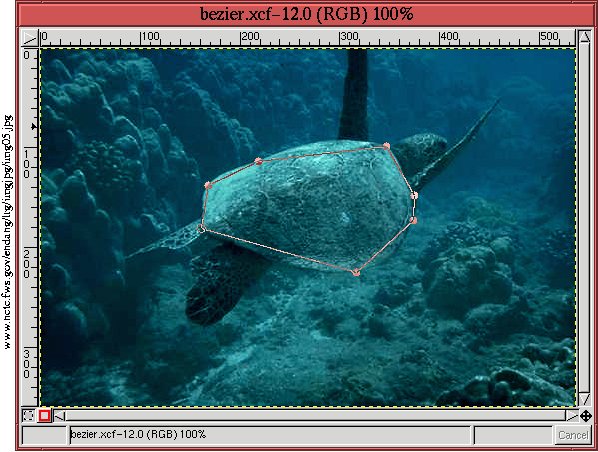
3.7 shows that a closed
Bezier path has
been created by placing seven control points around the perimeter of a sea turtle's shell. Although the points are all positioned on the edge of the shell, the straight-line segments between points do not marry well to the shell's shape.
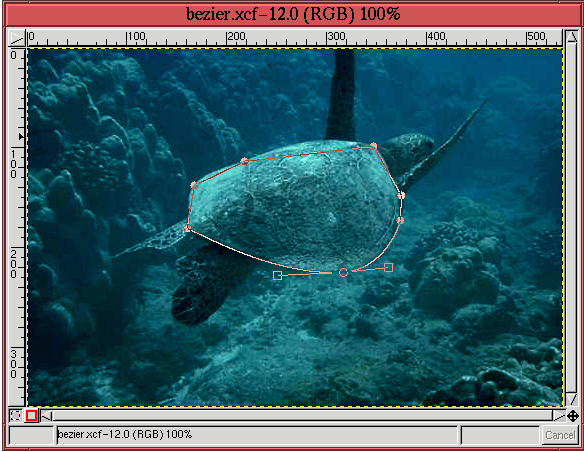
As just described, the Bezier path can be adjusted to the shell's
shape by manipulating the control handles. The first pair of handles
are shown in Figure
3.8.
The two handles had to be adjusted independently of each other to properly match the curve of the shell on either side of the control point. This can be seen in the figure by the different lengths of the control handles and by the slight angle between them.
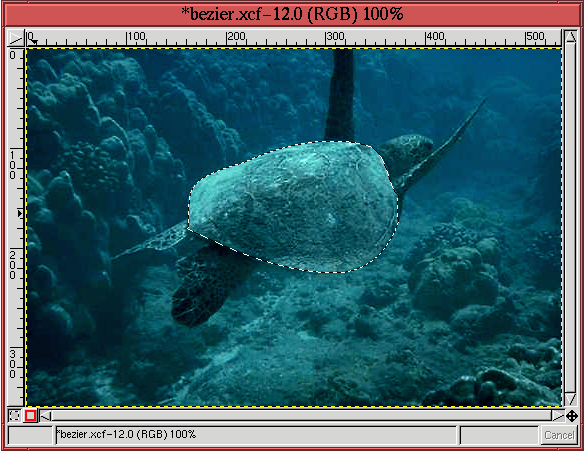
After adjusting the control handles for each point in the Bezier path
it is converted to a selection. The result, showing the Marching
Ants, is illustrated in Figure
3.9.
What is particularly interesting about this example is that the selection has been made with only a few control points. This is a strength of this tool. However, there are limitations to what can be accomplished with a Bezier path. A very irregular shape will need many control points and will require a lot of work to adjust the path to the shape. A practical question is where should the control points be placed? Another is how many control points are necessary to adequately select a shape? For the placement of control points here are some rules of thumb:
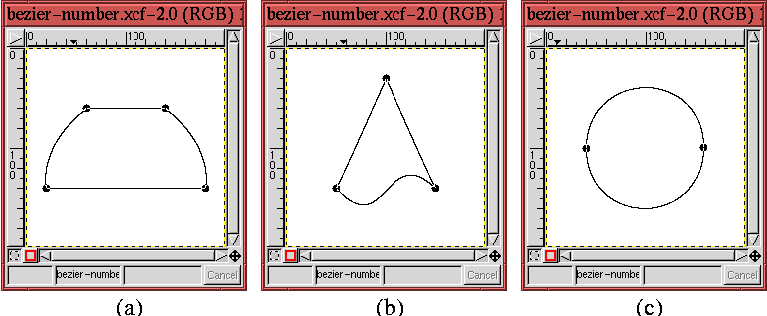
The number of control points needed to adequately adjust a Bezier path to a shape is a more difficult question. Figure 3.10(c) shows that a pair of control points are all that is needed to create a circle. Thus, a single control point can cover up to 180 degrees of curve. However, this doesn't account for all curve characteristics. I personally like to place control points as the shape of my selection passes through 90 degrees of curve. This personal rule is borne out in the sea turtle selection shown in Figures 3.7. In any case, the issue of the number of points required for a shape is not critical because it can be resolved using the Add Point and Delete Point functions available in the Paths dialog. These are discussed in detail in Section 3.4.
|
|
||||||||||||||||||||||


| Published under the terms of the Open Publication License | Design by Interspire |