2.6.5 The Transform Tool
General transformations of a layer can be done using the Transform tool from the Toolbox. This tool can perform rotation,
scaling, shearing, and perspective transformations of the active
layer. As usual, care must be taken to specify the active layer
before applying this tool.
Figure
2.24(a)
Figure 2.24:
Transform Tool Dialog
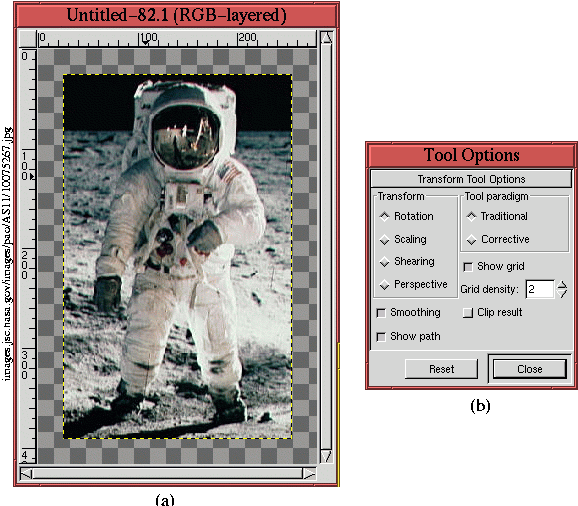 |
illustrates an image layer contained in a somewhat larger window.
Shown in Figure
2.24(b) is the
Tool Options
dialog, which is obtained by double-clicking the
Transform tool
icon in the Toolbox window. The four radio buttons in the Transform
area of the dialog are used to select the desired transformation type,
which can be Rotation, Scaling, Shearing, or Perspective.
Transforming a layer requires interpolation of pixel values, and
this can introduce some jagged-edge artifacts into the result. The
toggle button labeled Smoothing diminishes this effect, which is why
it is on by default. It does tend to make the image a little less
sharp, though (see Section
6.4.1 for a discussion of
how to recover some of the lost sharpness).
The Tool paradigm area of the dialog has two options. The default is
Traditional, which maps the image to a transformed grid (see
Figure
2.26). For those who like to go
against the grain, the Corrective option maps the transformed grid to
the image, thus producing an inverse transformation. For example,
rotating the transform grid in one direction with the Corrective
option maps the grid back to the image, making the image itself rotate
in the opposite direction. Sound complicated? It isn't. Just try it
yourself and you'll see.
2.6.5.0.1 Rotation
Figures
2.25
Figure 2.25:
Initiating the Rotation Transformation
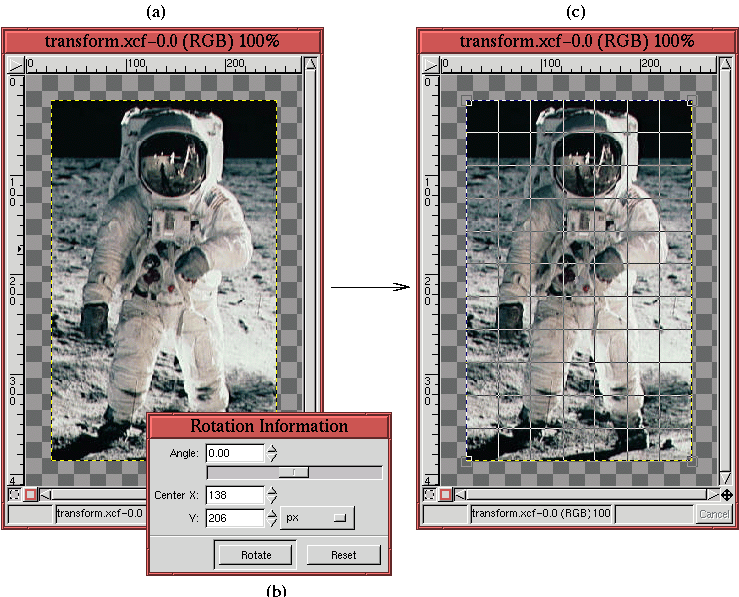 |
and
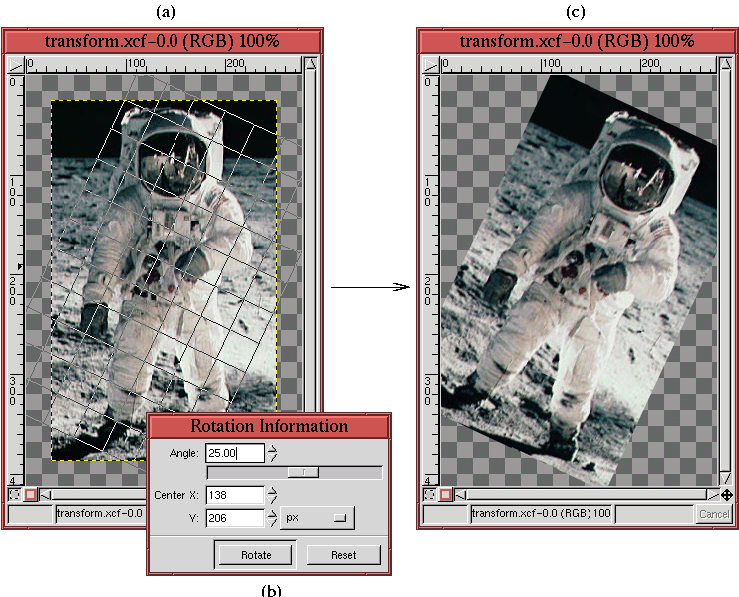
2.26
Figure 2.26:
Finalizing the Rotation Transformation
 |
illustrate the use of the Rotation option of the
Transform tool.
Figure
2.25(a) shows the image layer, and
Figure
2.25(b) the
Rotation
Information dialog that appears
when the left mouse button is clicked in the image window. The
Rotation Information dialog has entry boxes that can be used to give
a specific angle of rotation as well as the position of the point that
will be the center of rotation. By default, the center of rotation is
the geometric center of the active layer.
For each of the Transform options, Rotation, Scaling, Shearing, or
Perspective, the first mouse click on the image brings up a dialog
specific to the chosen option. This mouse click also displays a
grid superimposed on the active
layer in the image window. The number of grid lines can be controlled
from the Tool Options dialog (see
Figure
2.24(b)). The grid lines can be seen in
Figure
2.25(c). Placing the mouse cursor
within the active layer in the image window changes the cursor in
accordance with the type of transformation to be performed. The image
outline and grid can then be transformed by clicking and dragging.
The transformation of the grid can be adjusted as many times as
desired because the transformation of the image is not initiated
until the option transform button is clicked. For example, the Rotate
button in Figure
2.26(b) must be clicked to
cause the actual rotation of the image.
As the grid is rotated for the Rotate option of the Transform
tool, the angle is interactively reported in the Rotation
Information dialog. The rotated outline for an angle of 25o is
shown in Figure
2.26(a). As already stated,
once the desired angle of rotation is found, the image itself is
rotated by clicking on the Rotate button, seen in the dialog shown in
Figure
2.26(b). The resulting rotated layer
is shown in Figure
2.26(c).
As an alternative to interactively rotating the grid with the mouse,
the rotation can also be performed by entering a value into the Angle
entry box or by using the slider in the Rotation dialog. Useful
values of rotation can be determined with the Measure tool. An example of this is illustrated
in Section
7.2.
2.6.5.0.2 Scaling
Figure
2.27
Figure 2.27:
The Scaling Transformation
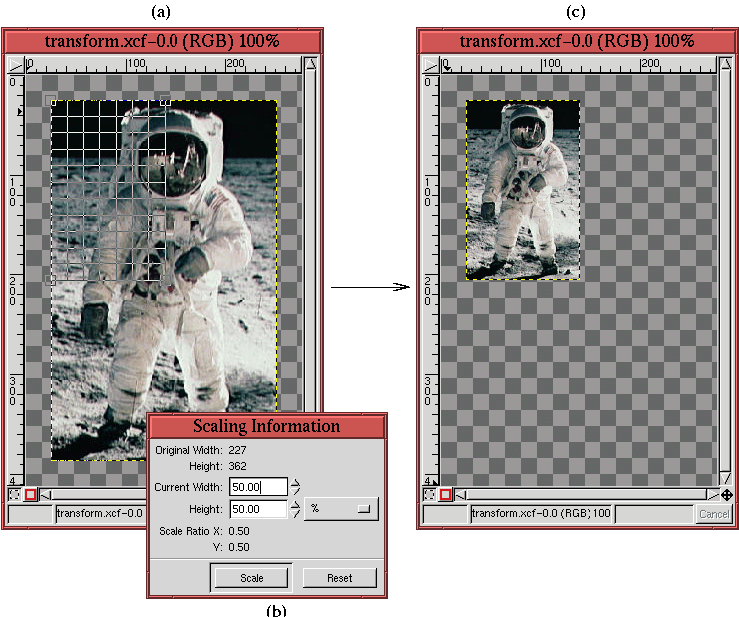 |
illustrates the Scaling option of the
Transform tool. Like for
rotation, scaling can be performed interactively with the mouse or by
entering values into the Width and Height entry boxes in the Scaling
dialog.
Values can be entered into the Scaling dialog in
a number of units, the default being pixels. It is often convenient
to perform scaling as a percentage of the original dimensions (which
are shown at the top of the Scaling dialog as the Original Width and
Height). This can be done by choosing the % option from the
pull-down menu in the dialog. Figure
2.27(b)
shows that this choice was used to scale the grid in
Figure
2.27(a) by 50% in both dimensions.
When the Scale button in the dialog is clicked, this produces the
result shown in Figure
2.27(c).
It is useful to be able to constrain the X and Y scale ratio so as to
maintain their aspect ratio when scaling a layer with the Transform tool. This is done by pressing both the Control and Alt
keys while using the mouse to scale the transform grid. Useful values
for scaling can be determined using the Measure tool. Section
7.5 illustrates an example of
this.
2.6.5.0.3 Shearing
Figure
2.28
Figure 2.28:
The Shear Transformation
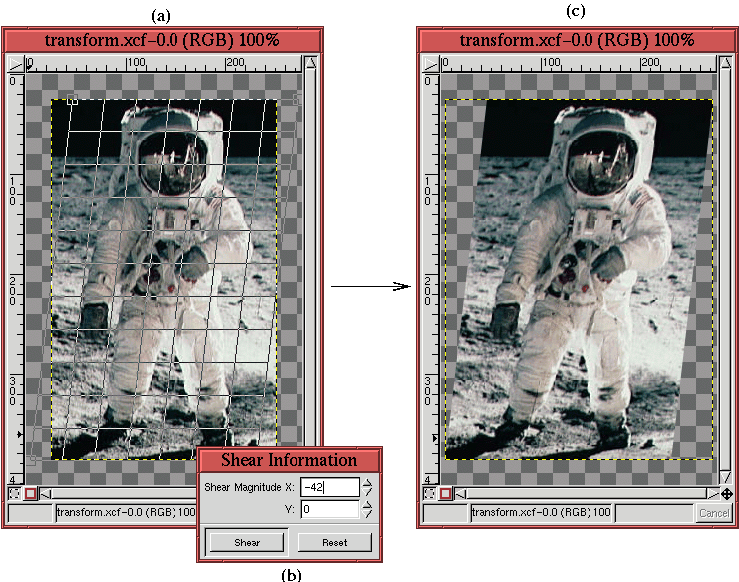 |
shows the application of the Shearing option of the
Transform
tool. As with the other options, shearing can be applied
interactively with the mouse or by entering values into the
Shear
Information dialog.
Shearing can be
applied either horizontally or vertically, but not in both directions
simultaneously. If applied using the mouse, the direction of shear is
determined by the mouse's initial direction of movement. Otherwise,
it depends on the first entry box used in the dialog.
2.6.5.0.4 Perspective
Perspective is perhaps the most intriguing option of the Transform tool. This option is illustrated in
Figure
2.29.
Figure 2.29:
The Perspective Transformation
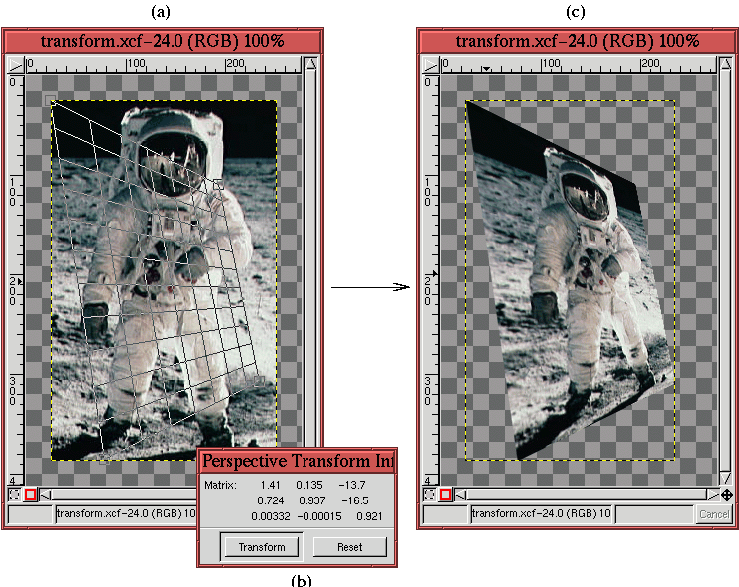 |
This is the only transform option where values cannot be directly
entered into a dialog. As shown in
Figure
2.29(b), there is numerical feedback
about how the Perspective transform option is applied to the image,
but this is not particularly valuable because it is unclear how to
reuse the information. The consequence is that the Perspective option
may only be applied interactively with the mouse.
Figure
2.29(a) shows that the grid line
feature provides very useful feedback for this particular tool. The
lines help visualize the perspective warping that will take place once
the Transform button is clicked in the Perspective Transform
dialog. The perspective transform
allows each of the four corners of the layer to be independently
repositioned. The resulting image is warped to a general
quadrilateral. Figure
2.29(c) shows the
result of applying the perspective transform specified by the grid
shown in Figure
2.29(a).
It should be noted that all the transforms can be used in conjunction
with the Transform Lock option of the Paths
dialog. This is extremely useful and is discussed in more detail in
Section
3.4.1. A relevant example is shown in
Section
7.2.
©2000 Gimp-Savvy.com
