This book uses several conventions for describing keystrokes and for
indicating the locations of menu items in the GIMP. This section
describes these.
Figure
1(a)
Figure 1:
Convention for Describing Paths to Functions Found in the
Image Menu
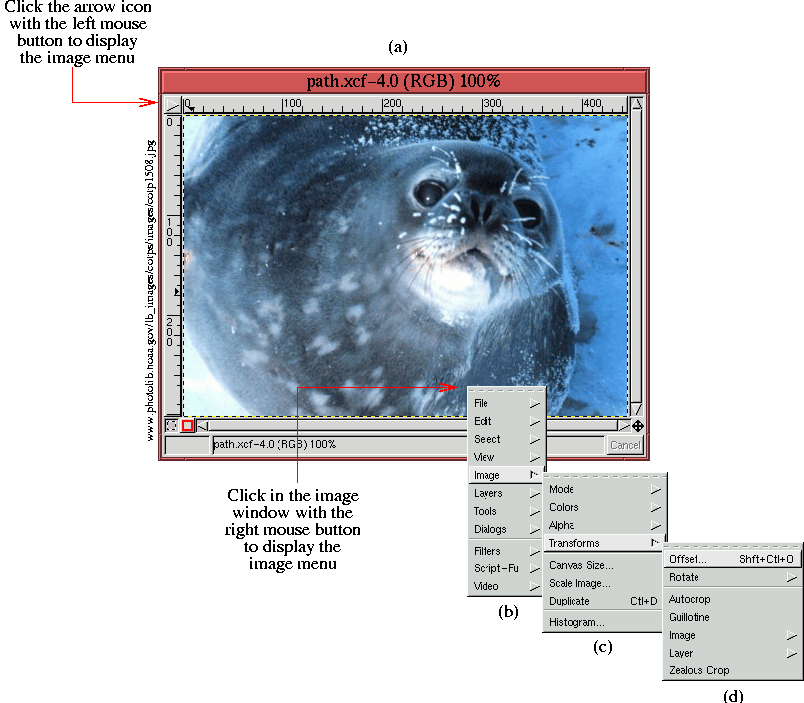 |
illustrates an image of a friendly-looking fellow who is going to
introduce us to the GIMP's Image menu.
As described
in the figure, the Image menu is obtained by either right-clicking in
the image window or by clicking on the arrow icon in the window's
upper-left corner. Either will display the Image menu, as shown in
Figure
1(b).
A menu item highlights when the mouse cursor is moved over it. When an
entry in the Image menu has an arrow pointing to the right, this
indicates that it is the title of a submenu. For example, moving the
mouse cursor to the entry labeled Image, brings up the
associated submenu, as shown in Figure
1(c). Moving
the mouse cursor over the submenu entry labeled Transforms
displays the subsubmenu, as shown in Figure
1(d).
Finally, menu entries which do not have a right-pointing arrows are
functions that can be run by clicking on them. The Offset
function is shown highlighted in Figure
1(d).
In order to compactly and efficiently describe where a function is
located in a system of menus and submenus the following notation is
adopted for this book. For the example shown in
Figure
1, the menu path to the function is denoted
Image:Image/Transforms/Offset. This indicates that the Offset function is found in the Transforms menu, which itself
is in the Image menu, obtained by right-clicking in the Image window. The use of the typewriter typeface indicates that the
text represents a GIMP function or tool.
Note that for certain menu entries in Figures
1(c)
and (d), a keyboard shortcut is indicated.
Learning these significantly accelerates access to GIMP functions. In
the GIMP menus, the keyboard shortcuts are denoted by capital letters,
perhaps with one or more modifier keys. In the menus the modifiers
are indicated by Ctl, Shft, or Alt which refer to
the Control, Shift, and Alt keys on your keyboard. Thus, the keyboard
shortcut for the Offset function, as shown in
Figure
1(d), is Shft+Ctl+O. This is applied
by moving the mouse cursor into the image window, simultaneously
pressing the Shift and Control keys, and typing o. Note that although
the key sequence is indicated with an uppercase O, the actual
key required is lowercase, unless, of course, the Shift modifier is
specifically indicated. Keyboard shortcut notation used in this book
is slightly different from that seen in the GIMP menus. The Control,
Shift, and Alt keys are denoted by uppercase C, S, and
A. These modifier keys are followed by a dash and the keystroke
in lowercase. Thus, the notation used in this book for applying the
Curves function is A-c. As another example, the notation
C-S-l indicates that the Control and Shift keys are pressed
simultaneously, followed by typing the letter l. This
corresponds to the Float function found in the Image:Select menu (but not shown in Figure
1).
Appendix
B lists all the default keyboard
shortcuts. It also describes how to customize the shortcuts to your
personal tastes.
The convention just described for specifying the menu location of a
function is also used for items found in the Toolbox window.
Figure
2(a)
Figure 2:
Conventions for Describing Paths for Functions Found in the Toolbox
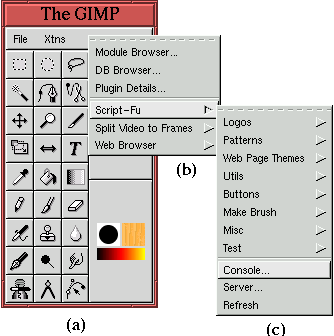 |
shows the Toolbox, which contains the two menus
File and
Xtns, seen at the top of the window. Here the reference
Toolbox:Xtns/Script-Fu/Console is the path to the submenu
Script-Fu, shown in Figure
2(b), and then to the
function named
Console, as shown in
Figure
2(c).
In this book, the functions represented by the icons in the Toolbox are
referred to by name. Figure
3
Figure 3:
Names of the Toolbox Icons
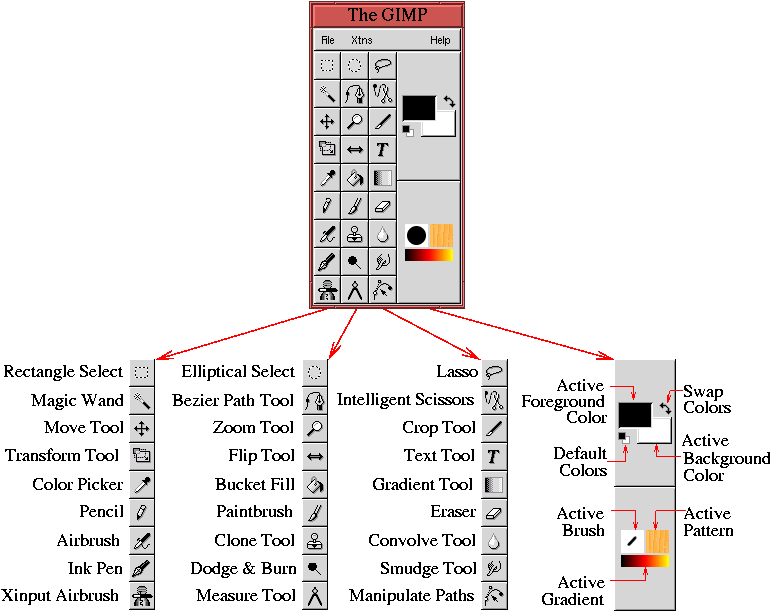 |
illustrates an exploded view of the Toolbox, giving the name used for
each icon.
©2000 Gimp-Savvy.com


