Add a class for the view
Add code into the view to handle the TPTP profiling data. This is the
part where the plug-in provides the user with its values.
The extension point created in the Creating the plug-in
topic does not contain any code for an
Eclipse view. It contains only an Action class that will eventually
invoke the view. This section will demonstrate how to add a simple view
class to the demo analyzer plug-in.
The implementation of a TPTP analyzer view is no different
from that of a regular Eclipse view: you extend the extension point
org.eclipse.ui.views. Add the following code to the demo analyzer's
plug-in manifest file:
<extension point="org.eclipse.ui.views">
  <category
    name="TPTP Demo Views"
    id="org.eclipse.hyades.demo.analyzerview.category">
  </category>
  <view id="org.eclipse.hyades.demo.analyzerview.demoview1"
     name="The Demo View"
     class="org.eclipse.hyades.demo.analyzerview.DemoView1"
     category="org.eclipse.hyades.demo.analyzerview.category"
     icon="./icons/sample.gif"/>
</extension>
A view called The Demo View is defined. It is grouped in the category
org.eclipse.hyades.demo.analyzerview.category. It is a good practice
for plug-in vendors to define their own categories for their views, instead of
inserting themselves into existing TPTP view categories.
Add a class, org.eclipse.hyades.demo.analyzerview.DemoView1, that extends class org.eclipse.ui.part.ViewPart.
Add any necessary code in the createPartControl(Composite)
method to give the view a custom look. Here is a simple example of a
createPartControl(Composite):
    private org.eclipse.swt.widgets.Label label;

    public void createPartControl(Composite parent) {
        label = new Label(parent, 0);
        label.setText("TPTP Demo Analyzer View");
    }

    public void setLabelText(String arg) {
        label.setText(arg);
    }
Additional code must be added in the class ViewAction1 to invoke DemoView1. Add the following method to ViewAction1:
    protected void openView() {
        IWorkbenchWindow workbenchWindow =
            Activator.getDefault().getWorkbench().getActiveWorkbenchWindow();
        try {
            IWorkbenchPage workbenchPage = workbenchWindow.getActivePage();
            DemoView1 view =
                (DemoView1) workbenchPage.showView("org.eclipse.hyades.demo.analyzerview.demoview1");
        } catch (Exception e) {
            e.printStackTrace();
        }
    }
You may see compile warnings at first about the unused view field. Ignore them for now.
Add a line in the ViewAction1 run() method to invoke openView().
Now launch the Runtime Workbench again. Select the Demo Analyzer View from the Open With
menu to launch the view we just added (see figure 1).
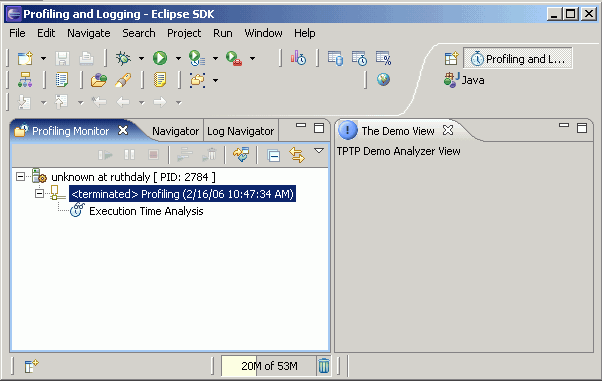
Figure 1: The Demo Analyzer View
An analyzer view plug-in provides value by introducing unique ways to present profiling
data textually, graphically, or both. Profiling data is stored as EMF objects, and TPTP
provides utilities to access them. However, it is up to the analyzer plug-in to disseminate an
EMF object and display it properly given the context of the TPTP UI
(namely the granularity of resources displayed in the Profiling Monitor view) at the moment of its invocation.
To fetch the profiling data, the Demo Analyzer plug-in needs to fetch an EMF object from
TPTP that represents the data. This is made easy by using the TPTP utility
org.eclipse.hyades.trace.ui.HyadesUtil. Add the following import statements into ViewAction1:
import org.eclipse.hyades.trace.ui.HyadesUtil;
import org.eclipse.emf.ecore.EObject;
Next add 2 new lines (in bold) within the try block as shown
below to the method ViewAction1.openView():
    protected void openView() {
        IWorkbenchWindow workbenchWindow =
            DemoAnalyzerviewPlugin
                .getDefault()
                .getWorkbench()
                .getActiveWorkbenchWindow();
        try {
            IWorkbenchPage workbenchPage = workbenchWindow.getActivePage();
            DemoView1 view =
                (DemoView1) workbenchPage.showView("org.eclipse.hyades.demo.analyzerview.demoview1");

            EObject eObj = HyadesUtil.getMofObject(); // Fetching data
            view.setLabelText(eObj.toString()); // Setting view

        } catch (Exception e) {
            e.printStackTrace();
        }
    }
Launch the Runtime Workbench. Open the Demo Analyzer View again; the view's main pane
should display the class name of the resource (see figure 2).
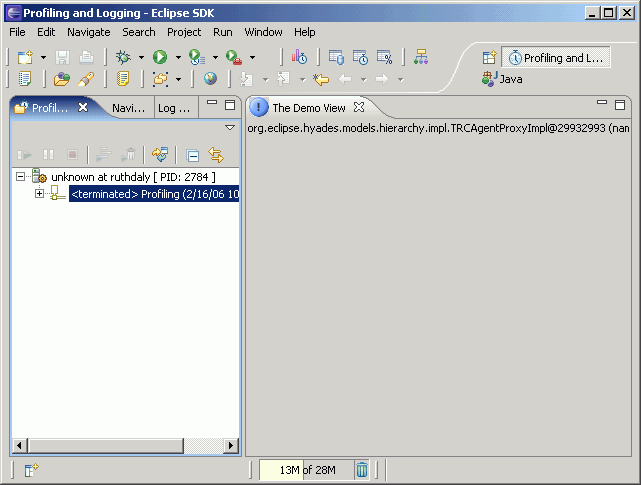
Figure 2: Demo Analyzer View shows TRCAgentProxyImpl
Related tasks
Adding a view to the Profiling and Logging Perspective
Creating the plug-in
Add a class for the action


