JSP
Implementing a New Tag-Based EL Variable Contributor for JSP
|
Summary
In this tutorial we will write a plugin that supplies a symbol factory
for a fictious JSF tag called "locallyDefinedBean" and see how it works
at design time. Our fictious tag adds bean variables to a JSP-JSF
page at runtime and we will implemented the logic necessary to simulate
this behaviour at design time using the JSF EL framework. Once you
finish this tutorial, you should have a basic grasp of what is required
to add tooling support for JSF-JSP tags that contribute variables to
JSF EL for you own real JSF tag libraries..
Getting Started
To begin, create a blank plugin project by using
File > New > Project... and selecting Plug-in Project. Create the project with all of the defaults:

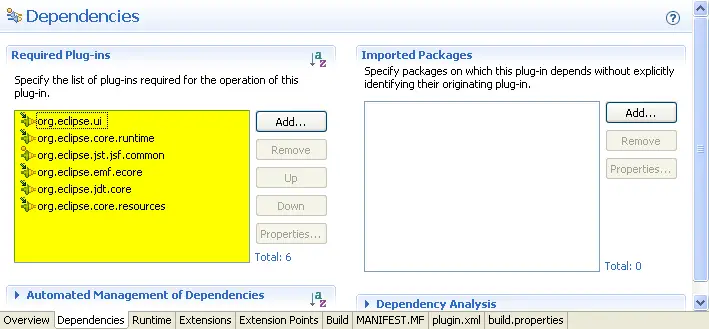
Next, open the plug-in dependencies for your project:
Add the plugin dependencies highlighted in yellow below:
Now we are ready to construct our factory and meta-data extensions.
Constructing the Factory
The symbol factory is delegated the task of constructing your custom
design time variables. First, we will create the factory class.
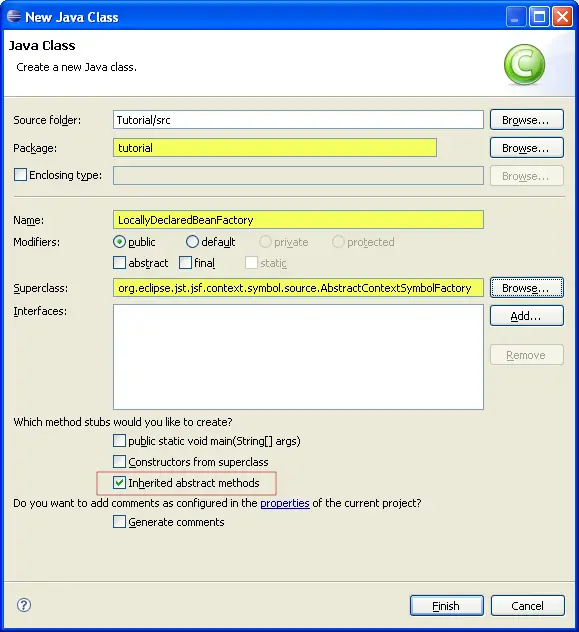
Create a new java class in your project by clicking on the src folder and clicking File > New > Class.
Call the class "LocallyDeclaredBeanFactory" and make sure it extends
org.eclipse.jst.jsf.context.symbol.source.AbstractContextSymbolFactory.
Also be sure enable the check box, Inherited abstract methods:
Open the new class in the Java editor. You will see two methods
automatically generated from the abstract parent class. For the
supports method, replace the method with the following:
	public boolean supports(IAdaptable context) {
		return context.getAdapter(IStructuredDocumentContext.class) != null;
	}
This code tells the framework to only call this factory when the context is adaptable to a structured document context.
Next, replace the internalCreate code with the following:
	protected ISymbol internalCreate(String symbolName, int scope, IAdaptable context, List problems)
	{
		// get the context
		final IStructuredDocumentContext sContext =
			(IStructuredDocumentContext)context.getAdapter(IStructuredDocumentContext.class);

		// construct a dom resolver for this context
		final IDOMContextResolver domResolver =

			IStructuredDocumentContextResolverFactory.INSTANCE.getDOMContextResolver(sContext);

		// if resolver can be constructed
		if (domResolver != null)
		{
			// get the current node
			// this	is the node marked by our meta-data as contributing an el variable
			final Node curNode = domResolver.getNode();

			// node must be an XML attribute
			if (curNode instanceof Attr)
			{
				final Attr attr = (Attr) curNode;

				final Node owningElement = attr.getOwnerElement();


				//attribute must have a owningElement
				if (owningElement != null)
				{

					IWorkspaceContextResolver workspaceResolver =


						IStructuredDocumentContextResolverFactory.INSTANCE.getWorkspaceContextResolver(sContext);


					IProject iProject = workspaceResolver.getProject();


					if (iProject != null)
					{

						return
						handleSymbolCreation(symbolName, sContext, attr, owningElement,
								iProject);
					}
				}
			}
		}

		return null;

	}
You also need to add this private method that does the symbol creation:
	private ISymbol handleSymbolCreation(final String symbolName,
			final IStructuredDocumentContext context,
			final Attr attr,
			final Node owningElement,
			final IProject project)
	{
		// create tag lib resolver for this context
		final ITaglibContextResolver resolver = IStructuredDocumentContextResolverFactory.INSTANCE
		.getTaglibContextResolver(context);

		if (resolver == null || !resolver.canResolveContext(context)) {
			return null;
		}


		final String uri = resolver.getTagURIForNodeName(owningElement);
		IBeanInstanceSymbol beanSymbol = null;

		// process core taglib
		if ("https://oracle.com/tutorial/fake/taglib".equals(uri)) {
			final String elementName = owningElement.getLocalName();
			final String attrName = attr.getName();

			// protect ourselves by ensuring we are in the var attribute of
			// a locallyDeclaredBean
			if ("locallyDeclaredBean".equals(elementName)) {
				if ("var".equals(attrName)) {

					final NamedNodeMap attrMap =
						owningElement.getAttributes();

					final Node baseNameNode =
						attrMap.getNamedItem("classname");


					if (baseNameNode instanceof Attr)
					{

						// get the name of the bean's class

						final String
						className = ((Attr)baseNameNode).getValue();

						// create a new empty bean instance symbol
						// this will encapsulate all of the design time information
						// about our new variable
						beanSymbol =
							SymbolFactory.eINSTANCE.createIBeanInstanceSymbol();


						// name the new variable after the value of the var attribute
						// in the tag

						beanSymbol.setName(attr.getValue());

						// next, we	will ask JDT to resolve the class name to a type
						try
						{

							IJavaProject javaProject = JavaCore.create(project);
							IType type = javaProject.findType(className);

							// don't bother setting a type descriptor if we
							// can't find a type
							if (type != null)
							{
								// now we must create a type descriptor that encapsulates
								// the specific type information about our bean
								IJavaTypeDescriptor2 javaTypeDescriptor =
									SymbolFactory.eINSTANCE.createIJavaTypeDescriptor2();
								javaTypeDescriptor.setType(type);
								beanSymbol.setJavaTypeDescriptor(javaTypeDescriptor);
							}
						}
						catch (JavaModelException jme)
						{
							// could not construct
							// fall-through
						}
						// finally, add a description that will appear in the content assis
						// drop-down, to prove that it really worked
						beanSymbol.setDetailedDescription("Hello world, this is my first tag variable factory");
					}
				}
			}
		}

		return beanSymbol;
	}
You may need to hit Ctrl-O to organize your imports.
Save the class and check that it compiles.
Adding the Meta-data
Our ultimate goal is to make a tag like this:
<t:locallyDeclaredBean var="x" classname="beans.MyBean"/>
declare a variable called "x" to the tooling which corresponds to a bean
of type "beans.MyBean". In order to tell the framework this, we
must use meta-data to annotate the t:locallyDeclaredBean.
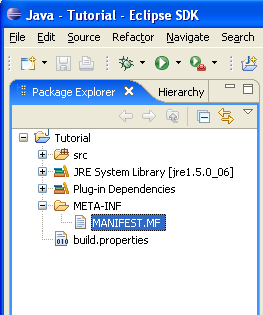
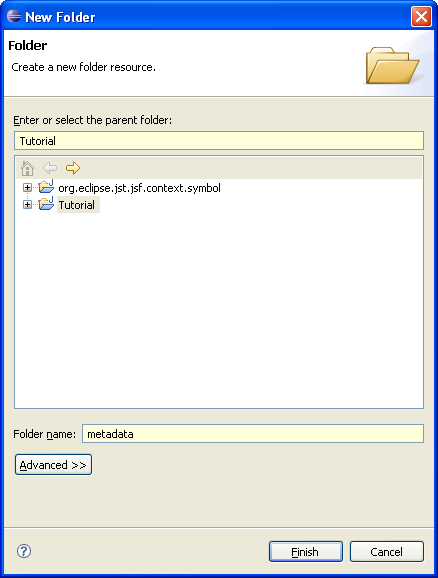
First we create a new folder in our project called metadata:
Next use right-click on the project click File > New > File to create a new meta-data xml file:
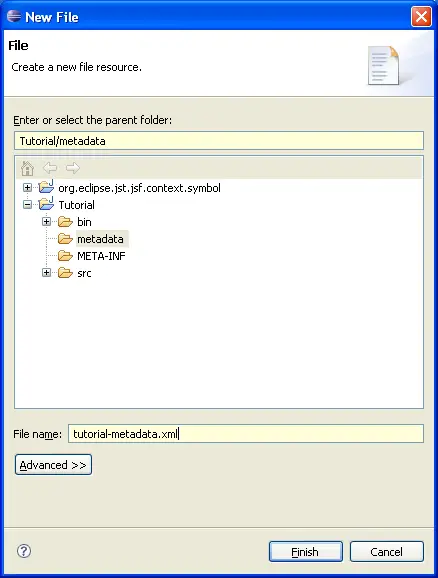
Open the file as source and copy the following markup into the editor:
<?xml version="1.0" encoding="UTF-8"?>
<md:metadatamodel
	xmlns:xsi="https://www.w3.org/2001/XMLSchema-instance"
	xmlns:ecore="https://www.eclipse.org/emf/2002/Ecore"
	xmlns:md="https://org.eclipse.jst.jsf.common.metadata/metadata.ecore"
	xmlns:mdt="https://org.eclipse.jst.jsf.common.metadata/metadataTraitTypes.ecore"
	id="https://oracle.com/tutorial/fake/taglib">

	<entity id="locallyDeclaredBean">
		<entity id="var">
			<trait id="contributes-value-binding">
				<value>true</value>
			</trait>
			<trait id="value-binding-scope">
				<value>request</value>
			</trait>
			<trait id="value-binding-symbol-factory">
				<value>tutorial.locallyDeclaredBean</value>
			</trait>
		</entity>
	</entity>

</md:metadatamodel>
Notice the entities and traits. The "var" attribute entity is a child of the "locallyDeclaredBean" entity.
The property
"value-binding-symbol-factory" is what points the framework to our
factory. However the value here is not the factory itself, but an
id for its extension, which we'll define in the next section.
Implementing the extensions
Two extension points work together to declare our symbol factory.
First we will extend an extension point to declare
the meta-data that we just defined to the framework. Second, we will
register the factory id.
Open the plugin.xml editor for the project and select the
Extensions tab, click
Add... and select
org.eclipse.jst.jsf.common.standardMetaDataFiles. Right click on the new extension element in the tree on the left and add a new
standardMetaDataFile entry. Enter the uri and location information as shown.
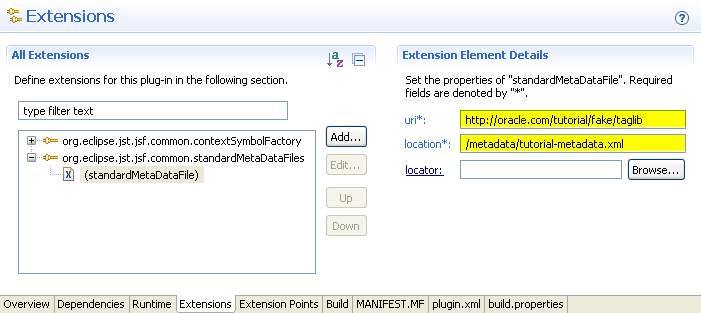
Adding this extension point tells the framework to look in our
tutorial-metadata.xml file when queried for metadata about a tag
library with the identifying uri
https://oracle.com/tutorial/fake/taglib. Note the strange name of
the uri in this case. That is to emphasize that they tag library
we are creating a tag variable for doesn't really exist -- it's just
for this tutorial.
Next, we need to declare an extension to
org.eclipse.jst.jsf.common.contextSymbolFactory
that declares our factory and gives it a unique id:
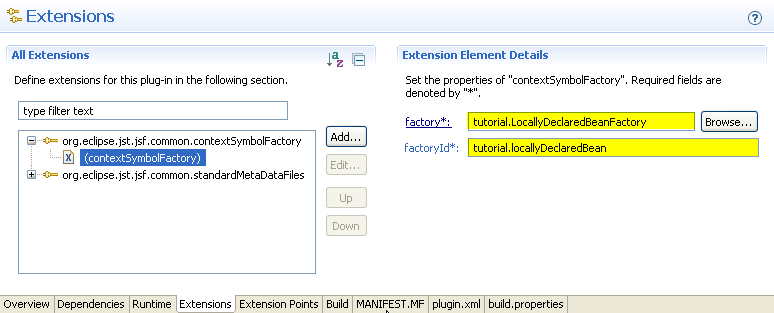
Notice that the value we put in the factory
property matches what is in the "value-binding-symbol-factory" metadata
property. These values must match so that the framework can find
our factory.
We are now finished with defining our tag contributor (easy
huh?). But we're not quite finished. We need to construct a
dynamic web project complete with our fake tag library to test out what
we've done.
Setting Up the Dynamic Web Project
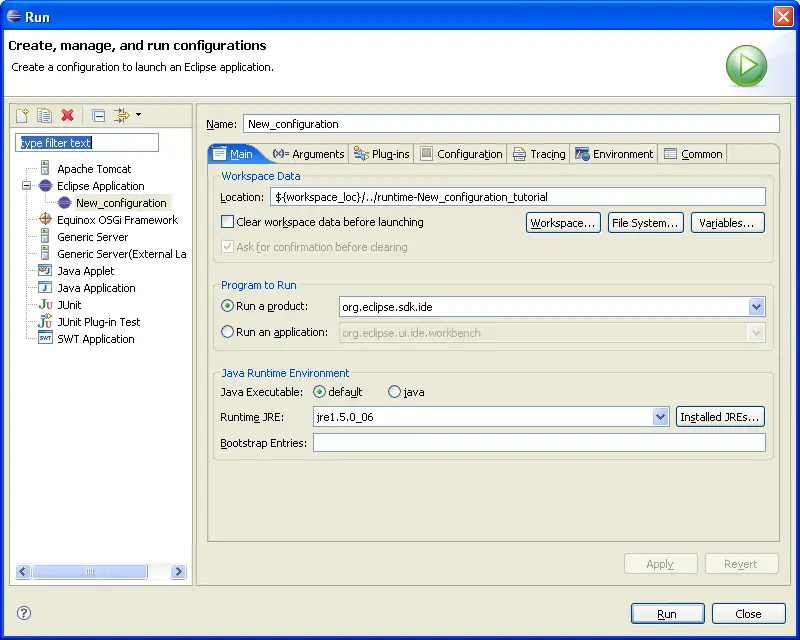
First we need to launch a new runtime workbench with our plugin installed. To do this, execute
Run > Run... to create a new launch profile. Create a new Eclipse Application and launch it with the defaults:
Once the workbench has loaded, go to New > Project > Other and select Web > Dynamic Web Project and hit Next.
Name the project and hit next. From the Project Facets wizard page, enable the JavaServer Faces facet and click Next. Click Next at the Web Modules page leaving the defaults unchanged. Last you will come to the JSF Capabilities
page. Here you need to set up your JSF Libraries (see user's
guide for more details on JSF Libraries). When you are done,
click Finish. This should create a skeletal JSF project. Next we will add the "fake" tag library.
Adding the demonstration tag library
Right-click on the META-INF folder under the WebContent folder in your new Dynamic Web Project and select
New > File and name the file tutorial.tld and save the following into it:
<?xml version="1.0" encoding="ISO-8859-1" ?>


<!DOCTYPE taglib
  PUBLIC "-//Sun Microsystems, Inc.//DTD JSP Tag Library 1.2//EN"
  "https://java.sun.com/dtd/web-jsptaglibrary_1_2.dtd">


<taglib>


  <!-- ========== Tag Library Description Elements ========================= -->


  <tlib-version>1.0</tlib-version>
  <jsp-version>1.2</jsp-version>
  <short-name>tutorial</short-name>
  <uri>https://oracle.com/tutorial/fake/taglib</uri>
  <description>
    An tld to help demonstrate how to implemented tag contributed EL variables.
    NOTE: this is a taglib for demonstration purposes: it is not fully or correctly
    implemented and it is not intended to be run in real JSP applications
  </description>
  <tag>


    <name>locallyDeclaredBean</name>
    <tag-class>foo</tag-class>
    <tei-class>foo</tei-class>
    <body-content>empty</body-content>
    <description>
      Tag declares a new bean variable at request scope based on the name
      and classname provided.
    </description>


    <attribute>
      <name>var</name>
      <required>true</required>
      <rtexprvalue>false</rtexprvalue>
      <description>
        The name of the locally declared variable.  This name will be added
        to the EL variable namespace for the JSP in which it is used at request scope
      </description>
    </attribute>


    <attribute>
      <name>classname</name>
      <required>true</required>
      <rtexprvalue>false</rtexprvalue>
      <description>
        The fully qualified name of the Java class that will be instantiated as
        the backing bean for the locally declared bean.
      </description>
    </attribute>
  </tag>

</taglib>
and save and close the file.
Create a simple bean called
beans.MyBean in the src folder and paste in the following code:
package beans;


public class MyBean
{
	public String getFooProperty()
	{
		return "foo!";
	}
}
Create the Test JSP
Now we will create a test JSP file by right-clicking on the
WebContent folder and clicking
New > Other and in the tree selecting
Web > JSP. Select the defaults and click finish. Then, open the file and replace the contents with the following:
<%@page contentType="text/html"%>
<%@page pageEncoding="UTF-8"%>
<%--
>The taglib directive below imports the JSTL library. If you uncomment it,<br/>you must also add the JSTL library to the project. The Add Library... action on Libraries node in Projects view can be used to add the JSTL 1.1 library.
--%>

<%@taglib uri="https://java.sun.com/jsf/core" prefix="f"%>
<%@taglib uri="https://java.sun.com/jsf/html" prefix="h"%>
<%@taglib uri="https://oracle.com/tutorial/fake/taglib" prefix="t" %>


<!DOCTYPE HTML PUBLIC "-//W3C//DTD HTML 4.01 Transitional//EN"
   "https://www.w3.org/TR/html4/loose.dtd">

<html>
<head>
<meta http-equiv="Content-Type" content="text/html; charset=UTF-8">
<title>JSP Page</title>
</head>
<body>
	<f:view>
		<h1>JSP Page</h1>
		<!--  no errors -->
		<t:locallyDeclaredBean var="x" classname="beans.MyBean"/>
		<h:outputText value="#{}"/>
	</f:view>
</body>
</html>
Note a few things. First, we have a taglib declared for our "fake"
tag library with prefix "t". Second, we have declared a bean
using the locallyDeclaredBean tag to declare a variable "x" of the type "beans.MyBean" that we created above.
So now let's test it. Position your cursor inside the empty "{}"
braces in the value attribute of the outputText tag. Type
Ctrl-Space to request content assist. You should see your bean
"x" in the list:

You can try requesting content assist for the property we added in the bean by typing a period after the "x":
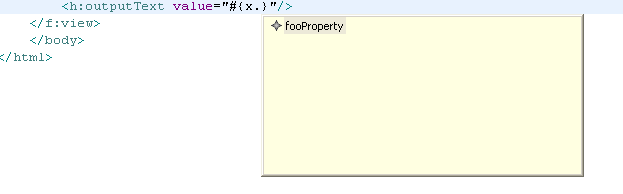
Select the property so that the EL text reads "x.fooProperty". Finally, right-click on the JSP file in the File Explorer and select Validate to prove that your variable and property are recognized correctly by the validation framework.
Conclusion
We hope this tutorial has helped you understand how to use the JSF
tooling to add design time support for your JSF component tag libraries
that contribute EL variables. If you need further help or have
trouble with this tutorial please post to our web forum on
eclipse.org. Putting "EL Variable Contributor" in the subject
will ensure speedier response from knowledgeable parties.


