Menus are an important part of any application. They provide familiar interfaces
that reveal application functions and settings. Android offers an easy programming interface
for developers to provide standardized application menus for various situations.
Android offers three fundamental types of application menus:
- Options Menu
- This is the primary set of menu items for an Activity. It is revealed by pressing
the device MENU key. Within the Options Menu are two groups of menu items:
- Icon Menu
- This is the collection of items initially visible at the bottom of the screen
at the press of the MENU key. It supports a maximum of six menu items.
These are the only menu items that support icons and the only menu items that do not support
checkboxes or radio buttons.
- Expanded Menu
- This is a vertical list of items exposed by the "More" menu item from the Icon Menu.
It exists only when the Icon Menu becomes over-loaded and is comprised of the sixth
Option Menu item and the rest.
- Context Menu
- This is a floating list of menu items that may appear when you perform a long-press on a View
(such as a list item).
- Submenu
- This is a floating list of menu items that is revealed by an item in the Options Menu
or a Context Menu. A Submenu item cannot support nested Submenus.

The Options Menu is opened by pressing the device MENU key.
When opened, the Icon Menu is displayed, which holds the first six menu items.
If more than six items are added to the Options Menu, then those that can't fit
in the Icon Menu are revealed in the Expanded Menu, via the "More" menu item. The Expanded Menu
is automatically added when there are more than six items.
The Options Menu is where you should include basic application functions
and any necessary navigation items (e.g., to a home screen or application settings).
You can also add
Submenus for organizing topics
and including extra menu functionality.
When this menu is opened for the first time,
the Android system will call the Activity onCreateOptionsMenu() callback method. Override this method in your Activity
and populate the Menu object given to you. You can populate the menu by
inflating a menu resource that was
defined in XML, or by calling
add()
for each item you'd like in the menu. This method adds a MenuItem, and returns the
newly created object to you. You can use the returned MenuItem to set additional properties like
an icon, a keyboard shortcut, an intent, and other settings for the item.
There are multiple add() methods.
Usually, you'll want to use one that accepts an itemId argument.
This is a unique integer that allows you to identify the item during a callback.
When a menu item is selected from the Options Menu, you will recieve a callback to the
onOptionsItemSelected()
method of your Activity. This callback passes you the
MenuItem that has been selected. You can identify the item by requesting the
itemId, with getItemId(),
which returns the integer that was assigned with the add() method. Once you identify
the menu item, you can take the appropriate action.
Here's an example of this procedure, inside an Activity, wherein we create an
Options Menu and handle item selections:
/* Creates the menu items */
public boolean onCreateOptionsMenu(Menu menu) {
    menu.add(0, MENU_NEW_GAME, 0, "New Game");
    menu.add(0, MENU_QUIT, 0, "Quit");
    return true;
}

/* Handles item selections */
public boolean onOptionsItemSelected(MenuItem item) {
    switch (item.getItemId()) {
    case MENU_NEW_GAME:
        newGame();
        return true;
    case MENU_QUIT:
        quit();
        return true;
    }
    return false;
}
The add() method used in this sample takes four arguments:
groupId, itemId, order, and title.
The groupId allows you to associate this menu item with a group of other items
(more about
Menu groups, below) — in
this example, we ignore it. itemId is a unique integer that we give the
MenuItem so that can identify it in the next callback. order allows us to
define the display order of the item — by default, they are displayed by the
order in which we add them. title is, of course, the name that goes on the
menu item (this can also be a
string resource,
and we recommend you do it that way for easier localization).
Tip:
If you have several menu items that can be grouped together with a title,
consider organizing them into a
Submenu.
Adding icons
Icons can also be added to items that appears in the Icon Menu with
setIcon(). For example:
menu.add(0, MENU_QUIT, 0, "Quit")
    .setIcon(R.drawable.menu_quit_icon);
Modifying the menu
If you want to sometimes re-write the Options Menu as it is opened, override the
onPrepareOptionsMenu() method, which is
called each time the menu is opened. This will pass you the Menu object, just like the
onCreateOptionsMenu() callback. This is useful if you'd like to add or remove
menu options depending on the current state of an application or game.
Note:
When changing items in the menu, it's bad practice to do so based on the currently selected item.
Keep in mind that, when in touch mode, there will not be a selected (or focused) item. Instead, you
should use a
Context Menu for such behaviors, when you want to provide
functionality based on a particular item in the UI.
The Android context menu is similar, in concept, to the menu revealed with a "right-click" on a PC.
When a view is registered to a context menu,
performing a "long-press" (press and hold for about two seconds) on the object
will reveal a floating menu that provides functions relating to that item.
Context menus can be registered to any View object,
however, they are most often used for items in a
ListView, which helpfully indicates the presence of the context menu
by transforming the background color of the ListView item when pressed.
(The items in the phone's contact list offer an example of this feature.)
Note: Context menu items do not support icons or shortcut keys.
To create a context menu, you must override the Activity's context menu callback methods:
onCreateContextMenu() and
onContextItemSelected().
Inside the onCreateContextMenu() callback method, you can add menu items using one of the
add() methods, or by
inflating a menu resource that was
defined in XML.
Then, register a ContextMenu for the View, with
registerForContextMenu().
For example, here is some code that can be used with the
Notepad application
to add a context menu for each note in the list:
public void onCreateContextMenu(ContextMenu menu, View v,
                                ContextMenuInfo menuInfo) {
  super.onCreateContextMenu(menu, v, menuInfo);
  menu.add(0, EDIT_ID, 0, "Edit");
  menu.add(0, DELETE_ID, 0,  "Delete");
}

public boolean onContextItemSelected(MenuItem item) {
  AdapterContextMenuInfo info = (AdapterContextMenuInfo) item.getMenuInfo();
  switch (item.getItemId()) {
  case EDIT_ID:
    editNote(info.id);
    return true;
  case DELETE_ID:
    deleteNote(info.id);
    return true;
  default:
    return super.onContextItemSelected(item);
  }
}
In onCreateContextMenu(), we are given not only the ContextMenu to
which we will add MenuItems, but also the View
that was selected and a ContextMenuInfo object,
which provides additional information about the object that was selected.
In this example, nothing special is done in onCreateContextMenu() — just
a couple items are added as usual. In the onContextItemSelected()
callback, we request the AdapterContextMenuInfo
from the MenuItem, which provides information about the currently selected item.
All we need from
this is the list ID for the selected item, so whether editing a note or deleting it,
we find the ID with the AdapterContextMenuInfo.info field of the object. This ID
is passed to the editNote() and deleteNote() methods to perfrom
the respective action.
Now, to register this context menu for all the items in a ListView,
we pass the entire ListView to the
registerForContextMenu(View) method:
registerForContextMenu(getListView());
Remember, you can pass any View object to register a context menu. Here,
getListView() returns the ListView
object used in the Notepad application's ListActivity. As such, each item
in the list is registered to this context menu.
A sub menu can be added within any menu, except another sub menu.
These are very useful when your application has a lot of functions that may be
organized in topics, like the items in a PC application's menu bar (File, Edit, View, etc.).
A sub menu is created by adding it to an existing Menu
with addSubMenu().
This returns a SubMenu object (an extension of Menu).
You can then add additional items to this menu, with the normal routine, using
the add() methods. For example:
public boolean onCreateOptionsMenu(Menu menu) {
  boolean result = super.onCreateOptionsMenu(menu);

  SubMenu fileMenu = menu.addSubMenu("File");
  SubMenu editMenu = menu.addSubMenu("Edit");
  fileMenu.add("new");
  fileMenu.add("open");
  fileMenu.add("save");
  editMenu.add("undo");
  editMenu.add("redo");

  return result;
}
Callbacks for items selected in a sub menu are made to the parent menu's callback method.
For the example above, selections in the sub menu will be handled by the
onOptionsItemSelected() callback.
You can also add Submenus when you
define the parent menu in XML.
Define Menus in XML
Just like Android UI layouts, you can define application menus in XML, then inflate them
in your menu's onCreate...() callback method. This makes your application code cleaner and
separates more interface design into XML, which is easier to visualize.
To start, create a new folder in your project res/ directory called menu.
This is where you should keep all XML files that define your application menus.
In a menu XML layout, there are
three valid elements: <menu>, <group> and <item>. The
item and group elements must be children of a menu, but item
elements may also be the children of a group, and another menu element may be the child
of an item (to create a Submenu). Of course, the root node of any file
must be a menu element.
As an example, we'll define the same menu created in the
Options Menu section,
above. We start with an XML file named options_menu.xml inside the res/menu/ folder:
<menu xmlns:android="https://schemas.android.com/apk/res/android">
    <item android:id="@+id/new_game"
          android:title="New Game" />
    <item android:id="@+id/quit"
          android:title="Quit" />
</menu>
Then, in the onCreateOptionsMenu() method, we inflate this resource using
MenuInflater.inflate():
public boolean onCreateOptionsMenu(Menu menu) {
    MenuInflater inflater = getMenuInflater();
    inflater.inflate(R.menu.options_menu, menu);
    return true;
}
The getMenuInflater() method returns the MenuInflater
for our activity's context. We then call inflate(),
passing it a pointer to our menu resource and the Menu object given by the callback.
While this small sample may seem like more effort, compared to creating the menu items in the
onCreateOptionsMenu() method, this will save a lot of trouble when dealing with more items
and it keeps your application code clean.
You can define
menu groups by wrapping item elements in a group
element, and create Submenus by nesting another menu inside an item.
Each element also supports all the necessary attributes to control features like shortcut keys,
checkboxes, icons, and more. To learn about these attributes and more about the XML syntax, see the Menus
topic in the Available
Resource Types document.
Menu Features
Here are some other features that can be applied to most menu items.
Menu groups
When adding new items to a menu, you can optionally include each item in a group.
A menu group is a collection of menu items that can share certain traits, like
whether they are visible, enabled, or checkable.
A group is defined by an integer (or a resource id, in XML). A menu item is added to the group when it is
added to the menu, using one of the add() methods that accepts a groupId
as an argument, such as add(int, int, int, int).
You can show or hide the entire group with
setGroupVisible();
enable or disable the group with
setGroupEnabled();
and set whether the items can be checkable with
setGroupCheckable().
Checkable menu items
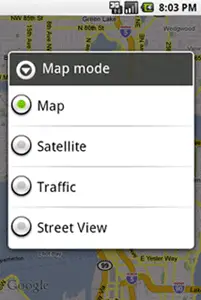
Any menu item can be used as an interface for turning options on and off. This can
be indicated with a checkbox for stand-alone options, or radio buttons for groups of
mutually exlusive options (see the screenshot, to the right).
Note: Menu items in the Icon Menu cannot
display a checkbox or radio button. If you choose to make items in the Icon Menu checkable,
then you must personally indicate the state by swapping the icon and/or text
each time the state changes between on and off.
To make a single item checkable, use the setCheckable() method, like so:
menu.add(0, VIBRATE_SETTING_ID, 0, "Vibrate")
    .setCheckable(true);
This will display a checkbox with the menu item (unless it's in the Icon Menu). When the item
is selected, the onOptionsItemSelected() callback is called as usual. It is here that
you must set the state of the checkbox. You can query the current state of the item with
isChecked() and set the checked state with
setChecked().
Here's what this looks like inside the
onOptionsItemSelected() callback:
switch (item.getItemId()) {
case VIBRATE_SETTING_ID:
  if (item.isChecked()) item.setChecked(false);
  else item.setChecked(true);
  return true;
...
}
To make a group of mutually exclusive radio button items, simply
assign the same group ID to each menu item
and call setGroupCheckable(). In this case, you don't need to call setCheckable()
on each menu items, because the group as a whole is set checkable. Here's an example of
two mutually exclusive options in a Submenu:
SubMenu subMenu = menu.addSubMenu("Color");
subMenu.add(COLOR_MENU_GROUP, COLOR_RED_ID, 0, "Red");
subMenu.add(COLOR_MENU_GROUP, COLOR_BLUE_ID, 0, "Blue");
subMenu.setGroupCheckable(COLOR_MENU_GROUP, true, true);
In the setGroupCheckable() method, the first argument is the group ID
that we want to set checkable. The second argument is whether we want the group items
to be checkable. The last one is whether we want each item to be exclusively checkable
(if we set this false, then all the items will be checkboxes instead of radio buttons).
When the group is set to be exclusive (radio buttons), each time a new item is selected,
all other are automatically de-selected.
Note:
Checkable menu items are intended to be used only on a per-session basis and not saved to the device
(e.g., the Map mode setting in the Maps application is not saved — screenshot above).
If there are application settings that you would like to save for the user,
then you should store the data using
Preferences,
and manage them with a PreferenceActivity.
Shortcut keys
Quick access shortcut keys using letters and/or numbers can be added to menu items with
setAlphabeticShortcut(char) (to set char shortcut), setNumericShortcut(int)
(to set numeric shortcut),
or setShortcut(char,int) (to set both). Case is not sensitive.
For example:
menu.add(0, MENU_QUIT, 0, "Quit")
    .setAlphabeticShortcut('q');
Now, when the menu is open (or while holding the MENU key), pressing the "q" key will
select this item.
This shortcut key will be displayed as a tip in the menu item, below the menu item name
(except for items in the Icon Menu).
Note: Shortcuts cannot be added to items in a Context Menu.
Menu item intents
If you've read the Application
Fundamentals, then you're at least a little familiar
with Android Intents. These allow applications to bind with each other, share information,
and perform user tasks cooperatively. Just like your application might fire an Intent to launch a web browser,
an email client, or another Activity in your application,
you can perform such actions from within a menu.
There are two ways to do this: define an Intent and assign it to a single menu item, or
define an Intent and allow Android to search the device for activities and dynamically add a
menu item for each one that meets the Intent criteria.
For more information on creating Intents and providing your application's services to other applications,
read the Intents
and Intent Filters document.
Set an intent for a single menu item
If you want to offer a specific menu item that launches a new Activity, then you
can specifically define an Intent for the menu item with the
setIntent() method.
For example, inside the onCreateOptionsMenu() method, you can define a new menu item with an Intent like this:
MenuItem menuItem = menu.add(0, PHOTO_PICKER_ID, 0, "Select Photo");
menuItem.setIntent(new Intent(this, PhotoPicker.class));
Android will automatically launch the Activity when the item is selected.
Note: This will not return a result to your Activity.
If you wish to be returned a result, then do not use setIntent().
Instead, handle the selection as usual in the onOptionsMenuItemSelected()
or onContextMenuItemSelected() callback and call
startActivityForResult().
Dynamically add intents
If there are potentially multiple activities that are relevant to your current
Activity or selected item, then the application can dynamically add menu items that execute other
services.
During menu creation, define an Intent with the category Intent.ALTERNATIVE_CATEGORY and/or
Intent.SELECTED_ALTERNATIVE, the MIME type currently selected (if any), and any other
requirements, the same way as you would satisfy an intent filter to open a new
Activity. Then call
addIntentOptions() to have Android search for any services meeting those requirements
and add them to the menu for you. If there are no applications installed
that satisfy the Intent, then no additional menu items are added.
Note:
SELECTED_ALTERNATIVE is used to handle the currently selected element on the
screen. So, it should only be used when creating a Menu in onCreateContextMenu() or
onPrepareOptionsMenu(), which is called every time the Options Menu is opened.
Here's an example demonstrating how an application would search for
additional services to display on its menu.
public boolean onCreateOptionsMenu(Menu menu){
    super.onCreateOptionsMenu(menu);

    // Create an Intent that describes the requirements to fulfill, to be included
    // in our menu. The offering app must include a category value of Intent.CATEGORY_ALTERNATIVE.
    Intent intent = new Intent(null, getIntent().getData());
    intent.addCategory(Intent.CATEGORY_ALTERNATIVE);

    // Search for, and populate the menu with, acceptable offering applications.
    menu.addIntentOptions(
         thisClass.INTENT_OPTIONS,  // Menu group
         0,      // Unique item ID (none)
         0,      // Order for the items (none)
         this.getComponentName(),   // The current Activity name
         null,   // Specific items to place first (none)
         intent, // Intent created above that describes our requirements
         0,      // Additional flags to control items (none)
         null);  // Array of MenuItems that corrolate to specific items (none)

    return true;
}
For each Activity found that provides an Intent Filter matching the Intent defined, a menu
item will be added, using the android:label value of the intent filter as the text
for the menu item.
The addIntentOptions() method will also return the number of menu items added.
Also be aware that, when addIntentOptions() is called, it will override any and all
menu items in the menu group specified in the first argument.
If you wish to offer the services of your Activity to other application menus, then you
only need to define an intent filter as usual. Just be sure to include the ALTERNATIVE and/or
SELECTED_ALTERNATIVE values in the name attribute of
a <category> element in the intent filter. For example:
<intent-filter label="Resize Image">
    ...
    <category android:name="android.intent.category.ALTERNATIVE" />
    <category android:name="android.intent.category.SELECTED_ALTERNATIVE" />
    ...
</intent-filter>
read more about writing intent filters in the
Intents and Intent Filters document.
For a sample application using this technique, see the
Note Pad
sample code.


