There are several places where you can find online
documentation shipped with your product. The KDE desktop includes
a help center that offers a wide range of online documentation for
your SUSE Linux Enterprise Desktop. There, you can access SLED-specific
information as well as application descriptions provided by the
open source community.
When installing new software with YaST, the software
documentation is installed automatically in most cases and usually
appears in the help center of your KDE desktop. However, some
applications, such as The GIMP, may have different online help
packages that can be installed separately with YaST and do
not integrate into the help center.
A.1.1 Using the Help Center
You can access the Help Center in various ways: Clicking the
button in an application or pressing
F1 takes you directly to that application's
documentation in the Help Center. However, if you start the Help
Center from the main menu, by clicking the icon in the panel, or
by entering the susehelp command, you are
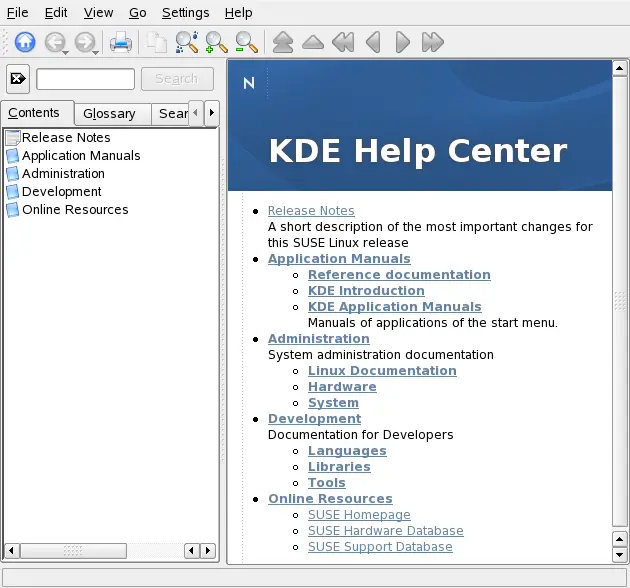
taken to the main window of the Help Center as shown below.
The menu and the toolbar provide options for printing
contents from the Help Center, searching the currently displayed
page, and navigating and customizing the Help Center. The
display field in the right part of the window always shows the
currently selected contents, such as online manuals, search
results, or Web pages.
The navigation area in the left part of the window contains
several tabs.
-
-
Presents a tree view of all available information
sources. The Help Center addresses various target groups,
such as users, administrators, and developers. Click the
book icons to open and browse the individual categories.
Under the heading , for
example, you can also browse man (manual) and info
(information) pages associated with command line programs.
The Help Center also provides access to some online
databases that cover special hardware and software issues
for your product. All these sources can be searched
comfortably once a search index has been generated.
The contents of your Help Center depends on which
software packages are currently installed and which
languages are selected as your system languages.
-
-
Provides a quick reference where you can look up the
definitions of words that might be unfamiliar to
you.
-
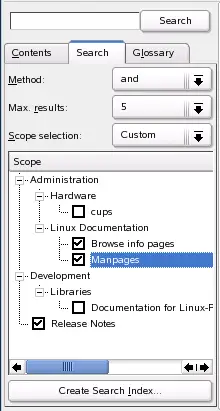
-
Holds options for the full text search of the Help
Center. You can combine several search criteria.
To use the full text search, generate a search index and set
the search parameters. If the search index has not yet been
generated, the system automatically prompts you to do so when
you click the tab or type a search
string and click .
Generating a Search Index
-
To create a new search index, select from the menu. A window opens, showing a list
of documentation currently available in the Help
Center.
-
Select the documents to integrate in the search index
and click . After the index
has been generated, you can use the full text search.
Using the Full Text Search
-
Click and enter the
string to find.
-
To combine your search strings with operands, click
and select the operand to use.
-
To limit the number of hits to display, choose an option
from .
-
To restrict your search to certain types of
documentation, choose an option from
. With , a
predefined selection of documents is searched.
includes all types of documents in
the search. lets you define which
documents to include in your search. Just activate the
documents you want in the list.
-
When you have set the options according to your wishes,
click . The search results are then
displayed as a list of links in the display field and can be
navigated with mouse clicks.