|
 |
|
| |
3.1 Understanding OpenOffice.org
This section contains information that applies to all of the
application modules in OpenOffice.org. Module-specific information
can be found in the sections relating to each module.
3.1.1 What’s New in OpenOffice.org 2.0
OpenOffice.org 2.0 contains many improvements and features
that were not included in earlier versions. The biggest new
feature is the Base database module. There have been many other
changes since the previous version, such as enhanced PDF export
and improved word count capabilities. For a complete list of
features, fixes, and enhancements, go to the OpenOffice.org Web
site (https://www.openoffice.org/dev_docs/features/2.0/).
3.1.2 Enhancements in the Novell Edition of OpenOffice.org 2.0
The Novell Edition of OpenOffice.org included with
SUSE® Linux Enterprise Desktop contains enhancements that are not available in the
standard edition. These include:
Integration with SUSE Linux Enterprise Desktop
The Novell Edition of OpenOffice.org features redesigned
tool bar icons for maximum consistency with SUSE Linux Enterprise Desktop, including
support for desktop appearance or theme changes. These features
provide a consistent interface across the Linux desktop, which
enhances overall usability and helps minimize enterprise
training and support requirements.
Native Desktop Dialogs
The Novell Edition of OpenOffice.org uses your
desktop’s native file dialogs rather than those in the
standard edition. This provides the same look and feel of other
applications in your environment, giving you a consistent,
familiar experience.
Enhanced Support for Microsoft Office
File Formats
OpenOffice.org supports import and export of Microsoft
Office file formats, even taking advantage of compatible fonts
to match document length. Transparent document sharing makes
OpenOffice.org the best choice if you are deploying Linux
desktops in a mixed Linux/Windows environment.
E-Mail as Microsoft Office Document
The standard edition of OpenOffice.org supports e-mailing of
files as PDF files from within the OpenOffice.org application.
With the Novell Edition of OpenOffice.org, you can also e-mail
any document as a Microsoft Office file. For example, you can
e-mail a Writer file as a Microsoft Word file. If that option is
selected, the file is automatically converted and attached to an
e-mail in your default e-mail application.
Excel VBA Macro Interoperability
The Novell Edition of OpenOffice.org eases the migration of
many macros from Microsoft Excel. Although not all macros can be
successfully migrated, this interoperability offers more than
the standard edition, which does not support migration of
macros.
Enhanced Fonts
For the Novell Edition of OpenOffice.org, Novell licensed
fonts from AGFA that use the same or similar names as the fonts
available in Microsoft Office. The fonts also look similar to
those used by Microsoft. This allows OpenOffice.org to match
fonts when opening documents originally composed in Microsoft
Office, and very closely match pagination and page formatting.
Integration with Novell Evolution
The Novell Edition of OpenOffice.org is tightly integrated
with Novell Evolution™, allowing users to send documents as
e-mail and to perform mail merges using the Evolution address
book as a datasource.
Improved File Access
Files are available from any source available to the
computer. Network files open and save seamlessly.
Anti-aliased Presentation Graphics
With hardware acceleration enabled (the default), the Novell
Edition of OpenOffice.org provides higher-quality graphics in
Impress slide shows.
Faster Start-up Times
The Novell Edition of OpenOffice.org includes an improved
built-in quickstarter that loads OpenOffice.org components at
system startup and thus improves the application’s
start-up time. Subsequent document load times have also been
improved.
3.1.3 Using the Standard Edition of OpenOffice.org
The standard edition of OpenOffice.org also works with
SLED. If you install the latest version of OpenOffice.org,
all of your Novell Edition files remain compatible. However, the
standard edition does not contain the Novell
enhancements.
3.1.4 Compatibility with Other Office Applications
OpenOffice.org can work with documents, spreadsheets,
presentations, and databases in many other formats, including
Microsoft Office. They can be seamlessly opened like other files
and saved back to the original format. Because the Microsoft
formats are proprietary and the specifications are not available
to other applications, there are occasionally formatting issues.
If you have problems with your documents, consider opening them
in the original application and resaving in an open format such
as RTF for text documents or CSV for spreadsheets.
Converting Documents to the OpenOffice.org Format
OpenOffice.org can read, edit, and save documents in a
number of formats. It is not necessary to convert files from
those formats to the OpenOffice.org format to use those files.
However, if you want to convert the files, you can do so. To
convert a number of documents, such as when first switching to
OpenOffice.org, do the following:
-
Select .
-
Choose the file format from which to convert.
There are several StarOffice and Microsoft Office
formats available.
-
Click .
-
Specify where OpenOffice.org should look for templates
and documents to convert and in which directory the
converted files should be placed.
IMPORTANT:
Documents from a Windows partition are
usually in a subdirectory of
/windows.
-
Make sure that all other settings are appropriate,
then click .
-
Review the summary of the actions to perform, then
start the conversion by clicking
.
The amount of time needed for the conversion depends
on the number of files and their complexity. For most
documents, conversion does not take very long.
Sharing Files with Users of Other Office Suites
OpenOffice.org is available for a number of operating
systems. This makes it an excellent tool when a group of users
frequently need to share files and do not use the same system
on their computers.
When sharing documents with others, you have several
options.
3.1.5 Starting OpenOffice.org
-
Start the application in one of the following ways:
-
On the menu bar, click
 .
.
This opens Writer. To open a different module, click
from the newly opened Writer
document, then choose the module you want to
open.
-
From the Computer menu, click , then click the name of the
OpenOffice.org module you want to start.
-
In a terminal window, enter
ooffice. The OpenOffice.org window
opens. Click , then choose the module you want
to open.
-
Select the module you want to open.
If any OpenOffice.org application is open, you can open any
of the other applications by clicking .
3.1.6 Improving OpenOffice.org Load Time
To speed up the load time of OpenOffice.org by preloading
the application at system startup:
The next time you restart your system, OpenOffice.org will
preload. When you open an OpenOffice.org application module, it
will open faster.
3.1.7 Customizing OpenOffice.org
You can customize OpenOffice.org to best suit your needs and
working style. Toolbars, menus, and keyboard shortcuts can all
be reconfigured to help you more quickly access the features you
use the most. You can also assign macros to application events
if you want specific actions to occur when those events take
place. For example, if you always work with a specific
spreadsheet, you can create a macro that opens the spreadsheet
and assign it to the Start Application event.
This section contains simple, generic instructions for
customizing your environment. The changes you make are effective
immediately, so you can see if the changes are what you wanted
and go back and modify them if they weren’t. See the
OpenOffice.org help files for detailed instructions.
Customizing Toolbars
Use the dialog to modify
OpenOffice.org toolbars.
-
Click the arrow icon at the end of any toolbar.
-
Click .
-
Select the toolbar you want to customize.
-
Select the check boxes next to the commands you want
to appear on the toolbar, and deselect the check boxes
next to the commands you don’t want to
appear.
-
Select whether to save your customized toolbar in the
OpenOffice.org module you are using or in the document.
-
Repeat to customize additional toolbars.
-
Click .
You can quickly choose the buttons that appear on a
particular toolbar.
-
Click the arrow icon at the end of the toolbar you
want to change.
-
Click to display a list of buttons.
-
Select the buttons in the list that appears to enable
(check) or disable (uncheck) them.
Customizing Menus
You can add or delete items from current menus, reorganize
menus, and even create new menus.
-
Click .
-
Select the menu you want to change, or click
to create a new menu.
Click for more information
about the options in the
dialog.
-
Modify, add, or delete menu items as desired.
-
Click .
Customizing Keyboard Shortcuts
You can reassign currently assigned keyboard shortcuts and
assign new shortcuts to frequently used functions.
-
Click .
-
Select the keys you want to assign to a function, or
select the function and assign the keys or key
combinations.
Click for more information
about the options in the
dialog.
-
Modify, add, or delete keyboard shortcuts as
desired.
-
Click .
Customizing Events
OpenOffice.org also provides ways to assign macros to
events such as application startup or the saving of a
document. The assigned macro runs automatically whenever the
selected event occurs.
-
Click .
-
Select the event you want to change.
Click for more information
about the options in the
dialog box.
-
Assign or remove macros for the selected event.
-
Click .
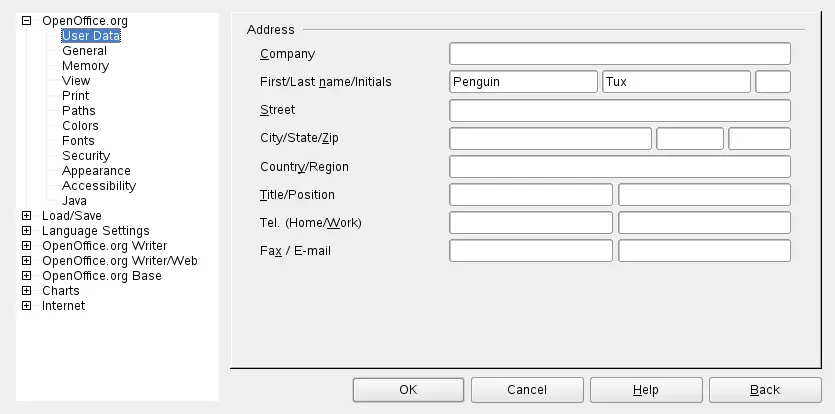
Changing the Global Settings
Global settings can be changed in any OpenOffice.org
application by clicking on the menu bar. This opens the window shown in
the figure below. A tree structure is used to display
categories of settings.
The following table lists the settings categories along
with a brief description of each category:
Table 3-2 Global Setting Categories
|
|
Various basic settings, including your user data
(such as your address and e-mail), important paths,
and settings for printers and external
programs. |
|
|
Includes the settings related to the opening and
saving of several file types. There is a dialog for
general settings and several special dialogs to
define how external formats should be
handled. |
|
|
Covers the various settings related to languages
and writing aids, such as your locale and spell
checker settings. This is also the place to enable
support for Asian languages. |
|
|
Includes the dialogs to configure any proxies
and to change settings related to search
engines. |
|
|
Configures the global word processing options,
such as the basic fonts and layout that Writer
should use. |
|
|
Changes the settings related to the HTML
authoring features of OpenOffice.org. |
|
|
Changes the settings for Calc, such as those
related to sort lists and grids. |
|
|
Changes the settings that should apply to all
presentations. For example, you can specify the
measurement unit for the grid used to arrange
elements. |
|
|
Includes the settings related to the vector
drawing module, such as the drawing scale, grid
properties, and some print options. |
|
|
Provides a single dialog to set special print
options for formulas. |
|
|
Defines the default colors used for newly
created charts. |
|
|
Defines how external data sources should be
accessed. |
IMPORTANT:All settings listed in the table are applied
globally. They are used as defaults
for every new document you create.
3.1.8 Finding Templates
Templates greatly enhance the use of OpenOffice.org by
simplifying formatting tasks for a variety of different types of
documents. OpenOffice.org comes with a few templates, and you
can find additional templates on the Internet. You can also
create your own. Creating templates is beyond the scope of this
guide, but detailed instructions are found in the OpenOffice.org
help system and in other documents and tutorials available
online.
In addition to templates, you can find other extras and
add-ins online. The following table lists a few of the prominent
places where you can find templates and other extras. (Because
Web sites often close or their content changes, the information
in the following table might not be current when you read it.)
Table 3-3 Where to Find OpenOffice.org Templates and Extras
For more information about templates, see Section 3.2.4,
Using Templates to Format Documents and
Section 3.3.2,
Using Templates in Calc.
|
|
|