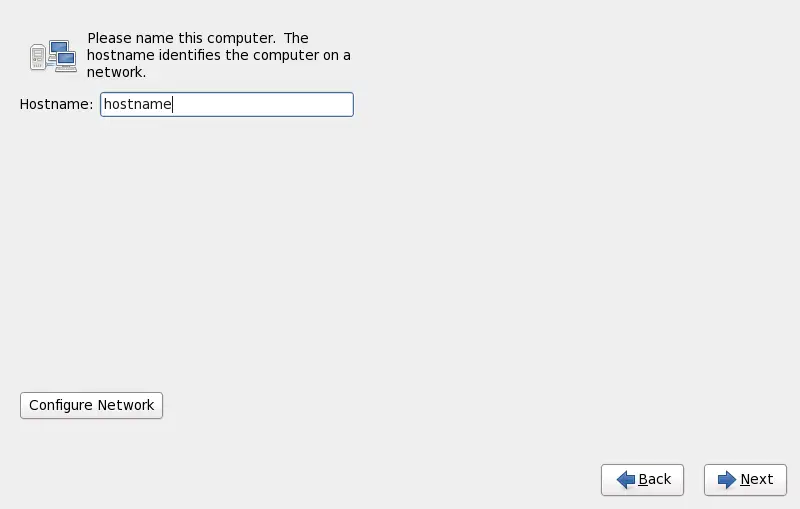
23.7. Setting the Hostname
23.7.1. Edit Network Connections
To change your network configuration after you have completed the installation, use the Network Administration Tool.
Type the system-config-network command in a shell prompt to launch the Network Administration Tool. If you are not root, it prompts you for the root password to continue.
The Network Administration Tool is now deprecated and will be replaced by NetworkManager during the lifetime of Red Hat Enterprise Linux 6.
Usually, the network connection configured earlier in installation phase 1 does not need to be modified during the rest of the installation. You cannot add a new connection on System z because the network subchannels need to be grouped and set online beforehand, and this is currently only done in installation phase 1. To change the existing network connection, click the button Configure Network. The Network Connections dialog appears that allows you to configure network connections for the system, not all of which are relevant to System z.
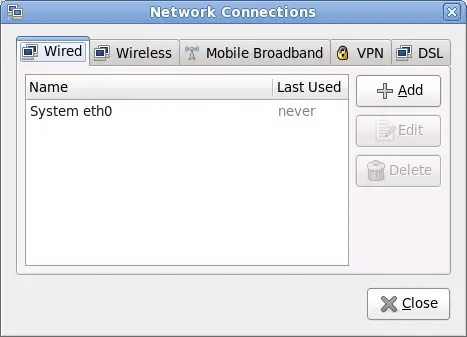
All network connections on System z are listed in the Wired tab. By default this contains the connection configured earlier in installation phase 1 and is either eth0 (OSA, LCS), or hsi0 (HiperSockets). Note that on System z you cannot add a new connection here. To modify an existing connection, select a row in the list and click the Edit button. A dialog box appears with a set of tabs appropriate to wired connections, as described below.
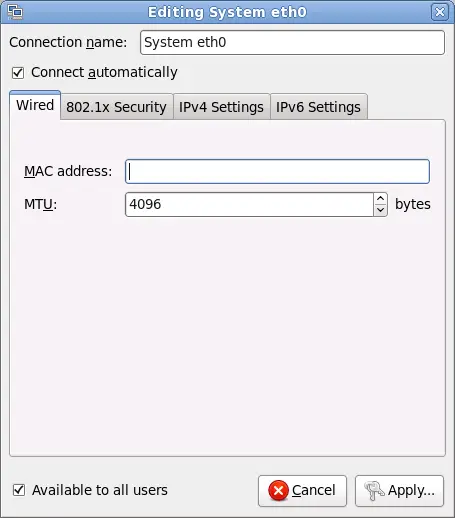
The most important tabs on System z are Wired and IPv4 Settings.
When you have finished editing network settings, click Apply to activate your changes. Note that re-configuring your network settings might require you to re-connect using the new settings.
23.7.1.1. Options common to all types of connection
Certain configuration options are common to all connection types.
Specify a name for the connection in the Connection name name field.
Select Start automatically to start the connection automatically when the system boots.
Select Available to all users to make the connection available to all users.
Use the Wired tab to specify or change the media access control (MAC) address for the network adapter, and either set the maximum transmission unit (MTU, in bytes) that can pass through the interface.
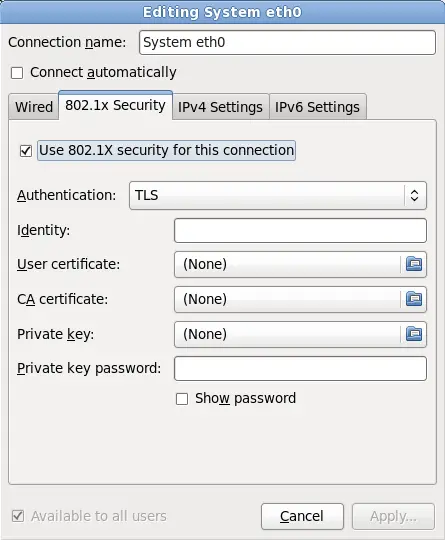
23.7.1.3. The 802.1x Security tab
Use the 802.1x Security tab to configure 802.1X port-based network access control (PNAC). Select Use 802.1X security for this connection to enable access control, then specify details of your network. The configuration options include:
- Authentication
-
Choose one of the following methods of authentication:
-
TLS for Transport Layer Security
-
Tunneled TLS for Tunneled Transport Layer Security, otherwise known as TTLS, or EAP-TTLS
-
Protected EAP (PEAP) for Protected Extensible Authentication Protocol
- Identity
-
Provide the identity of this server.
- User certificate
-
Browse to a personal X.509 certificate file encoded with Distinguished Encoding Rules (DER) or Privacy Enhanced Mail (PEM).
- CA certificate
-
Browse to a X.509 certificate authority certificate file encoded with Distinguished Encoding Rules (DER) or Privacy Enhanced Mail (PEM).
- Private key
-
Browse to a private key file encoded with Distinguished Encoding Rules (DER), Privacy Enhanced Mail (PEM), or the Personal Information Exchange Syntax Standard (PKCS#12).
- Private key password
-
The password for the private key specified in the Private key field. Select Show password to make the password visible as you type it.
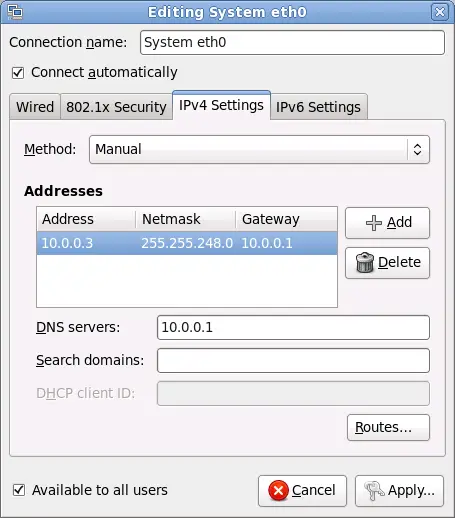
23.7.1.4. The IPv4 Settings tab
Use the IPv4 Settings tab tab to configure the IPv4 parameters for the previously selected network connection.
The address, netmask, gateway, DNS servers and DNS search suffix for an IPv4 connection were configured during installation phase 1 or reflect the following parameters in the parameter file or configuration file:
IPADDR,
NETMASK,
GATEWAY,
DNS,
SEARCHDNS (Refer to
Section 26.3, “Installation network parameters”).
Use the Method drop-down menu to specify which settings the system should attempt to obtain from a Dynamic Host Configuration Protocol (DHCP) service running on the network. Choose from the following options:
- Automatic (DHCP)
-
IPv4 parameters are configured by the DHCP service on the network.
- Automatic (DHCP) addresses only
-
The IPv4 address, netmask, and gateway address are configured by the DHCP service on the network, but DNS servers and search domains must be configured manually.
- Manual
-
IPv4 parameters are configured manually for a static configuration.
- Link-Local Only
-
A link-local address in the 169.254/16 range is assigned to the interface.
- Shared to other computers
-
The system is configured to provide network access to other computers. The interface is assigned an address in the 10.42.x.1/24 range, a DHCP server and DNS server are started, and the interface is connected to the default network connection on the system with network address translation (NAT).
- Disabled
-
IPv4 is disabled for this connection.
If you selected a a method that requires you to supply manual parameters, enter details of the IP address for this interface, the netmask, and the gateway in the Addresses field. Use the Add and Delete buttons to add or remove addresses. Enter a comma-separated list of DNS servers in the DNS servers field, and a comma-separated list of domains in the Search domains field for any domains that you want to include in name server lookups.
Optionally, enter a name for this network connection in the DHCP client ID field. This name must be unique on the subnet. When you assign a meaningful DHCP client ID to a connection, it is easy to identify this connection when troubleshooting network problems.
Deselect the Require IPv4 addressing for this connection to complete check box to allow the system to make this connection on an IPv6-enabled network if IPv4 configuration fails but IPv6 configuration succeeds.
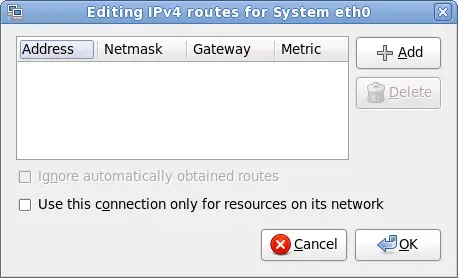
23.7.1.4.1. Editing IPv4 routes
Red Hat Enterprise Linux configures a number of routes automatically based on the IP addresses of a device. To edit additional routes, click the Routes button. The Editing IPv4 routes dialog appears.
Click Add to add the IP address, netmask, gateway address, and metric for a new static route.
Select Ignore automatically obtained routes to make the interface use only the routes specified for it here.
Select Use this connection only for resources on its network to restrict connections only to the local network.
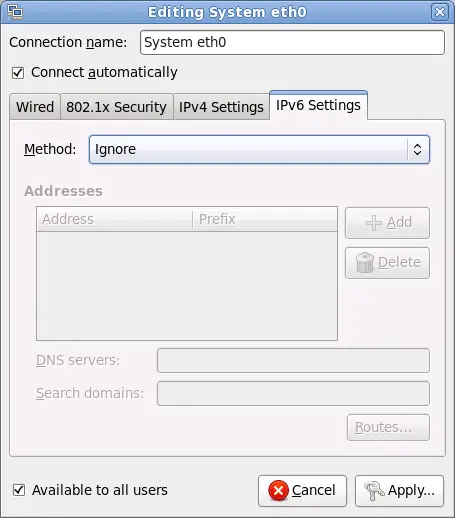
23.7.1.5. The IPv6 Settings tab
Use the IPv6 Settings tab tab to configure the IPv6 parameters for the previously selected network connection.
Use the Method drop-down menu to specify which settings the system should attempt to obtain from a Dynamic Host Configuration Protocol (DHCP) service running on the network. Choose from the following options:
- Ignore
-
IPv6 is ignored for this connection.
- Automatic
-
IPv6 parameters are configured by the DHCP service on the network.
- Automatic, addresses only
-
The IPv6 address, prefix, and gateway address are configured by the DHCP service on the network, but DNS servers and search domains must be configured manually.
- Manual
-
IPv6 parameters are configured manually for a static configuration.
- Link-Local Only
-
A link-local address with the fe80::/10 prefix is assigned to the interface.
If you selected a a method that requires you to supply manual parameters, enter details of the IP address for this interface, the netmask, and the gateway in the Addresses field. Use the Add and Delete buttons to add or remove addresses. Enter a comma-separated list of DNS servers in the DNS servers field, and a comma-separated list of domains in the Search domains field for any domains that you want to include in name server lookups.
Optionally, enter a name for this network connection in the DHCP client ID field. This name must be unique on the subnet. When you assign a meaningful DHCP client ID to a connection, it is easy to identify this connection when troubleshooting network problems.
Deselect the Require IPv6 addressing for this connection to complete check box to allow the system to make this connection on an IPv4-enabled network if IPv6 configuration fails but IPv4 configuration succeeds.
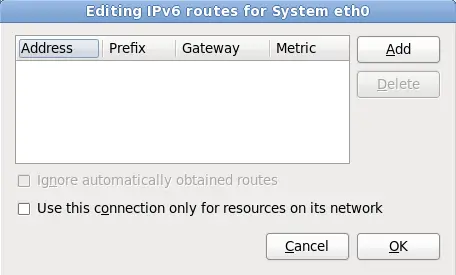
23.7.1.5.1. Editing IPv6 routes
Red Hat Enterprise Linux configures a number of routes automatically based on the IP addresses of a device. To edit additional routes, click the Routes button. The Editing IPv6 routes dialog appears.
Click Add to add the IP address, netmask, gateway address, and metric for a new static route.
Select Use this connection only for resources on its network to restrict connections only to the local network.