It is useful to store a group of files in one file for easy
backup, for transfer to another directory, or for transfer to another
computer. It is also useful to compress large files; compressed files take
up less disk space and download faster via the Internet.
3.4.1. Using File Roller
Red Hat Enterprise Linux includes a graphical utility called File
Roller. File
Roller can compress, decompress, and archive
files in common Unix and Linux formats. It has a simple
interface and extensive help documentation. To start
File Roller, select
Archive Manager from the
(the main menu on the
panel) => sub-menu. File
Roller is also integrated into the desktop
environment and Nautilus.
 | Tip |
|---|
| | If you are using a file manager (such as
Nautilus), you can double-click
the file you wish to unarchive or decompress to start
File Roller. The
File Roller browser window
appears with the decompressed/unarchived file in a folder
for you to extract or browse.
|
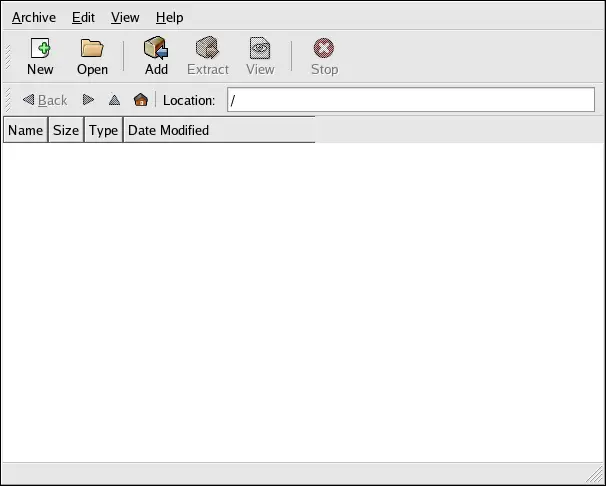
3.4.1.1. Decompressing and Unarchiving with File
Roller
To unarchive and/or decompress a file, click the
Open button on the main toolbar. A file menu pops
up, allowing you to choose the archive you wish to manipulate. For example, if you have a file called
foo.tar.gz located in your home
directory, highlight the file and click
OK. The file appears in the main
File Roller browser window as a
folder, which you can navigate by double-clicking the folder
icon. File Roller preserves all
directory and subdirectory structures, which is convenient
if you are looking for a particular file in the archive. You
can extract individual files or entire archives by clicking
the Extract button, choosing the
directory in which to save the unarchived files, and
clicking OK.
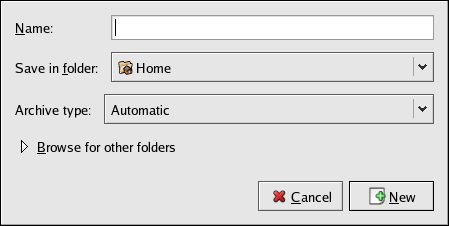
3.4.1.2. Creating Archives with File
Roller
File Roller allows you to create
archives of your files and directories. To create a new
archive, click New on the toolbar. A
file browser pops up, allowing you to specify an archive
name and the compression technique. For example, you may
choose a Tar Compressed with gzip
(.tar.gz) format from the drop-down menu and
type the name of the archive file you want to create. Click
OK and your new archive is ready to
be filled with files and directories. To add files to your
new archive, click Add, which opens a
browser window that you can navigate to find the file or
directory to add to the archive. Click
Add when you are finished, and click
=>
to close the archive.
| Tip |
|---|
| | There is much more you can do with File
Roller than is explained here. Refer to
the File Roller manual
(available by clicking =>
) for more information.
|
3.4.2. Compressing Files at the Shell Prompt
Red Hat Enterprise Linux provides the bzip2,
gzip, and zip tools for
compression from a shell prompt. The bzip2
compression tool is recommended because it provides the most
compression and is found on most UNIX-like operating systems.
The gzip compression tool can also be found
on most UNIX-like operating systems. To transfer files between
Linux and other operating system such as MS Windows, use
zip because it is more compatible with the
compression utilities available for Windows.
| Compression Tool | File Extension | Decompression Tool |
|---|
| bzip2 | .bz2 | bunzip2 |
| gzip | .gz | gunzip |
| zip | .zip | unzip |
Table 3-1. Compression Tools
By convention, files compressed with bzip2
are given the extension .bz2, files
compressed with gzip are given the
extension .gz, and files compressed with
zip are given the extension
.zip.
Files compressed
with bzip2 are uncompressed with
bunzip2, files compressed with gzip are
uncompressed with gunzip, and files compressed with
zip are uncompressed with
unzip.
3.4.2.1. Bzip2 and Bunzip2
To use bzip2 to compress a file, enter the
following command at a shell prompt:
The file is compressed and saved as
filename.bz2.
To expand the compressed file, enter the following
command:
The filename.bz2 compressed file is
deleted and replaced with filename.
You can use bzip2 to compress multiple
files and directories at the same time by listing them with
a space between each one:
bzip2 filename.bz2 file1 file2 file3 /usr/work/school |
The above command compresses file1,
file2, file3, and
the contents of the /usr/work/school/
directory (assuming this directory exists) and places them
in a file named filename.bz2.
| Tip |
|---|
| | For more information, enter man bzip2
and man bunzip2 at a shell prompt to
read the man pages for bzip2 and
bunzip2.
|
3.4.2.2. Gzip and Gunzip
To use gzip to compress a file, enter the
following command at a shell prompt:
The file is compressed and saved as
filename.gz.
To expand the compressed file, enter the following
command:
The filename.gz compressed file is
deleted and replaced with filename.
You can use gzip to compress multiple
files and directories at the same time by listing them with
a space between each one:
gzip -r filename.gz file1 file2 file3 /usr/work/school |
The above command compresses file1,
file2, file3, and
the contents of the /usr/work/school/
directory (assuming this directory exists) and places them
in a file named filename.gz.
| Tip |
|---|
| | For more information, enter man gzip and
man gunzip at a shell prompt to read
the man pages for gzip and
gunzip.
|
3.4.2.3. Zip and Unzip
To compress a file with zip, enter the
following command:
zip -r filename.zip filesdir |
In this example, filename.zip represents
the file you are creating and filesdir
represents the directory you want to put in the new zip
file. The -r option specifies that you want
to include all files contained in the
filesdir directory
recursively.
To extract the contents of a zip file,
enter the following command:
You can use zip to compress multiple
files and directories at the same time by listing them with
a space between each one:
zip -r filename.zip file1 file2 file3 /usr/work/school |
The above command compresses file1,
file2, file3, and
the contents of the /usr/work/school/
directory (assuming this directory exists) and places them
in a file named filename.zip.
| Tip |
|---|
| | For more information, enter man zip and
man unzip at a shell prompt to read the
man pages for zip and
unzip.
|
3.4.3. Archiving Files at the Shell Prompt
A tar file is a collection of several files
and/or directories in one file. This is a good way to create
backups and archives.
Some of tar's options include:
-c — create a new archive
-f — when used with the
-c option, use the filename specified for
the creation of the tar file; when used
with the -x option, unarchive the
specified file
-t — show the list of files in the
tar file
-v — show the progress of the files
being archived
-x — extract files from an archive
-z — compress the
tar file with gzip
-j — compress the
tar file with
bzip2
To create a tar file, enter:
tar -cvf filename.tar directory/file |
In this example, filename.tar represents
the file you are creating and
directory/file represents the directory
and file you want to put in the archived file.
You can tar multiple files and directories
at the same time by listing them with a space between each
one:
tar -cvf filename.tar /home/mine/work /home/mine/school |
The above command places all the files in the
work and the school
subdirectories of /home/mine in a new
file called filename.tar in the current
directory.
To list the contents of a tar file, enter:
To extract the contents of a tar file, enter:
This command does not remove the tar file,
but it places copies of its unarchived contents in the current
working directory, preserving any directory structure that the
archive file used. For example, if the tarfile contains a file
called bar.txt within a directory called
foo/, then extracting the archive file
results in the creation of the directory
foo/ in your current working directory
with the file bar.txt inside of it.
Remember, the tar command does not compress
the files by default. To create a tarred and bzipped
compressed file, use the -j option:
tar -cjvf filename.tbz file |
tar files compressed with
bzip2 are conventionally given the
extension .tbz; however, sometimes users
archive their files using the tar.bz2
extension.
The above command creates an archive file and then compresses
it as the file filename.tbz. If you
uncompress the filename.tbz file with the
bunzip2 command, the
filename.tbz file is removed and replaced
with filename.tar.
You can also expand and unarchive a bzip
tar file in one command:
To create a tarred and gzipped compressed file, use the
-z option:
tar -czvf filename.tgz file |
tar files compressed with
gzip are conventionally given the extension
.tgz.
This command creates the archive file
filename.tar and compresses it as the
file filename.tgz. (The file
filename.tar is not saved.) If you
uncompress the filename.tgz file with the
gunzip command, the
filename.tgz file is removed and replaced
with filename.tar.
You can expand a gzip
tar file in one command:
| Tip |
|---|
| | Enter the command man tar for more
information about the tar command.
|